Models > MDE25PDAYW0

MDE25PDAYW0 Maytag Dryer - Overview

Sections of the MDE25PDAYW0

[Viewing 5 of 5]
Keep searches simple, eg. "belt" or "pump".
Idler Pulley – Part Number: 279640
Idler Pulley
★★★★★
★★★★★
(54)
PartSelect #: PS334244
Manufacturer #: 279640
This Idler Pulley includes the tri-ring and gasket and everything included here is manufacturer-certified. This part maintains correct tension on the drive belt in order to spin the drum properly. If ...
$34.36
  In Stock
Order within the next 12 hrs and your part ships today!
Lint Filter – Part Number: W10120998
Lint Filter
★★★★★
★★★★★
(37)
PartSelect #: PS1491676
Manufacturer #: W10120998
This filter collects lint as it passes through the dryer vent.
$78.37
  In Stock
Order within the next 12 hrs and your part ships today!
Thermostat, Internal-Bias – Part Number: WP8577274
Thermostat, Internal-Bias
★★★★★
★★★★★
(18)
PartSelect #: PS11746740
Manufacturer #: WP8577274
This thermostat may differ in appearance, but functions the same as the original part. This part controls the temperature of the inside of the dryer drum and prevents the dryer from overheating.
$60.87
  In Stock
Order within the next 12 hrs and your part ships today!
Leveling Foot – Part Number: 49621
Leveling Foot
★★★★★
★★★★★
(5)
PartSelect #: PS1609293
Manufacturer #: 49621
Sold individually.
$10.80
  In Stock
Order within the next 12 hrs and your part ships today!
Roller Support Tri-Ring – Part Number: WPW10512946
Roller Support Tri-Ring
★★★★★
★★★★★
(3)
PartSelect #: PS11755850
Manufacturer #: WPW10512946
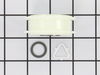
If you notice that your dryer is noisy or will not tumble, you may need to replace the tri ring. This part is triangular, and is less than an inch in size. Tri rings can be found both on the idler pul...
$17.11
  In Stock
Order within the next 12 hrs and your part ships today!
High Limit Thermostat and Thermal Cut-Off Kit – Part Number: 279973
High Limit Thermostat and Thermal Cut-Off Kit
★★★★★
★★★★★
(11)
PartSelect #: PS334387
Manufacturer #: 279973
Also known as Thermal Cut-Off kit. The thermostat acts as a safety mechanism that keeps the dryer from overheating and the fuse is like a backup system - it's set to trip at a higher temperature than...
$67.94
  In Stock
Order within the next 12 hrs and your part ships today!
Touch-Up Paint - White – Part Number: 72017
Touch-Up Paint - White
★★★★★
★★★★★
(16)
PartSelect #: PS385132
Manufacturer #: 72017
This 18 ml bottle of white appliance touch-up paint is used to cover scratches or marks on your appliance. The white touch-up paint can be used on refrigerators, microwaves, ranges, clothes dryers, an...
$10.20
  In Stock
Order within the next 12 hrs and your part ships today!
Dryer Drum Seal with Adhesive – Part Number: 280114
Dryer Drum Seal with Adhesive
★★★★★
★★★★★
(14)
PartSelect #: PS970088
Manufacturer #: 280114
This part seals the drum to prevents air from escaping. This includes silicone rubber adhesive.
$60.28
  In Stock
Order within the next 12 hrs and your part ships today!
Outlet Screen Door Grille – Part Number: W11086603
Outlet Screen Door Grille
★★★★★
★★★★★
(11)
PartSelect #: PS12070617
Manufacturer #: W11086603
Top cover for lint filter.
$35.58
  In Stock
Order within the next 12 hrs and your part ships today!
Door Catch Kit – Part Number: LA-1003
Door Catch Kit
★★★★★
★★★★★
(9)
PartSelect #: PS2162263
Manufacturer #: LA-1003
This kit comes in two pieces: the catch and the clip.
$41.24
  In Stock
Order within the next 12 hrs and your part ships today!
Heating Element Connection Wire Kit – Part Number: 279457
Heating Element Connection Wire Kit
★★★★★
★★★★★
(3)
PartSelect #: PS334206
Manufacturer #: 279457
This kit is used for electric clothes dryers, and it comes with a yellow wire nut.
$14.10
  In Stock
Order within the next 12 hrs and your part ships today!
Push Button – Part Number: WPW10424308
Push Button
★★★★★
★★★★★
(1)
PartSelect #: PS11754596
Manufacturer #: WPW10424308
This push button is just over three inches long. It is all black in color and is made of plastic.
$24.02
  In Stock
Order within the next 12 hrs and your part ships today!

Questions And Answers for MDE25PDAYW0

Be the first to ask our experts a question about this model!

Common Symptoms of the MDE25PDAYW0

[Viewing 12 of 12]
Noisy
Fixed by
these parts
Fixing Fixing Fixing
Show All
Door won’t close
Fixed by
these parts
Fixing Fixing Fixing
Show All
Too hot
Fixed by
these parts
Fixing Fixing Fixing
Show All
Marks left on clothes
Fixed by
these parts
Fixing Fixing Fixing
Show All
Not Heating
Fixed by
these parts
Fixing Fixing Fixing
Show All
Touchpad does not respond
Fixed by
these parts
Fixing Fixing
Show All
Drum Not Spinning
Fixed by
these parts
Fixing Fixing
Show All
Will not agitate
Fixed by
these parts
Fixing
Show All
Burning smell
Fixed by
these parts
Fixing
Show All
Won’t Start
Fixed by
these parts
Fixing
Show All
Door won’t open after self cleaning cycle
Fixed by
these parts
Fixing
Show All
Spins slowly
Fixed by
these parts
Fixing
Show All
Keep searches simple. Use keywords, e.g. "leaking", "pump", "broken" or "fit".
felt strip came off lint screen
ordered new lint screen, removed old screen, inserted new screen.
Parts Used:
Lint Filter
  • JEFFREY from FALL RIVER, MA
  • Difficulty Level:
    Really Easy
  • Total Repair Time:
    Less than 15 mins
220 of 272 people found this instruction helpful.
Was this instruction helpful to you?
Thank you for voting!
catch mounted on door broke
The door had always opened with the wrong swing and it wasn't til I needed to repair this that I noticed you could change the swing. I changed the swing of the door and then noticed that the clip was included on both sides so i did not need to repair the catch. I still have the part so when it breaks again, I can just pop it in.
Parts Used:
Door Catch Kit
  • Paul from Mt. Pleasant, SC
  • Difficulty Level:
    Really Easy
  • Total Repair Time:
    Less than 15 mins
  • Tools:
    Screw drivers
93 of 123 people found this instruction helpful.
Was this instruction helpful to you?
Thank you for voting!
Rear tub seal failure
I removed the top cover and then the back cover, released the belt tensioner and removed the drive belt. Then slid the tub out of the unit and onto the back dack. Sanded the remnents of the old seal off. Wiped the tub lip with laquer thinner and applied the "fast" drying glue supplied with the kit. Installed the seal and re-assembled the unit...works fine
Parts Used:
Dryer Drum Seal with Adhesive
  • Jerry from Everett, WA
  • Difficulty Level:
    Easy
  • Total Repair Time:
    30 - 60 mins
  • Tools:
    Screw drivers, Socket set
66 of 84 people found this instruction helpful.
Was this instruction helpful to you?
Thank you for voting!