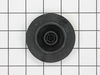
The fold away tine pivot or clip holds the tine rows in place. This part is made of gray plastic and is approximately 3 and a half inches in length. Some dishwasher models will have fold away tine row...
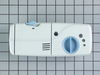
This part is essential in your dishes getting clean during the wash cycle. If there is any debris or a tear in the filter, it can cause extra buildup and, therefore, causing dirty dishes.
This is the replacement convertible tine pivot for your dishwasher. It is made of gray plastic and is approximately 4 inches long and 1 inch wide. The convertible tine pivot allows the tine row to eit...
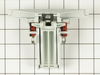
This inner door insulation seal is almost twenty-four inches long. It is gray in color and is made of a foam material.
$46.26
In Stock
Questions And Answers for MDBH970AWB
Ask our experts a question about this model and we'll get back to you as soon as possible!
2 questions answered by our experts.
< Prev
1
Next >
Sort by:
Search filter:
Clear Filter
Your search term must have 3 or more characters.
Keep searches simple. Use keywords, e.g. "leaking", "pump", "broken" or "fit".
Sorry, we couldn't find any existing answers that matched.Try using some different or simpler keywords, or submit your new question by using the "Ask a Question" button above!
Ted
November 18, 2022
What is the part (#6) which looks like the door seal around the tub?
I believe that is what is causing leaking on the bottom left edge of our dishwasher.
Is that part available to purchase?
For model number MDBH970AWB
Hello Ted, thank you for your question. The item 6 on the door is actually the Inner Door Foam Insulation Strip. It is used to create a waterproof seal that helps prevent leaking from the door area of the dishwasher. However, we definitely recommend the item 7, PS11747685, which is listed as Bottom Door Seal which are two little seals on the door. Good luck with this repair.
Runs for a few seconds and stops with blinking light
For model number MDBH970AWB
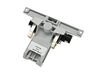
Hi Barbarba, thank you for contacting us. We have researched the model and would recommend checking the door latch and switch assembly, part number PS11748729. A faulty door latch might not detect if the door is closed properly and might cause the dishwasher to stop mid-cycle. Checking the latch assembly for continuity using a multimeter might help. Good luck with the repair!
The hardest thing was figuring out that you only need to purchase the latch handle because it only comes as a complete latch assembly, why they even list the latch assembly as a separate part in the parts list stupid. (you get the handle and latch already put together and it cost less than the latch assembly without the handle). Anyway all you need to do is disconect the power from the dishwasher (unless you like to live dangerously like me) take your drill with the correct size torx bit and remove all the screws on the inside door pannel (the top center two screws actually hold the latch assembly in place). Disconect the 4 wires from the old part and reconect them to the new part and reinstall all the torx screws being careful not to strip the plastic threads that they screw into if you are using a drill. Whole process takes less than 5 minutes. I am surprised that Maytag used such a flimsy handle assembly in their dishwashers since they are supposed to have the repair men with the most time on their hands. They probably sell just as many handle assemblies as they do dishwashers that have this particular part in it, probably more since you will probably have to change it 2 or 3 times during the life of the unit.
I Followed others' instructions already posted to replace the whole handle assembly. In particular, use a big screwdriver placed against the bottom of the handle and whack the grip with the palm of your hand to get the handle to move back to the open position so you can open the door and start the job. I am no handyman, but this fix was easy, about 30 minutes in all, most of which was spent figuring out which breaker to pull so as not to get shocked. One note of caution: use the correct screwdriver attachment (not a Phillips head or regular, but a star or something- see I am not a handyman but I do have a $15 screwdriver set that just paid for itself 10 times over!).
Remove the 8 or 9 torx screws holding the inner and outer door assembly together (leave the bottom screws in), lift the old handle assembly out, transfer the switches to the new handle assembly, and reassemble door.


.gif "SUPPLEMENTAL INFORMATION Diagram and Parts List for Maytag Dishwasher")