


MDB7601AWB41 Maytag Dishwasher - Overview
Sections of the MDB7601AWB41
[Viewing 10 of 10]


Keep searches simple, eg. "belt" or "pump".

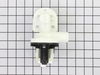
Lower Wheel Assembly
PartSelect #: PS11747757
Manufacturer #: WP99003149
This part is the wheel and the axle or clip that holds it on the dish rack. It is sold individually.
$20.85
In Stock
Order within the next 10 hrs and your part ships today!

Touch-Up Paint - White
PartSelect #: PS385132
Manufacturer #: 72017
This 18 ml bottle of white appliance touch-up paint is used to cover scratches or marks on your appliance. The white touch-up paint can be used on refrigerators, microwaves, ranges, clothes dryers, an...
$17.95
In Stock
Order within the next 10 hrs and your part ships today!

Dishwasher Door Latch w/Switches No Handle
PartSelect #: PS11751688
Manufacturer #: WPW10275768
This is the door latch and switches only. The handle is not included with this part.
$86.22
In Stock
Order within the next 10 hrs and your part ships today!

Dishwasher Accumulator Filter
PartSelect #: PS11749941
Manufacturer #: WPW10192799
This part is essential in your dishes getting clean during the wash cycle. If there is any debris or a tear in the filter, it can cause extra buildup and, therefore, causing dirty dishes.
$251.55
In Stock
Order within the next 10 hrs and your part ships today!

Dishwasher Door Cable Link
PartSelect #: PS11747772
Manufacturer #: WP99003446
Sold individually.
$14.73
In Stock
Order within the next 10 hrs and your part ships today!

Dishwasher Inner Door Foam Insulation Strip
PartSelect #: PS11748543
Manufacturer #: WPW10117748
This inner door insulation seal is almost twenty-four inches long. It is gray in color and is made of a foam material.
$39.55
Special Order

Docking Station with Flappers
PartSelect #: PS11743061
Manufacturer #: WP6-917647
The docking station is located on the water supply tube at the far back. It provides water to the upper and middle spray arm and also includes the flappers.
No Longer Available

Washer Hose Clamp
PartSelect #: PS11743008
Manufacturer #: WP596669
This hose clamp extends from half an inch to an inch in diameter. It is made entirely of metal and is intended for use with Maytag brand washing machines.
$10.95
In Stock
Order within the next 10 hrs and your part ships today!

Water Valve
PartSelect #: PS12070506
Manufacturer #: W11082871
This is the replacement water valve for your dishwasher. The water inlet valve connects to the water source and solenoid wires, and ensures the tub has the right amount of water entering it. If your d...
$139.36
In Stock
Order within the next 10 hrs and your part ships today!

USE WPL 99002588
PartSelect #: PS4136830
Manufacturer #: 99002588
It provides a waterproof seal between the tub and the door.
No Longer Available

Touch-up Paint - Black
PartSelect #: PS385141
Manufacturer #: 72032
16ml
$24.95
In Stock
Order within the next 10 hrs and your part ships today!

Dishwasher Top Wash Arm And Retainer
PartSelect #: PS11743060
Manufacturer #: WP6-917644
$54.95
Special Order
Common Symptoms of the MDB7601AWB41
[Viewing 10 of 10]Leaking
Fixed by
these parts
these parts


Show All
Not cleaning dishes properly
Fixed by
these parts
these parts


Show All
Door latch failure
Fixed by
these parts
these parts


Show All
Will not fill with water
Fixed by
these parts
these parts


Show All
Noisy
Fixed by
these parts
these parts


Show All
Not draining
Fixed by
these parts
these parts

Show All
Door won’t close
Fixed by
these parts
these parts
Show All
Will Not Start
Fixed by
these parts
these parts

Show All
Not drying dishes properly
Fixed by
these parts
these parts

Show All
Will not dispense detergent
Fixed by
these parts
these parts

Show All


Keep searches simple. Use keywords, e.g. "leaking", "pump", "broken" or "fit".
One of the wheel assemblies fell off and melted in the dishwasher.
I ordered the part and snapped it on. It was so easy to find the part on the website and it came very quickly. I am a satisfied customer!
Parts Used:
-
Kathryn from Oak Creek, CO
-
Difficulty Level:Really Easy
-
Total Repair Time:Less than 15 mins
475 of 483 people
found this instruction helpful.
Was this instruction helpful to you?
Thank you for voting!
Broken Inlet Valve due to freezing - water leak
Most of the time was spent pulling out the dishwasher from under the counter, as a new tile floor had been installed after the DW was installed.
Great pictures of components on this website confirmed what part to order.
Shut off water feed to DW and disconnect power to DW.
Unplug wire connector to old valve (solenoid) and disconnect water inlet hose. Observe that valve is attached to sheet metal bracket.
Remove bracket, with valve attached. Don't remove valve from bracket. New valve comes with sheet metal bracket.
Remove female threaded adaptor (brass) from back of old valve and screw on to new valve using Teflon tape. That is the only piece you need to reuse.
Attached the new bracket (with valve attached) to DW. Attach water inlet hose. Attach plug to new valve.
Turn on water to DW. Check for leaks. Retighten hose connection if required. Run dishwasher. Keep lower panel off for a couple of days to be certain no leaks develop.
Parts Used:
-
Craig from Old Orchard Beach, ME
-
Difficulty Level:Really Easy
-
Total Repair Time:Less than 15 mins
-
Tools:Nutdriver, Wrench (Adjustable)
86 of 87 people
found this instruction helpful.
Was this instruction helpful to you?
Thank you for voting!
dishwasher door leaks
I ordered and replaced both the door gasket (easy) and inner door seal (difficult) to try and correct a leak during operation. The door gasket was easily replaced. However, the inner door seal was a bit more trouble. After removing the inner door I found that the old inner seal needed to be removed and surfaces thoroughly cleaned of old build-up of dishwasher soap residue, in order to allow the sticky back tape side of door seal to properly stick to the door. There also was a plastic cover over the wire bundle that needed to be cleaned. The inner door seal was the exact length, so proper positioning of the sticky back was very important.
Upon reassemly the leak still existed and I was unable to correct the leak. Further inspection indicated that the basic tub/body of the dishwasher might be slightly distorted due to age and may not create seal with door seal as originally designed.
I guess I need to find a new dishwasher, at this point.
A word to the wise: Check to see if the tub/body is still in good condition.
Parts Used:
-
jerry from vernon, CT
-
Difficulty Level:Difficult
-
Total Repair Time:More than 2 hours
-
Tools:Screw drivers
80 of 89 people
found this instruction helpful.
Was this instruction helpful to you?
Thank you for voting!