Models > LFX29945ST

LFX29945ST LG Refrigerator - Overview

Sections of the LFX29945ST

[Viewing 7 of 7]
Keep searches simple, eg. "belt" or "pump".
Plastic Tube - 5/16 Inch – Part Number: MJU62070602
Plastic Tube - 5/16 Inch
★★★★★
★★★★★
(4)
PartSelect #: PS3536013
Manufacturer #: MJU62070602
$29.11
  In Stock
Refrigerator Water Filter – Part Number: AGF80300702
Refrigerator Water Filter
★★★★★
★★★★★
(2)
PartSelect #: PS12724833
Manufacturer #: AGF80300702
This refrigerator water filter replacement is for 2010 LG refrigerators that have either forward French doors or are the four-door dispensing models. This filter is designed to minimize impurities tha...
$102.35
  In Stock
FILTER ASSEMBLY,AIR CLEANER – Part Number: ADQ73214408
FILTER ASSEMBLY,AIR CLEANER
PartSelect #: PS16222687
Manufacturer #: ADQ73214408
Refrigerator Air Filters are a key component for neutralizing odors and ensuring a fresh stream of air into your refrigerator. Swapping your old filter out for a fresh one isn’t difficult and should t...
$67.74
  In Stock
Handle Screw – Part Number: MJB63190001
Handle Screw
★★★★★
★★★★★
(1)
PartSelect #: PS8752913
Manufacturer #: MJB63190001
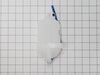
This handle screw, also known as a mounting bolt, is a mounting screw to help secure the door handle to your refrigerator door. If your handle is loose, you may just need to tighten the screw. If your...
$11.92
  In Stock
BASKET ASSEMBLY,DOOR – Part Number: AAP73252302
BASKET ASSEMBLY,DOOR
★★★★★
★★★★★
(1)
PartSelect #: PS3637059
Manufacturer #: AAP73252302
$154.06
  In Stock
Tube Assembly,Ice Water – Part Number: AJR56656503
Tube Assembly,Ice Water
PartSelect #: PS3533046
Manufacturer #: AJR56656503
$36.17
  In Stock
STOPPER,DOOR – Part Number: MJB62830601
STOPPER,DOOR
PartSelect #: PS7796195
Manufacturer #: MJB62830601
$11.17
  In Stock
Roller Assembly – Part Number: AHJ72909001
Roller Assembly
★★★★★
★★★★★
(2)
PartSelect #: PS3532772
Manufacturer #: AHJ72909001
$17.18
  On Order
Cap Assembly,Head – Part Number: ABN73019101
Cap Assembly,Head
PartSelect #: PS3530706
Manufacturer #: ABN73019101
$40.68
  In Stock
Refrigerator Compressor Overload Protector – Part Number: 6750CL0001D
Refrigerator Compressor Overload Protector
PartSelect #: PS3603394
Manufacturer #: 6750CL0001D
The compressor overload protector attaches to the compressor and shuts off the compressor if the compressor motor draws too much current.
$45.74
  In Stock
Glass Shelf – Part Number: MHL42613220
Glass Shelf
PartSelect #: PS3649794
Manufacturer #: MHL42613220
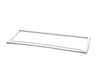
This glass shelf provides storage space in your refrigerator above the crisper. Shelves can crack and chip due to frequent use, and should be replaced immediately if cracks start to appear. This shelf...
$87.04
  In Stock
WATER INLET VALVE – Part Number: AJU72992603
WATER INLET VALVE
PartSelect #: PS3618979
Manufacturer #: AJU72992603
$141.99
  In Stock

Questions And Answers for LFX29945ST

Be the first to ask our experts a question about this model!

Common Symptoms of the LFX29945ST

[Viewing 8 of 8]
Leaking
Fixed by
these parts
Fixing Fixing Fixing
Show All
Door won’t open or close
Fixed by
these parts
Fixing Fixing
Show All
Door Sweating
Fixed by
these parts
Fixing Fixing
Show All
Ice maker won’t dispense ice
Fixed by
these parts
Fixing
Show All
Frost buildup
Fixed by
these parts
Fixing
Show All
Ice maker not making ice
Fixed by
these parts
Fixing
Show All
Not dispensing water
Fixed by
these parts
Fixing
Show All
Fridge and Freezer are too warm
Fixed by
these parts
Fixing
Show All
Keep searches simple. Use keywords, e.g. "leaking", "pump", "broken" or "fit".
Water feed line running from water valve to filter housing was leaking
Shut off water supply. Disconnect main supply line. Remove rear lower panel on back of refrigerator. Remove all tubing clamps on back. Disconnect leaking tubing from water supply valve. Remove water filter and unscrew/remove water filter housing. Replace tubing - connect to water filter housing then to water supply valve. Reconnect filter housing and filter. Reinstall lower panel, then main water supply line, then all tubing clamps. Turn water back on and check for leaks after discarding several glasses of water to fill filter. Job complete!
Parts Used:
Plastic Tube - 5/16 Inch
  • Tom from EASTON, PA
  • Difficulty Level:
    Easy
  • Total Repair Time:
    30 - 60 mins
  • Tools:
    Screw drivers, Wrench (Adjustable)
11 of 18 people found this instruction helpful.
Was this instruction helpful to you?
Thank you for voting!
Icemaker quit releasing ice from tray and water was pouring and freezing in ice storage bin
This couldn't have been easier. Two tiny screws in the front needed unscrewed, and then two plastic clips in the middle just had to be popped lose. Finally, you unplugged the power cord. Then, you just needed to reverse the process by plugging the new ice maker in, popping the clips in place, and screwing the two holes back in and turning the whole thing on. Voila! Perfect ice cubes again. And for only a little over $100.
Parts Used:
ICE MAKER ASSEMBLY,KIT
  • Amber from PEORIA, IL
  • Difficulty Level:
    Really Easy
  • Total Repair Time:
    15 - 30 mins
  • Tools:
    Screw drivers
8 of 11 people found this instruction helpful.
Was this instruction helpful to you?
Thank you for voting!
Changing out the Ice Maker tube
An easy way to get a refrigerator out from the wall is to use a tow strap or 1/2 to 3/4 in. rope. Throw a loop behind refer while keeping both ends in your hands. Let it settle down to the lower half of unit and pull using both hands. Comes right out.
Remove lower panel. Unscrew water valve from cabinet. Remove all tube holders Lay some rags down to catch a little water drainage.
Turn off water supply valve at wall. Unplug Power. Remove filter and filter holder. (one screw).
remove tube from valve by removing plastic C clip. Push plastic ring towards the valve and pull out tube at same time.
With the tube free, remove filter, then mount screw to remove the inside filter holder. When it is out, pull the tube doing the same process as the lower end. Pull tube out and replace with new one putting everything back in reverse order.
Before placing tube holders back on, turn on water to check for leaks.
After turning water back on and plugging in power, push refer back into place.
While I was there, I also replaced the hose from the wall to the refer.
Parts Used:
Plastic Tube - 5/16 Inch
  • HARRY from SPARKS, NV
  • Difficulty Level:
    Really Easy
  • Total Repair Time:
    15 - 30 mins
  • Tools:
    Screw drivers, Wrench (Adjustable)
8 of 12 people found this instruction helpful.
Was this instruction helpful to you?
Thank you for voting!