The lower door closing cam is used in refrigerator doors, it can be located on the fresh food side or the freezer side. It helps hold the door open. This cam is made out of plastic, so it might crack ...
$9.83
In Stock
Order within the next 9 hrs and your part ships today!
The Door Cam is a black plastic part which helps the door pivot shut while keeping the door and hinge in proper alignment. Lubricating this part upon installation may help it move easier. It attaches...
$13.47
In Stock
Order within the next 9 hrs and your part ships today!
This 18 ml bottle of white appliance touch-up paint is used to cover scratches or marks on your appliance. The white touch-up paint can be used on refrigerators, microwaves, ranges, clothes dryers, an...
$10.21
In Stock
Order within the next 9 hrs and your part ships today!
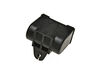
Note: This valve has been updated by the manufacturer and no longer includes the removable pre-filter bracket connector. It must be ordered separately; part number WPW10445062.
$140.73
In Stock
Order within the next 9 hrs and your part ships today!
This icemaker can be used with 25-27 cubic feet refrigerators that have a vertical auger dispenser located on the freezer door. Reuse bottom bracket from the original icemaker and attach to the new.
$185.04
In Stock
Order within the next 9 hrs and your part ships today!
Sold individually. This door bin is for refrigerators.
Door bin attaches to the inside of the refrigerator door and typically holds jars and bottles.
Follow the instructions in the owner's manua...
$86.95
In Stock
Order within the next 9 hrs and your part ships today!
This set of two electronic control boards contains both the emitter and the receiver. These boards tells the icemaker when it's full and that it has to dump the ice, and it also tells the icemaker whe...
$491.19
In Stock
Order within the next 9 hrs and your part ships today!
Questions And Answers for KSRW25CRSS03
Ask our experts a question about this model and we'll get back to you as soon as possible!
1 question answered by our experts.
< Prev
1
Next >
Sort by:
Search filter:
Clear Filter
Your search term must have 3 or more characters.
Keep searches simple. Use keywords, e.g. "leaking", "pump", "broken" or "fit".
Sorry, we couldn't find any existing answers that matched.Try using some different or simpler keywords, or submit your new question by using the "Ask a Question" button above!
Sharon
December 6, 2022
Ice maker ices over
For model number KSRW25CRSS03
Hi Sharon,
Thank you for your question. If your ice maker is icing over, make sure that the temperature in the freezer section is set correctly. It should be set to 0°F. If the temperature is set correctly, check the ice maker to see if it is jammed and remove any obstructions that you find. Sometimes ice may stick and clump together and you will need to remove the ice from from the ice maker or let it unthaw. If you have not replaced your water filter for more than 6 months, it may be clogged and can cause water pressure issues. If the water pressure is over 120 PSI it can cause freezing and jamming. Check the water line and the ice fill tube to see if they are frozen and unthaw them if they are. Also check the water inlet valve and the ice maker to see if they are working correctly. If you have any questions, please let us know. We are open 7 days a week. We look forward to hearing from you!
Was this helpful?
Thank you for voting!
< Prev
1
Next >
✖
Ask a Question
Ask our experts a question on this model and we'll respond as soon as we can.
removed flap door in front of icemaker...removed 3 screws with bolt heads...removed one additional screw with bolt head and ice unit slid out. I removed motor unit (pops out no screws). Replaced and had ice within 3 hours.
Remove the icemaker service door... gently pry the door pins from the hinge sockets. Remove the 3 screws from the under side of the icemaker with a nut driver (1/4"). Gently remove the icemaker . It's a tight fit between the top of the compartment and the icemaker lower support tray. Next, disconnect the electrical connector at the right side. You're done! Reverse procedure for installing. Good luck. Remember, your working with cold plastic...take your time and don't force too much.