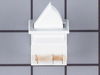
This crisper drawer cover support is for refrigerators.
Crisper drawer cover support supports the crisper drawer lid.
Wear work gloves to protect your hands when installing this part.
$8.97
In Stock
Order within the next 11 hrs and your part ships today!
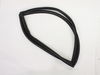
Glass and centre support is NOT included. Must be ordered separately. This frame along with the glass provides the crisper drawer for fresh storage of vegetables
$133.82
In Stock
Order within the next 11 hrs and your part ships today!
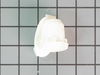
This 18 ml bottle of white appliance touch-up paint is used to cover scratches or marks on your appliance. The white touch-up paint can be used on refrigerators, microwaves, ranges, clothes dryers, an...
$10.21
In Stock
Order within the next 11 hrs and your part ships today!
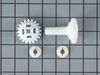
This includes both the run capacitor and the start relay. The capacitor helps the compressor kick on and off while maintaining a constant temperature to keep things frozen in your freezer.
The start ...
$96.85
In Stock
Order within the next 11 hrs and your part ships today!
This light switch may also be known as a refrigerator door switch or a light switch kit, and is compatible with your refrigerator. The function of the refrigerator door switch is to turn on the light ...
$35.26
In Stock
Order within the next 11 hrs and your part ships today!
This is a temperature sensing mechanism. It can sense the rise in evaporator temperature during a defrost cycle and cycles the defrost heater off after all frost is melted from the coils.
$70.91
In Stock
Order within the next 11 hrs and your part ships today!
Start by removing the freezer door and inner baskets so you have some space. Next, take out the ice maker by removing the 3 screws that attach it to the side and unplug it from the harness. Then the cover for the thermistor and the fan vent should be popped off carefully leaving the back cover only. The back cover is held on by 4 screws, one in each corner. Remove all 4 screws and carefully loosen the back cover by pulling the top forward and laying it level to pull it out. Behind the cover are the coils and other components. If the coils are covered with ice they should be defrosted by using a blow dryer. Once the ice is clear, the thermostat is located towards the top left clamped onto a copper pipe that circles up and around. Carefully pull it off the pipe and cut the wires making sure you leave enough to reattach the new ones with a butt connector. Strip about 1/4 inch of insulation off the wires and crimp both ends into the butt connector making sure they are tight. Heat shrink is highly recommended. Clamp the new thermostat to the copper pipe where the old one used to be and your almost done. Replace the back cover the opposite of the way it was pulled out by putting it in flat with the bottom part in front. Once it is all the way to where it needs to be, push the top upwards while sliding the bottom downwards, then push it in flat against the back. It can be bent slightly if needed. Put the screws back in that hold it on and replace the plastic covers. Then reinstall the ice maker being sure the hose for the water is correctly positioned so that the water goes into the ice maker. Turn it back on and put the baskets and door back on and you're done.
Overload relay accessible from back, by compressor unit. Very easy to change out. Diagram from your site placed defrost thermostat in same area.It wasn't. Found another diagram, showed it in refrigerator light area, took that apart, not there. Yet another diagram showed it in the duct work area at back of refrigerator cabinet. Not there. Finally removed back of freezer compartment, found thermistor and thermostat with the fins. Clipped wires, wired in parts, quick fix. Longest amount of time was spent finding the old parts to replace them. Actual replacement took less than 15 minutes. Refrigerator holding at 35 degrees set on 2 now, better than ever. Total cost, less than $120, doing iy ourselves....priceless.