


Models
>
JE1390GAC
JE1390GAC - Overview
Models starting with JE1390GAC
Click on the best match to narrow your results.
Keep searches simple, eg. "belt" or "pump".

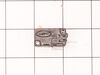
Primary Door Interlock Switch
PartSelect #: PS237015
Manufacturer #: WB24X10047
This interlock switch is located in the door latch.
$42.64
Special Order


SWITCH MONITOR INTERLOCK
PartSelect #: PS11766871
Manufacturer #: WB24X25397
This is the replacement monitor switch for your microwave. It is black in color and measures approximately 1 inch by ¾ of an inch. This switch monitors the door latch position of your microwave and co...
No Longer Available


Common Symptoms of models starting with JE1390GAC
[Viewing 4 of 4]Won’t turn on
Fixed by
these parts
these parts


Show All
No heat
Fixed by
these parts
these parts

Show All
Doesn’t shut off
Fixed by
these parts
these parts
Show All
Tray won’t turn
Fixed by
these parts
these parts
Show All
Keep searches simple. Use keywords, e.g. "leaking", "pump", "broken" or "fit".
Microwave runs with the door open
Remove microwave outer cover. Turn on side & locate the upper & lower door switches. Better to replace in pairs even if one is ok. Remove the wire harness to each switch. Then replace switch and re connect the wire harness. Re attach outer cover
and test to see if that solved the problem. If so then well done!!
and test to see if that solved the problem. If so then well done!!
Parts Used:
-
Thomas from Andover, NJ
-
Difficulty Level:Really Easy
-
Total Repair Time:15 - 30 mins
-
Tools:Pliers, Screw drivers
35 of 50 people
found this instruction helpful.
Was this instruction helpful to you?
Thank you for voting!
Microwave would turn on and count down, but not heating and not rotate turntable. Pressing door up would occasionally start heat.
First I disconnected the power and opened the door. Then I removed the top screws holding the top vent louvers, then removed the screw at the top of the touch pad. The touch pad removes by sliding up slightly then tilting top out. I unscrewed two screws holding the door latch assembly. Press the tab to remove and replace switch. Reconnect wires, reseat latch mount by placing top bracket tab in place first, allign and secure with screws. Reseat touch pad by placing bottom tabs in first, tilt forward and press up to seat top tabs, secure with top screw. Secure vent louver screws, plug in and watch your microwave work again.
Parts Used:
-
Michael from Ridgefield, CT
-
Difficulty Level:Really Easy
-
Total Repair Time:Less than 15 mins
-
Tools:Screw drivers
37 of 58 people
found this instruction helpful.
Was this instruction helpful to you?
Thank you for voting!
Broken door micro switch. (unit does not start heating)
Unplug the unit before servicing. Need phillips screwdriver. Open door. Use step ladder to access and remove 2 small screws from top of the room air diffuser at top of unit. Slide diffuser slightly to the left to align the diffuser's plastic tab on the left side to rotate toward you. (The wires for the front control panel are at the far left side of this difuser, but difuser is slotted for easy removal). Once the difuser is removed you will see 1 screw at the top that secures the pannel cover on the left side of the unit. Remove screw and slide this panel slightly up and out. This exposes the plastic frame that holds the upper and lower door switches. To locate the door switches and observe how they work, close and open the door and watch the door (bayonets) open and close the micro switches. Do the (red) buttons on top of the switches move up and down when the door bayonets push and release? If the buttons do not "pop" up when opened the switch is defective. The switch frame is secured with 2 screws. Remove screws and rotate the unit out for easy access to the micro switch(s). The internal (spring?) on my unit that is suposed to allow the red (visible) button on top of the switch to "pop" up when the door is opened was broken. Carefully pry the switch outward while being careful to lift the plastic holder-piece that holds the switch in place. Be careful, there is a small pin on the frame, so rotate the switch OUT toward you while lifting (carefully) the plastic holder-piece (you will see it on top of the switch). You can use an ohm meter to test the continuity of the switches. But if the buttons don't "pop" they are defective. Replace switch and reassemble.
Parts Used:

-
JAMES from BILLINGS, MT
-
Difficulty Level:Very Easy
-
Total Repair Time:30 - 60 mins
-
Tools:Screw drivers
30 of 50 people
found this instruction helpful.
Was this instruction helpful to you?
Thank you for voting!