This 18 ml bottle of white appliance touch-up paint is used to cover scratches or marks on your appliance. The white touch-up paint can be used on refrigerators, microwaves, ranges, clothes dryers, an...
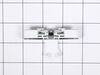
This is a replacement clutch assembly or cam kit for your washer. The clutch assembly is mounted on the drive shaft on the bottom of your washer. You may need to replace the clutch assembly if the spl...
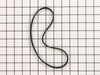
The drain hose carries used water from the washer to your house drain.
$31.80
In Stock
Questions And Answers for ITW4671EW0
Ask our experts a question about this model and we'll get back to you as soon as possible!
5 questions answered by our experts.
< Prev
1
Next >
Sort by:
Search filter:
Clear Filter
Your search term must have 3 or more characters.
Keep searches simple. Use keywords, e.g. "leaking", "pump", "broken" or "fit".
Sorry, we couldn't find any existing answers that matched.Try using some different or simpler keywords, or submit your new question by using the "Ask a Question" button above!
Andre
December 19, 2019
My Inglis washer fills up too much and never stops filling up i had to unplug it from the wall to cut the currant so it would stop filling up,i have check the transparent tube that bring the water uo to indicate the proper water level and stop the water to go higher.Semm to be the small printed circuit.
For model number ITW4671EW0
Good Day Andre. Thank you for your question in regards to your unit (Model Number ITW4671EW0). Based on our research you may need to replace the Water Inlet Valve (PartSelect Number PS11773194). You can order this part either online at our website www.PartSelect.ca or by calling us by phone at 877-910-4613. Best Regards.
1 person found this helpful.
Was this helpful?
Thank you for voting!
ANDRE
December 20, 2019
Ok,this is a follow up question,i id read your answer and some thing is puzzling me.This water valve do received a signal fron the wather level detector,when the water reaches the demanded water lavel it send a signal to the selenoid to shut of preventing more water then is needed for the wash.,i have check the selenoids and both seem ok,now i wonder could it be that printed circut where the tansparent rubber hose from the water level plugs in.,u may say i am a pain but with the cost of the parts we have to be sure ,right.
For model number ITW4671EW0
Hello Andre, thank you for your question. Yes, that is probably the issue. The pressure switch is controlled by the board. If the valve is tested and is fine, the issue is most likely that board. I hope this helps!
1 person found this helpful.
Was this helpful?
Thank you for voting!
Cheryl
March 24, 2023
My washer isn’t spinning and draining properly. I have tried all the setting to get it to work and it doesn’t. I have to manually change it to spin/drain after the cycle to get it to spin/drain. The hose isn’t plugged. I have also unplugged it.
For model number ITW4671EW0
Hello Cheryl, thank you for contacting us. It appears that you may have a faulty control board, part number, PS12347253, which needs to be replaced. We hope that helps!
How to get agitator off , something stuck under it
For model number ITW4671EW0
Hello Susan, thank you for getting in touch. We have attached a relevant video that may not be of the same model, but will help you in removing the agitator. Good luck with your repair!
Was this helpful?
Thank you for voting!
Wayne
October 25, 2023
Does this model have centering springs for tub
For model number ITW4671EW0
Hi Wayne, thank you for the question. Your model does not have a tub centering spring. We hope this information helps!
Was this helpful?
Thank you for voting!
< Prev
1
Next >
✖
Ask a Question
Ask our experts a question on this model and we'll respond as soon as we can.
Well, first investigated and found loose nut on drive clutch. First take off the two screws with nut drive then cover off using a screwdriver blade to snap off the cover. Then socket ratchet to take off the nut on drive clutch. take off belt by slowly rotating the drive gear. two screws that hold the electronics to the upper drive clutch and put aside, so you can snap off the cover for drive clutch on upper part with screwdriver and off the parts come and install whole unit back as took it apart. Line up the new upper clutch so that is position as was before. (Using parts diagram helps a lot as www. partsselect.com has for you or Maytag.com.) Then put the electronic part board back on and the gear and nut. Make sure it is tight by several attempts to make sure it's snugged up good and then slowly roll belt back on the pulley and motor drive. Put your cover guard back on with two screws and done.
This product comes in a bottle with a brush like Liquid Paper. It goes on incredibly easy. A second coat might be needed. I wanted to prevent rust from setting in so I covered the scratches and dings. The paint is a little brighter since my washer is 10 years old but it still looks great.


 Diagram and Parts List for Inglis Washer")