This part is the replacement drawer slide rail for your refrigerator. The crisper draw will slide in and out along this rail. If the rail is damaged or missing, the crisper will either hang from one s...
This evaporator fan motor grommet, or condenser fan grommet is built for refrigerators. It provides a cushion between the fan motor and the motor mounting bracket. It is made or round, black plastic a...
This 40-Watt light bulb is sold individually and is a genuine OEM replacement option for your home appliances. It is specially designed to withstand extreme temperatures, so this bulb is compatible wi...
This fan motor is most times used with frost-free refrigerators with a condenser coil. When the compressor runs, so does this fan, circulating air through the refrigerator grille, cooling the compress...
This is a replacement evaporator fan grommet for your refrigerator. The fan grommet absorbs the vibration from the evaporator fan motor for quiet operation while it runs. If your evaporator fan is unu...
The condenser fan blade assembly helps to regulate the temperature in your refrigerator or freezer. This fan assembly has 4 blades, but other fans may have 3 blades, so be sure to check the number of ...
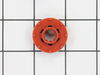
The lid bumper or evaporator fan motor bumper in your refrigerator prevents the fan motor from scraping against the side bracket. If your refrigerator/freezer is noisy, the bumper could be worn down o...
$12.42
Special Order
Questions And Answers for GTL22JCPDRBS
Be the first to ask our experts a question about this model!
✖
Ask a Question
Ask our experts a question on this model and we'll respond as soon as we can.
My refrigerator began to overheat and the everything was thawing!! The condenser fan motor had seized and I thought this is something even I can replace.
I did a Google search on the refrigerator model number. The link to your site looked promising and I clicked on it. I was taken to your web page for my refrigerator and I clicked on the schematic for the condenser assembly.
The schematic had the parts I needed labeled clearly so this layman could be sure to get the right ones.
I ordered the parts at 12:45PM Monday and selected overnight shipping. The parts arrived at 8:35AM Tuesday (Thank you FedEx). I installed the parts and my refrigerator is up and running again.
To get to the condenser fan motor I took off the back panel on the fridge that covers the condenser, fan and coil. The fan/motor assembly is attached to a bracket I removed with two screws. Pulled the bracket assembly out of the back of the fridge, removed the fan blade and then the motor, and put the new motor on the bracket and stuck the new fan blade on the motor spindle. The trickiest part was getting the complete assembly back in. Just went slowly and took my time. Reconnected the wires, no problems. I took pictures of everything that I disassembled BEFORE I disassembled it in case I wasn't sure how something went back in but this job was so simple I didn't need the pictures.
I’m not sure how I could improve on this except maybe you could ship a refrigerator technician, too, to do the install.
Thank you PartSelect everything worked out better than I could have hoped and I saved $220.00 compared to what a repair service was quoting.
I first shut off water flow to the fridge. Examination of the package (which was not exact in appearance to the original) demonstrated that the electrical connectors were well-insulated so I arrogantly and successfully proceded without disconnecting the power. My fridge is old enough that the model doesn't appear exactly on anyone's list so I wasn't alarmed that it took an extra 10 minutes or so to noodle out how to adapt the slightly different inlet cowling and electrical cord with extension, but the device is pretty simple. Soon I loosened the two mounting screws with a nut driver, used a screwdriver to pry away the plastic snap-in housing over the electrical socket on the fridge inner wall and pulled away the electrical plug. The original water fill tube remained in its cavity, ready for re-use. The new unit's mounting points matched the original screw locations perfectly, as did the fill cowling - which on the replacement icemaker has two possible attachment points. The new unit's electrical connector required an extension pigtail to adapt to my socket, but it was included in the package. The extra cable posed a minor cosmetic issue because it hangs in the collection basket a bit, but that will soon be remedied with a tie wrap. After the water was restored and an anxious wait of a few hours, we had well-formed ice cubes that weren't all stuck together and the stalactites haven't reappeared.
I unplugged the electrical connection. Then I removed the 2 screws holding the icemaker in place. I lifted out the old icemaker unit and put the new one in place. Then put the 2 screws back in and plugged in the new unit.
The icemaker started making ice very soon after turning the unit on.