Models > GSHS5KGXECSS

GSHS5KGXECSS General Electric Refrigerator - Overview

Sections of the GSHS5KGXECSS

[Viewing 7 of 7]

Manuals & Care Guides for GSHS5KGXECSS

Click to download
Keep searches simple, eg. "belt" or "pump".
Temperature Sensor – Part Number: WR55X10025
Temperature Sensor
★★★★★
★★★★★
(6)
PartSelect #: PS304103
Manufacturer #: WR55X10025
Also known as a thermistor. This part is used to sense the temperature in the cabinet.
$33.12
  Special Order
Main Electronic Control Board – Part Number: WR55X10942
Main Electronic Control Board
PartSelect #: PS2364946
Manufacturer #: WR55X10942
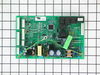
This board controls the operation of the unit. Note: This part has been updated by the manufacturer. It may differ in appearance but will function the same as the original.
$526.69
  Special Order
Evaporator Fan Grommet - Red – Part Number: WR02X12008
Evaporator Fan Grommet - Red
★★★★★
★★★★★
(4)
PartSelect #: PS963756
Manufacturer #: WR02X12008
This evaporator fan grommet is red in color, and is about 1 inch in diameter.
$16.84
  Special Order
Light Bulb - 40W – Part Number: 40A15
Light Bulb - 40W
★★★★★
★★★★★
(2)
PartSelect #: PS217532
Manufacturer #: 40A15
This 40-Watt light bulb is sold individually and is a genuine OEM replacement option for your home appliances. It is specially designed to withstand extreme temperatures, so this bulb is compatible wi...
$5.85
  Special Order
Compression Ring – Part Number: WR02X12149
Compression Ring
PartSelect #: PS1015726
Manufacturer #: WR02X12149
$11.80
  Special Order
Screw - 8-18 DG TRT20 5/8 S – Part Number: WR01X10621
Screw - 8-18 DG TRT20 5/8 S
PartSelect #: PS1483097
Manufacturer #: WR01X10621
This genuine OEM screw is designed for use in refrigerators. It measures approximately ¾ of an inch in length.
$11.80
  Special Order
Refrigerator Door Shelf Bin – Part Number: WR71X10973
Refrigerator Door Shelf Bin
PartSelect #: PS3513394
Manufacturer #: WR71X10973
Sold individually. This door bin is for refrigerators. Door bin attaches to the inside of the refrigerator door and typically holds jars and bottles. Follow the instructions in the owner's manu...
$135.62
  Special Order
Evaporator Fan Grommet - Grey – Part Number: WR02X11331
Evaporator Fan Grommet - Grey
PartSelect #: PS773826
Manufacturer #: WR02X11331
This is a replacement evaporator fan grommet for your refrigerator. The fan grommet absorbs the vibration from the evaporator fan motor for quiet operation while it runs. If your evaporator fan is unu...
$10.28
  Special Order
Defrost Heater and Bracket Assembly – Part Number: WR51X10055
Defrost Heater and Bracket Assembly
PartSelect #: PS303781
Manufacturer #: WR51X10055
The defrost heater keeps the cooling coils from frosting over. The heater will get hot and melt any ice or frost build up around the coils.
$135.81
  Special Order
Light Switch – Part Number: WR23X23343
Light Switch
PartSelect #: PS10066583
Manufacturer #: WR23X23343
This is the light switch that goes in your refrigerator. If the light is not working or stays on, you may need to replace the switch. It is made of mainly white plastic, and is an OEM part, directly f...
  No Longer Available
DC Condenser Fan Motor - 12V – Part Number: WR60X10209
DC Condenser Fan Motor - 12V
PartSelect #: PS1483567
Manufacturer #: WR60X10209
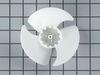
This fan motor circulates the air through the refrigerator grille and cools the compressor and condenser coils. It also helps to evaporate extra water in the drain pan.
$111.84
  Special Order
Lid Bumper – Part Number: WR02X10540
Lid Bumper
PartSelect #: PS284979
Manufacturer #: WR02X10540
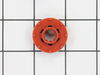
The lid bumper or evaporator fan motor bumper in your refrigerator prevents the fan motor from scraping against the side bracket. If your refrigerator/freezer is noisy, the bumper could be worn down o...
$12.42
  Special Order

Questions And Answers for GSHS5KGXECSS

Be the first to ask our experts a question about this model!

Common Symptoms of the GSHS5KGXECSS

[Viewing 20 of 20]
Fridge too warm
Fixed by
these parts
Fixing Fixing Fixing
Show All
Noisy
Fixed by
these parts
Fixing Fixing Fixing
Show All
Freezer section too warm
Fixed by
these parts
Fixing Fixing Fixing
Show All
Freezer not defrosting
Fixed by
these parts
Fixing Fixing Fixing
Show All
Light not working
Fixed by
these parts
Fixing Fixing
Show All
Fridge too cold
Fixed by
these parts
Fixing Fixing Fixing
Show All
Will Not Start
Fixed by
these parts
Fixing Fixing Fixing
Show All
Frost buildup
Fixed by
these parts
Fixing Fixing Fixing
Show All
Fridge and Freezer are too warm
Fixed by
these parts
Fixing Fixing Fixing
Show All
Clicking sound
Fixed by
these parts
Fixing Fixing Fixing
Show All
Too warm
Fixed by
these parts
Fixing Fixing Fixing
Show All
Leaking
Fixed by
these parts
Fixing Fixing
Show All
Fridge runs too long
Fixed by
these parts
Fixing Fixing Fixing
Show All
Freezer too cold
Fixed by
these parts
Fixing Fixing Fixing
Show All
Not dispensing water
Fixed by
these parts
Fixing
Show All
Door won’t open or close
Fixed by
these parts
Fixing Fixing Fixing
Show All
Ice maker not making ice
Fixed by
these parts
Fixing Fixing Fixing
Show All
Ice maker won’t dispense ice
Fixed by
these parts
Fixing
Show All
Doesn’t stop running
Fixed by
these parts
Fixing
Show All
Too cold
Fixed by
these parts
Fixing
Show All
Keep searches simple. Use keywords, e.g. "leaking", "pump", "broken" or "fit".
Fridge too warm, evaporator icing up
After replacing the defrost heater, main board and thermistor I still had the same problem. Called a repair guy and he (with the help of GE on the phone) diagnosed that the temperature sensor was bad. So I ordered from partselect and installed it and it fixed the problem. Been good for a couple months (knocking on wood). To install I had to cut the 2 wires to the old sensor, crimp the 2 new wires on and snap the new sensor to the clip on the evaporator. Very easy. Make sure you seal the ends of the wire crimps so moisture doesn't get in and corrode the connection.
Parts Used:
Temperature Sensor Evaporator Thermistor Clip
  • Gerald from San Clemente, CA
  • Difficulty Level:
    Easy
  • Total Repair Time:
    15 - 30 mins
  • Tools:
    Screw drivers
600 of 720 people found this instruction helpful.
Was this instruction helpful to you?
Thank you for voting!
The refrigerator made continous "whooing" sounds that increased and decreased in pitch. Sounded like a ghost. Would keep us up at night. Also noticed that the heater was not heating under the evaporator coils.
After checking the stories, the consensus of opinion was to change the mother board. I had a tremendous help from Tom Paone at quality@applianceeducator.com. He also told me to change the motherboard but to make sure that the coils were totally defrosted before starting up the refrigerator after changing the board.

Took off three nuts around the board at the back of the unit. Removed the input wires and you have to push in the plastic tabs holding the board in. Then just put the new board in place and push till the tabs click. Re-install the wires and put the cover back on.

Really simple task,

It is now a week since doing this and the unit is working perfectly. No soulds and good nights sleep. The ghost has moved on.
Parts Used:
Main Electronic Control Board
  • John from Holly Springs, NC
  • Difficulty Level:
    Really Easy
  • Total Repair Time:
    Less than 15 mins
  • Tools:
    Nutdriver
556 of 645 people found this instruction helpful.
Was this instruction helpful to you?
Thank you for voting!
my refigerator was warm but the freezer was cold and working correcttly
I went to a GE repair center to explain my problem, the service center reccomended that I have a techinician come out o look at it. $75.00 for the visit and what ever labor and materials wuld cost.

I went on line to see if there were others having this same problem and found that there were many with the same problem.

After reading some of the ways that people found out what was wrong ...it became a matter of three components, the timer, heater or thermostat.

I tried the most common component and the less expensive one first , the thermostat switch I installed it very easily snipping two wires and attaching the news using wire nuts I used the diagram on this website to pinpoint the component and there has not been a problem since.
Parts Used:
Temperature Sensor
  • michele from North Smithfield, RI
  • Difficulty Level:
    Really Easy
  • Total Repair Time:
    15 - 30 mins
  • Tools:
    Pliers
275 of 345 people found this instruction helpful.
Was this instruction helpful to you?
Thank you for voting!