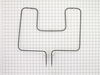
Also known as Probe. The quick connect on this part may be different than your original part. If it doesn't fit, you have to cut off the quick connect and wire together with porcelain wire nuts.
Ask our experts a question about this model and we'll get back to you as soon as possible!
1 question answered by our experts.
< Prev
1
Next >
Sort by:
Search filter:
Clear Filter
Your search term must have 3 or more characters.
Keep searches simple. Use keywords, e.g. "leaking", "pump", "broken" or "fit".
Sorry, we couldn't find any existing answers that matched.Try using some different or simpler keywords, or submit your new question by using the "Ask a Question" button above!
Robert
February 2, 2020
Cannot set baking temperature. Held bake button for six seconds. Display did not change.
For model number GLEB30S8ASA
Hello Robert, thank you for your question. That issue can be caused by either the oven sensor, or the electronic oven control board. We would recommend testing the sensor, PartSelect Number: PS820208
first. Testing the temperature sensor probe on your oven is easy. With the sensor at room temperature, measure the resistance between the two prongs at the end of the sensor connector. The resistance of the sensor should read approximately 1080 – 1090 ohms at room temperature. You can also test the elements for continuity to be sure they are both functioning. If the sensor and elements are tested and are functioning correctly the electronic control board would be the issue. Good luck with your repair!
2 people found this helpful.
Was this helpful?
Thank you for voting!
< Prev
1
Next >
✖
Ask a Question
Ask our experts a question on this model and we'll respond as soon as we can.
The repair was simple; first I removed the 2 screws from the old element and disconnected the wires and then I inserted the new element reconnected the wires and replaced the screws . The repair was easy and took less that 15 min. The oven works as good as new and I saved alot of money by doing it myself.
Replaced clock control by removing surface burner control knobs and plastic nuts, and then the cover over the oven control. Two screw hold the clock in place, after removal and disconnecting the plug-in you can reinstall the new clock control. The Heat Sensor inside the oven will also need to be replaced. It is located inside the oven and attached with two screws; the back of the oven will need to be removed to unplug. Reverse removal procedure and turn the power back on to the stove.
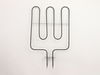
I pulled my unit out of the wall and noticed that the insulation around the top broiler element was a bit brown. Closer inspection revealed that the element had shorted somehow to the oven itself and caused the element to become non-functional. I tried measuring the resistance first, and it was within typical values for the other elements, but I decided to replace the element anyway.
I ordered from PD and the part arrived just a few days letter by regular shipping. I undid the screws holding in the element, undid the wire connectors and replaced the broken element with the new one. The element worked like a charm and I was back in business for cooking.