This is a flood switch assembly for your washer. The flood switch controls the hot and cold water filling your washer tub to ensure the proper amount of water. You may need to replace this part if you...
This is an end cap for a dishwasher rack. This part is about 2.5 inches long, is black, and is made of plastic. You may need to replaced this part if it is broken, or if your dishwasher rack continuou...
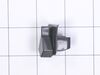
This is replacement door latch for your dishwasher. The door latch is attached to the tub frame, and connects to the door strike to keep your dishwasher door closed during operation. If you have a bro...
This drain pump kit is for dishwashers. The drain pump kit removes the water from the dishwasher tub during the drain phase of the dishwashing cycle. The kit may include multiple parts; refer to your ...
This conduit adapter attaches to the central wash arm in your dishwasher to allow the arm to clean dishes thoroughly and properly. This genuine OEM adapter is made of high quality plastic and measures...
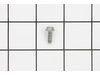
This is a genuine GE dishwasher leveling screw. It operates as a leg on the bottom of your dishwasher, and can be screwed in and out to raise and lower the height of the dishwasher. It is made of meta...
This is a lower rack roller for your dishwasher. It attaches in the lower roller assembly on the bottom of your rack to allow the rack to smoothly slide in and out. This replacement part is 1.5 inches...
Ask our experts a question about this model and we'll get back to you as soon as possible!
4 questions answered by our experts.
< Prev
1
Next >
Sort by:
Search filter:
Clear Filter
Your search term must have 3 or more characters.
Keep searches simple. Use keywords, e.g. "leaking", "pump", "broken" or "fit".
Sorry, we couldn't find any existing answers that matched.Try using some different or simpler keywords, or submit your new question by using the "Ask a Question" button above!
Mary
December 4, 2023
I need to replace my lower rack. need complete assembly? What is the lower rack part #?
For model number GDF540HMF4ES
Hello Mary, thank you for the great question. The compatible lower dishrack assembly for your model is part number PS16618974. If you need help placing an order, customer service is open 7 days a week!
1 person found this helpful.
Was this helpful?
Thank you for voting!
Lynne
January 17, 2022
Dishes on top rack are not getting clean
For model number GDF540HMF4ES
Hi Lynne,
Thank you for your question. To make sure the dishes on the top rack get clean, do not overload the dishwasher and make sure that you are positioning the dishes, so that there is nothing preventing the spray arms from spraying water onto the dishes. We hope this helps! If you have any questions, please let us know.
Was this helpful?
Thank you for voting!
Timothy
January 27, 2022
Does not do anything after filling with water
For model number GDF540HMF4ES
Hi Timothy,
Thank you for your question. If your washer will not start after filling with water, there are some parts that you will need to check to see which one is causing the issue. You will need to check the door latch, the latch striker, the user control and display board, the main electronic control board, the flood switch and the water inlet valve. We have included a link that you may reference on how to check these parts. Once you have determined the part you need, please feel free to call customer service. We are open 7 days a week and anyone will be happy to assist you. We look forward to hearing from you!
Hello Charles, thank you for contacting us. We have researched the model you have provided and have found the part you are looking for is part number PS16618974. This part comes as a kit with Silverware Basket. If you would like assistance placing an order, please contact customer service. Good luck with your repair!
Was this helpful?
Thank you for voting!
< Prev
1
Next >
✖
Ask a Question
Ask our experts a question on this model and we'll respond as soon as we can.
We tried cleaning out the filter and it clogged with a huge amount of gunk. We removed the gunk, scrubbed the filter, and tried running the dishwasher, but still no water. That took over an hour (not counting the time the dishwasher spent running). Then we tried your diagnosis center and it pointed to the flood switch or the water valve. I extracted the flood switch (another 30-60 minutes) to check it, and it also contained gunk and (significantly) did not rattle, which made me suspect the flood switch was the problem, so I ordered one. Once the replacement arrived, I checked it and the flood switch rattled, confirming that it should work properly. I spent 30-45 minutes installing it, plus the filter assembly and racks I had to remove to access it. Ran the dishwasher and everything came out sparkling clean. I don't know where the gunk came from, but if you aren't getting water and the filter is full of gunk, check the flood switch.
1. Turn off breaker supplying power to dishwasher in electrical panel 2. Open dishwasher door 3. Unscrew the screws that secure the dishwasher to the counter. 4. Tip dishwasher forward. Identify the non-functioning door latch. It looks exactly like the replacement. Unclip the wire harness from the door latch. 5. On the inside of the dishwasher, there are 2 screws directly under the door latch. Unscrew them and carefully set aside. 6. Remove old door latch. 7. Set new door latch in place. Holding securely, replace screws removed in step 5. Toward the end they get a little tougher to screw in. 8. Plug wire harness into new door latch. 9. Re-align dishwasher and re-secure to counter in previous position. 10. Test latch to make sure it closes properly. 11. Turn on breaker in electrical panel. The dishwasher should now function properly.
1. Pull out dishwasher (not all the way) 2. Open the door. 3. Remove the white rope holding the door hinge (both sides) 4. Remove the door by pulling up when the door is open about 4-8 inches. 5. Lay the door on the floor ( put something under the door so not to scratch the front. 6. Remove the small bolt at the bottom of the door (both sides). 7. Slide the hinge back, up, then out. 8. Where the hinges were are another set of bolts, remove those (both sides) 9. Grab the top part of the door (the part with the buttons) and slide apart. 10. Remove the styrofoam carefully. 11. Disconnect the wiring harness. 12. Remove the 6 screws holding the Despenser tray in place. 13. Put in new Despenser tray and put everything back together.