Models > FGHB2869LF1

FGHB2869LF1 Frigidaire Refrigerator - Overview

Sections of the FGHB2869LF1

[Viewing 11 of 11]

Manuals & Care Guides for FGHB2869LF1

Click to download
Keep searches simple, eg. "belt" or "pump".
Air Filter – Part Number: EAFCBF
Air Filter
★★★★★
★★★★★
(30)
PartSelect #: PS1993820
Manufacturer #: EAFCBF
This manufacturer-approved air filter system for refrigerators eliminates odors and any impurities. It does this by neutralizing and removing odor-causing molecules. For best results, it is important ...
$40.49
  In Stock
Refrigerator Water Filter – Part Number: ULTRAWF
Refrigerator Water Filter
★★★★★
★★★★★
(35)
PartSelect #: PS2364646
Manufacturer #: ULTRAWF
This genuine PureSource Ultra water filter will fit most Frigidaire french door and side by side refrigerators. You will find this filter located in the back, top right of the appliance. It is white i...
$107.46
  In Stock
Defrost Thermostat Kit – Part Number: 5303918214
Defrost Thermostat Kit
★★★★★
★★★★★
(12)
PartSelect #: PS469522
Manufacturer #: 5303918214
This kit includes the clip, leads and heat shrink.
$26.24
  In Stock
Screw - Kit of Four – Part Number: 5304515677
Screw - Kit of Four
★★★★★
★★★★★
(1)
PartSelect #: PS12365992
Manufacturer #: 5304515677
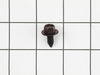
This screw is used in refrigerators. The screw can be loosened or tightened with a Phillips-head or square-head screwdriver. This screw is used to secure the refrigerator handle to the refrigerator do...
$20.45
  In Stock
Refrigerator Light Bulb – Part Number: 5304517886
Refrigerator Light Bulb
★★★★★
★★★★★
(3)
PartSelect #: PS12712277
Manufacturer #: 5304517886
$95.48
  In Stock
Refrigerator Door Gasket - Gray – Part Number: 241778307
Refrigerator Door Gasket - Gray
★★★★★
★★★★★
(9)
PartSelect #: PS3408461
Manufacturer #: 241778307
$201.46
  In Stock
Adjustable Leveling Foot - Black – Part Number: 216396900
Adjustable Leveling Foot - Black
★★★★★
★★★★★
(1)
PartSelect #: PS425733
Manufacturer #: 216396900
Sold Individually.
$32.92
  In Stock
Upper or Lower Mullion Hinge Pin – Part Number: 241779401
Upper or Lower Mullion Hinge Pin
★★★★★
★★★★★
(1)
PartSelect #: PS2358752
Manufacturer #: 241779401
Sold individually.
$29.56
  In Stock
Refrigerator Freezer Door Gasket - Gray – Part Number: 5304501270
Refrigerator Freezer Door Gasket - Gray
★★★★★
★★★★★
(7)
PartSelect #: PS11704172
Manufacturer #: 5304501270
This door gasket is for the freezer door on the refrigerator. The gasket is grey in color. This part is approximately 34-1/2" wide x 24" long. The door gasket is on the inner door panel and creates a ...
$204.03
  In Stock
Water Filter Base – Part Number: 242009602
Water Filter Base
★★★★★
★★★★★
(6)
PartSelect #: PS12364175
Manufacturer #: 242009602
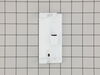
This is the replacement water filter base for your refrigerator. It is approximately 3-1/2 inches by 3 inches. It is made of white plastic with two blue water filter receptacles. The water filter base...
$75.85
  In Stock
PAN-CRISPER – Part Number: 241801802
PAN-CRISPER
★★★★★
★★★★★
(4)
PartSelect #: PS3408471
Manufacturer #: 241801802
This is a refrigerator crisper drawer used for storing vegetables at an optimum temperature to them fresh
$225.93
  In Stock
Hinge Mounting Hexagonal Screw – Part Number: 240578902
Hinge Mounting Hexagonal Screw
PartSelect #: PS1526054
Manufacturer #: 240578902
Sold individually.
$33.08
  In Stock

Questions And Answers for FGHB2869LF1

Ask our experts a question about this model and we'll get back to you as soon as possible!

1 question answered by our experts.
  • 1
Sort by:
Sorry, we couldn't find any existing answers that matched.Try using some different or simpler keywords, or submit your new question by using the "Ask a Question" button above!
William
March 22, 2022
My evaporator fan won’t turn Despite i replaced it with a new motor
For model number FGHB2869LF1
PartSelect logo
Hello William, thank you for your question. First, unplug the fridge, then check the wiring for the evaporator fan. If the wires seem to be ok, it could be the control board, part number PS3503803. If you need help placing an order, our customer service is open 7 days a week. Please feel free to give us a call. We look forward to hearing from you!

Was this helpful?
Thank you for voting!
Related Parts:
  • 1

Common Symptoms of the FGHB2869LF1

[Viewing 18 of 18]
Fridge too warm
Fixed by
these parts
Fixing Fixing Fixing
Show All
Fridge too cold
Fixed by
these parts
Fixing Fixing Fixing
Show All
Freezer section too warm
Fixed by
these parts
Fixing Fixing
Show All
Freezer not defrosting
Fixed by
these parts
Fixing Fixing Fixing
Show All
Noisy
Fixed by
these parts
Fixing Fixing Fixing
Show All
Ice maker not making ice
Fixed by
these parts
Fixing Fixing Fixing
Show All
Door won’t open or close
Fixed by
these parts
Fixing Fixing Fixing
Show All
Not dispensing water
Fixed by
these parts
Fixing Fixing Fixing
Show All
Leaking
Fixed by
these parts
Fixing Fixing Fixing
Show All
Fridge and Freezer are too warm
Fixed by
these parts
Fixing Fixing
Show All
Frost buildup
Fixed by
these parts
Fixing Fixing
Show All
Door Sweating
Fixed by
these parts
Fixing Fixing Fixing
Show All
Too warm
Fixed by
these parts
Fixing Fixing
Show All
Ice maker won’t dispense ice
Fixed by
these parts
Fixing Fixing Fixing
Show All
Freezer too cold
Fixed by
these parts
Fixing
Show All
Ice maker dispenses too little ice
Fixed by
these parts
Fixing
Show All
Light not working
Fixed by
these parts
Fixing
Show All
Fridge runs too long
Fixed by
these parts
Fixing
Show All
Keep searches simple. Use keywords, e.g. "leaking", "pump", "broken" or "fit".
Running but not cooling off and frost in the back of the freezer
Unplugged the refrigerator. Removed the 4 hex head screws on the lower back panel at the back of the freezer. Used a blow dryer to defrost the pipes and area surrounding the thermostat. Unplug the connection from the back of the freezer, unplug the 2 wires, one that goes to the heater, one that comes from power. Unclip the thermostat from the pipe and note which pipe you unclipped it from. Cut the wires on the old thermostat midway between the plugs and the sensor. Using the supplied butt connectors, strip the wire ends on color matched wires (should be a dark blue or black) and crimp them together. Repeat with the other wire. Discard the white shrink wrapping. I wasn't able to get it small enough with a hair dryer or lighter. Plug the thermostat back into it's respective plugs. Clip the thermostat back onto the pipe you removed it from. Replace the back panel with the four screws. Ensure the bottom of the panel is set inside of the drip tray. Replace any shelving you removed. Plug the refrigerator back into the wall. Your done!
Parts Used:
Defrost Thermostat Kit
  • Leo from Bentonville, AR
  • Difficulty Level:
    Easy
  • Total Repair Time:
    15 - 30 mins
  • Tools:
    Nutdriver, Pliers
266 of 316 people found this instruction helpful.
Was this instruction helpful to you?
Thank you for voting!
Refrigerator would sometimes freeze everything
we researched the internet with our symptoms and most sites said it was the thermostat. At $800+ for a new refrigerater, we decided to order the thermostat. Found schematics on the net, the thermostat was located in teh freezer compartment . Unplugged, removed food from freezer, removed the bottom shelf in freezer, and the back panel It was EASY to find. Cut 2 wires, replaced with new thermostat. DONE! The new thermostat came with new connecters.
Parts Used:
Defrost Thermostat Kit
  • donna from brandon, FL
  • Difficulty Level:
    Really Easy
  • Total Repair Time:
    15 - 30 mins
  • Tools:
    Screw drivers
84 of 95 people found this instruction helpful.
Was this instruction helpful to you?
Thank you for voting!
everything in refrigerator freezing even on warmest setting
To access the part you have to remove the back panel of the freezer compartment from the inside of the freezer itself. There are four screws to this panel. I emptied the contents of the freezer, took of 2 shelves and brackets to gain access and removed the cover. Located the part , cut the wires with a wire cutter and left a small tail ....MAKE SURE TO UNPLUG REFRIG OF COURSE ... the part is clipped on the coils , added the new part. matched the color wires and added the connectors , crimped the wires and added a little electrical tape and put the panel and shelves back. THE REFRIG IS WORKING LIKE A CHARM
Parts Used:
Defrost Thermostat Kit
  • Benny from astoria, NY
  • Difficulty Level:
    Easy
  • Total Repair Time:
    15 - 30 mins
  • Tools:
    Nutdriver, Pliers, Screw drivers
59 of 73 people found this instruction helpful.
Was this instruction helpful to you?
Thank you for voting!