This is a replacement rack for your oven. The oven rack fits into grooves on the side of the oven wall, and acts as a shelf that you can place food items on when you want to cook them in the oven. Thi...
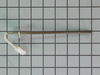
This part is a single oven rack link arm. It is a genuine OEM replacement part for your oven. It connects the oven rack to the door bracket, to allow the rack to extend out when you open the oven door...
This part goes over the top of the oven door glass. The door handle also attaches to the door cap.
$124.86
In Stock
Questions And Answers for FGGF3054MWE
Ask our experts a question about this model and we'll get back to you as soon as possible!
3 questions answered by our experts.
< Prev
1
Next >
Sort by:
Search filter:
Clear Filter
Your search term must have 3 or more characters.
Keep searches simple. Use keywords, e.g. "leaking", "pump", "broken" or "fit".
Sorry, we couldn't find any existing answers that matched.Try using some different or simpler keywords, or submit your new question by using the "Ask a Question" button above!
Samantha
December 2, 2019
Do I need to purchase a conversion kit to switch from gas to propane for this stove?
For model number FGGF3054MWE
Hello Samantha, Thank you for contacting us. I have researched the model you have provided and have found the part you are looking for is PartSelect Number PS3633782. Hope this helps!
Hello Eric, thank you for writing. May be caused by a faulty temperature sensor Number PS1528542. The probe allows the oven to maintain the set temperature by sensing the temperature and sending the information to the ovens motherboard. We have an installation video for you to access. We hope to hear from you soon.
Hi Mary, thank you for reaching out. To turn on a self-clean cycle: Be sure the clock displays the correct time of day. Press "Start Time." The time will be flashed. Press and hold up the scroll button to set the time to start the self-clean cycle. Release the key when the desired time is displayed. Press "Clean" when it appears on the display. Press the up scroll until 3:00 appears on the display for a 3-hour self-clean process, or push the down scroll until 2:00 appears on the display for a 2-hour self-clean process. As soon as the controls are set, the motor-driven lock will begin to close automatically, and the locked door indicator light will flash. Do not open the oven door while the light is flashing (allow about 15 seconds for the oven door to lock). "CLn" will appear in the display during the self-clean cycle, and the door-locked light will glow until the self-clean cycle is complete or canceled and the oven temperature has cooled. We hope this information is helpful!
Was this helpful?
Thank you for voting!
< Prev
1
Next >
✖
Ask a Question
Ask our experts a question on this model and we'll respond as soon as we can.
Repair was quite easy, as long as you have the instructions for removing the door. The screws that hold the bottom of the door to the fixed hinge are placed into the side of the hinge assembly after removal; this holds the door at a 45 degree angle for easy removal. After that, just place the door on a flat surface and dismantle the door from the inside. The inner glass is contained in a metal frame with another piece of glass; this frame comes apart easily using the clips in each side. The door assembles easily after the glass is replaced; just take your time and give yourself enough room to lay out the parts as you go. Good luck!
I called a repair place. They charged $54 to diagnose, (said it needed a new latch motor) then wanted $220 to complete the repair. I checked online prices and did it myself for about 15 minutes work and the latch motor itself ($44?).
Was necessary to uplug the range, pull it away from the wall and remove the back panel sheet metal, then 3 screws that mount the motor. Replace motor, reattach sheet metal. Plug in. Done. Ready to bake cookies.