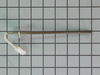
This is a replacement rack for your oven. The oven rack fits into grooves on the side of the oven wall, and acts as a shelf that you can place food items on when you want to cook them in the oven. Thi...
$155.18
In Stock
Order within the next 11 hrs and your part ships today!
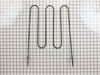
This broil element is found on the roof of the oven.
$218.60
In Stock
Order within the next 11 hrs and your part ships today!
Questions And Answers for FGEH3047VFB
Ask our experts a question about this model and we'll get back to you as soon as possible!
1 question answered by our experts.
< Prev
1
Next >
Sort by:
Search filter:
Clear Filter
Your search term must have 3 or more characters.
Keep searches simple. Use keywords, e.g. "leaking", "pump", "broken" or "fit".
Sorry, we couldn't find any existing answers that matched.Try using some different or simpler keywords, or submit your new question by using the "Ask a Question" button above!
Jim
January 5, 2023
My stove pops the circuit breaker after about 10 minutes of the oven on. I checked the resistance of the elements and it is about 16 ohms cold
For model number FGEH3047VFB
Hello Jim, thank you for contacting us. When an appliance is drawing an excessive amount of electricity, often due to a malfunction or defect, it can result in the circuit tripping. The elements appear to be good. To be sure please attach only the oven to the corresponding breaker. Once this is done, switch the oven to a low temperature. If you notice that the circuit breaker doesn’t trip immediately, then there is no short in the fuse that the oven is plugged into. This is good news. Next, increase the temperature of the oven slowly. If the circuit breaker ends up tripping as you are slowly increasing the temperature of the oven, the problem likely lies with the heating elements. If elements are found good, we would recommend checking the fan motor, part number PS2378860, the fan thermostat, part number PS3409411, and the temperature sensor, part number PS1528542. Please ensure that none of these parts are shorted. We look forward to hearing from you if you need assistance with placing an order through our 7-days-a-week customer service. We hope this helps!
First we removed two screws under the rim of the range top to open the lid. Lifted the lid and removed the screws from the bracket that holds the elements, Be careful with the clips that hold the element in, if you break them or bend them there aren't any more! Also note which holes they were in, they are marked according to the different sizes of elements. Disconnected the wires, needed needlenose pliers to grip them...connected new element, popped it back in place, replaced bracket, closed top ...Easy peasy!!!
Repair was quite easy, as long as you have the instructions for removing the door. The screws that hold the bottom of the door to the fixed hinge are placed into the side of the hinge assembly after removal; this holds the door at a 45 degree angle for easy removal. After that, just place the door on a flat surface and dismantle the door from the inside. The inner glass is contained in a metal frame with another piece of glass; this frame comes apart easily using the clips in each side. The door assembles easily after the glass is replaced; just take your time and give yourself enough room to lay out the parts as you go. Good luck!
I called a repair place. They charged $54 to diagnose, (said it needed a new latch motor) then wanted $220 to complete the repair. I checked online prices and did it myself for about 15 minutes work and the latch motor itself ($44?).
Was necessary to uplug the range, pull it away from the wall and remove the back panel sheet metal, then 3 screws that mount the motor. Replace motor, reattach sheet metal. Plug in. Done. Ready to bake cookies.