Order within the next 4 hrs and your part ships today!
Questions And Answers for FG4322ES
Ask our experts a question about this model and we'll get back to you as soon as possible!
2 questions answered by our experts.
< Prev
1
Next >
Sort by:
Search filter:
Clear Filter
Your search term must have 3 or more characters.
Keep searches simple. Use keywords, e.g. "leaking", "pump", "broken" or "fit".
Sorry, we couldn't find any existing answers that matched.Try using some different or simpler keywords, or submit your new question by using the "Ask a Question" button above!
ROBERT
September 27, 2022
I AM GETTING NO VOLTAGE TO THE BROILER IGNITER
For model number FG4322ES
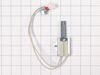
Hello Robert, thank you for contacting us. Before moving forward please make sure that the range is getting power and there is no issue in the external power supply. We would recommend checking the igniter for continuity using a multimeter and its wiring. Set the multimeter on the lowest ohm settings and then connect its probes to the terminals of the igniter. The readings should be in the range of 10-1100 ohms for a good igniter. If there is a discontinuity in the igniter, part number PS3535362, it should be replaced. If the igniter is good, the most probable cause can be a faulty relay in the control board. Please reach out to customer service if you need help placing an order, anyone will be happy to assist you. We hope that helps.
Is the igniter for the oven the same igniter for the broiler I have an LG stove with two igniters I need the broiler igniter part number
For model number FG4322ES
Hello John, thank you for your inquiry. According to our research, the igniter you are looking for is part number PS3535362. If you need help placing an order, customer service is open 7 days a week!
Go onto youtube, such as https://www.youtube.com/watch?v=-ITkrwhDNMQ and watch similar videos for DYI. The process is very similar to other models.
Once the door is removed, place oven door on a towel or soft place so it does not scratch the door. Unscrew the screws and make sure you notice where each screw goes, so you know the process of where each screw goes when you re-assemble.
Once the inner cover is removed, remove the insulation, too so you don't damage it. Use Wet/Dry Shop Vac to clean the shattered glass. (WORD OF ADVICE: I did not remove the insulation and the suction of the Shop Vac removed part of the insulation, so now instead of a quick turn around repair turns into a few weeks repair, because the insulation is on back order 10-14 days from the supplier. DON"T MAKE THE SAME MISTAKE!)
Once the glass has been removed, the new inner glass is replaced, begin by re-assemble the oven door with the correct screws and attached the oven door to the range.
Took off the oven door then took out the racks and two screws in the oven bottom and removed it . Then removed the heat deflector. Then un plugged the old igniter and removed the burner to make it easier to remove the old igniter. Then installed the new igniter and reversed the process
As soon as my husband put it in the oven, the very thin prongs broke. There was no guard on either side of the prongs for protection like the one that had been in there. Very costly to us of $185 with no fix. Very disappointed in that ignitor. It would have been an easy fix. Had replaced one previously but it only lasted 6 months. Now we have a new stove