This part is a replacement electronic clock/timer for your oven. The clock timer will display the time, and can be used to set a timer. If the clock will not start, will not allow you to program the t...
Sold individually. This part helps the flame to spread for even heat. Also protects your burner head from spills. The surface burner cap is located on the top of the burner head and is used in ranges ...
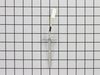
his oven door handle is for ranges.
Wear work gloves to protect your hands when installing this part.
$138.88
In Stock
Questions And Answers for FFGF3017LBE
Ask our experts a question about this model and we'll get back to you as soon as possible!
1 question answered by our experts.
< Prev
1
Next >
Sort by:
Search filter:
Clear Filter
Your search term must have 3 or more characters.
Keep searches simple. Use keywords, e.g. "leaking", "pump", "broken" or "fit".
Sorry, we couldn't find any existing answers that matched.Try using some different or simpler keywords, or submit your new question by using the "Ask a Question" button above!
William
November 9, 2023
Already replaced the gas igniter but still get the F10 error with beeping when power is turned back on.
For model number FFGF3017LBE
Hi William, thank you for your inquiry. The F10 error code means that your oven thinks your oven is too hot. This is either a bad oven sensor or a bad display relay control board. With a multimeter, check the resistance of the sensor at room temperature and it should be about 1080 ohms. If it is fine, you need to replace your display board, part number PS12717913. We hope this solves your problem!
I am an HVAC tech by trade so it wasn't difficult to diagnose problem with safety valve. The hard part was being without an oven for a week. Repair was simple and effective--oven works good as new. Shut off gas and unplugged oven. Removed floor of oven between broiler and bake section, used wrenches to disconnect gas line from safety valve in back of oven, used philipps head screwdriver to remove burner assembly and gas valve, reversed process to replace. Checked out operation--OK.
The repair of the oven was really easy . I removed a total of 7 screws with a 1/4 inch nut driver to remove the back cover of the instrument panel. I then unplugged the wires from the from the oven control and with a phillups screw driver I removed 4 screws that hold the oven control,the face plate with the words on it has to be taken off the old control and put on the new one . I then installed the new oven control by putting the 4 screws back on and plugging back the wires. I then replaced the back cover with the 7 screws and plugged the power back in the outlet, The clock has to be adjusted and your done.
Turned off power, took back off stove removed old probe. I had to splice wires since new probe ends did not match up. the instructions were to splice the wires. I had the breaker off for about 3 hours. this is not in the instructions, but being a widow, I had to ask a few people why it would not come on after I connected the wires. After waiting, I turned the breaker on and my range came back on.