This oven temperature sensor, also known as an oven probe, monitors the internal temperature of the oven cavity to ensure accurate and consistent heating. Measuring 6 inches in length and made of dura...
$58.25
In Stock
Order within the next 10 hrs and your part ships today!
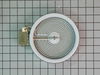
The 6” radiant cooking element with limiter fits under the glass cooktop and supplies heat to the cooking area. If your element is not heating, you can test the element for continuity with a multimete...
$147.02
In Stock
Order within the next 10 hrs and your part ships today!
This convection fan blade is designed for use with various makes and models of range and oven and is sold as an individual part. Made of metal and measuring approximately 4.75-inches in diameter, this...
$43.07
In Stock
Order within the next 10 hrs and your part ships today!
This is an authentic mounting screw, which works with ranges, wall ovens, cooktops and warming drawers.
$9.95
In Stock
Order within the next 10 hrs and your part ships today!
Questions And Answers for CGES3065PFF
Ask our experts a question about this model and we'll get back to you as soon as possible!
1 question answered by our experts.
< Prev
1
Next >
Sort by:
Search filter:
Clear Filter
Your search term must have 3 or more characters.
Keep searches simple. Use keywords, e.g. "leaking", "pump", "broken" or "fit".
Sorry, we couldn't find any existing answers that matched.Try using some different or simpler keywords, or submit your new question by using the "Ask a Question" button above!
James
April 5, 2024
broiler not working
For model number CGES3065PFF
Hi James, thank you for getting in touch. Based on the description that you have provided, we would recommend replacing the broil element, part number PS12724131, to fix the issue. We hope this solves your problem!
PF alarm appeared on display. Noticed clicking when cord was moved. Had arced for some time and melted original block. New part slightly different. Only has 3 lugs, old one had six. Stack using washers provided. Take note of colors before disassembly. Use caution while working through access opening. The edges are sharp. Only tools needed are phillips screwdriver, deep socket for lug nuts. Nut driver optional. Hope this is helpful.
First we removed two screws under the rim of the range top to open the lid. Lifted the lid and removed the screws from the bracket that holds the elements, Be careful with the clips that hold the element in, if you break them or bend them there aren't any more! Also note which holes they were in, they are marked according to the different sizes of elements. Disconnected the wires, needed needlenose pliers to grip them...connected new element, popped it back in place, replaced bracket, closed top ...Easy peasy!!!
Repair was quite easy, as long as you have the instructions for removing the door. The screws that hold the bottom of the door to the fixed hinge are placed into the side of the hinge assembly after removal; this holds the door at a 45 degree angle for easy removal. After that, just place the door on a flat surface and dismantle the door from the inside. The inner glass is contained in a metal frame with another piece of glass; this frame comes apart easily using the clips in each side. The door assembles easily after the glass is replaced; just take your time and give yourself enough room to lay out the parts as you go. Good luck!