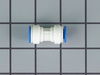
This is an OEM replacement ice and water filter for your refrigerator. In side-by-side refrigerators, it is found in the top right corner or the bottom left grille. In bottom-freezer refrigerators, th...
This 18 ml bottle of white appliance touch-up paint is used to cover scratches or marks on your appliance. The white touch-up paint can be used on refrigerators, microwaves, ranges, clothes dryers, an...
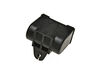
This compressor start relay is for refrigerators. The compressor start relay attaches to the compressor and helps start the compressor motor. Safely store any food that could deteriorate while the pow...
If your refrigerator or freezer is too warm, or making noises, you may need to replace the fan blade. The fan blade attaches to the evaporator motor, which is in the freezer section, to help circulate...
I knew the chances of all the freon leaking out was unlikely so I looked at the wiring to the compressor and there was a capacitor and a starter/overload so i figured I would start there. I went on line and found the parts at this site and they were less than the minimum service call charge for a service tech so I figured what the heck let's give her a shot so I did give it a shot. I ordered the parts and they were there in less time than a service tech could come out and i installed the parts and guess what for 90.00 in parts and 15 minutes in time I repaired my refrigerator. Thanks guys, It took less time to order the parts than it did to make the repair so thanks, your website rocks and is very well designed so my hat is off to you guys!
1) removed the face plate that runs 3/4 way up the back of the freezer side. a total of 8 screws. (6") 2) disconnected the three electrical connections.(30sec) 3) removed the fan of the the old evaporator fan motor (5sec) 3) removed the fan motor (1") 4) put in the new fan motor (1") 5) put on the old fan on the new fan motor(5sec) 6) reconnected the three electrical connections (30sec) 7) replaced the face plate on the back of the freezer (6") Had re-frozen meat within 1 hour.
I used a flat-head screwdriver to pop out the old light rocker switch. Then, I unplugged the wires, plugged them into the new light rocker switch, and then popped the new switch into the hole. That's it! Lights began working again.


 Diagram and Parts List for Whirlpool Refrigerator")