This an authentic OEM 40-Watt replacement light bulb, used in a number of household appliances. It is specially designed to withstand extreme temperatures, which is why these replacement bulbs are mos...
$14.96
In Stock
Order within the next 10 hrs and your part ships today!
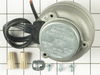
This condenser fan motor operates in a clockwise fashion and carries carries 2W and 115V. It comes with screws, a mounting nut for the blade and a cushion. This part provides forced-air cooling for the condenser coil.
$86.76
In Stock
Order within the next 10 hrs and your part ships today!
This is a multi-use and multi-appliance screw. It can be used on a microwave, refrigerator, range/oven, air conditioner, dehumidifier, washer, or dryer. The measurements of this screw are 8 x 1/2 inch...
$26.52
In Stock
Order within the next 10 hrs and your part ships today!
This evaporator fan motor assembly is just over three inches long. It is made of both metal and plastic, and is made up of black, white, and metalllic pieces.
$131.20
In Stock
Order within the next 10 hrs and your part ships today!
This cold control thermostat has a temperature range from 37 degrees Fahrenheit to 27 degrees Fahrenheit and a capillary length of 29 iches.
This cold control thermostat cycles on and off regularly t...
$202.74
In Stock
Order within the next 10 hrs and your part ships today!
Unplug the appliance. Removed the screws holding the back panel. Removed the fan blade. removed 3 screws holding the condenser fan. Remove the 3 metal brackets attached to the fan. (First note which studs the brackets are attached to. Attach the 3 metal brackets to the new fan. (New screws were supplied) Cut and strip the wire about two inches from the fan. Cut and strip the new wire. I cut the new wire in half (about 6 inches.) Connect the two wires, twist and used 2 wire nuts. Tie wrap the wire to the wire harness. Mount the new fan (three screws) Screw the back panel back on. Mount the new
I used a flat-head screwdriver to pop out the old light rocker switch. Then, I unplugged the wires, plugged them into the new light rocker switch, and then popped the new switch into the hole. That's it! Lights began working again.