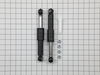
This kit is used for front load washers and includes 2 dual-stage shock absorbers, 1 spare shock mounting pin and 4 locking nuts. These shock absorbers keep the washer from vigorous shaking during it's cycles.
$50.58
In Stock
Order within the next 6 hrs and your part ships today!
This door lock and switch assembly is manufactured to lock the door on your front load washer to prevent it from opening while it is running. You may need to replace the door lock and switch if the do...
$163.10
In Stock
Order within the next 6 hrs and your part ships today!
The pump is what your washer uses to remove the water from the tub. This part is the pump and motor assembly which includes the red flapper to prevent drain back flow.
$211.11
In Stock
Order within the next 6 hrs and your part ships today!
Also known as a Door Boot Seal and is used in front load washers. This part is used to keep the clothes inside the tub during the wash cycle. The folds in the bellow allow the tub to move separately f...
$393.85
In Stock
Order within the next 6 hrs and your part ships today!
This is a replacement screw for your washer or dryer. The screw is approximately half an inch in length and is a Phillips-head screw. It screws in from the outside of the drum, into the vane/baffle. T...
$16.47
In Stock
Order within the next 6 hrs and your part ships today!
Order within the next 6 hrs and your part ships today!
Questions And Answers for ATF6700FS0
Ask our experts a question about this model and we'll get back to you as soon as possible!
1 question answered by our experts.
< Prev
1
Next >
Sort by:
Search filter:
Clear Filter
Your search term must have 3 or more characters.
Keep searches simple. Use keywords, e.g. "leaking", "pump", "broken" or "fit".
Sorry, we couldn't find any existing answers that matched.Try using some different or simpler keywords, or submit your new question by using the "Ask a Question" button above!
Caskaddon
February 7, 2022
Door needs to be replaced
For model number ATF6700FS0
Hello Caskaddon, Thank you for the question. The Door is not sold as a whole sorry, just the parts to the Door. Please feel free to send a question with details on the part needed and we will be happy to help you. If you need help placing an order, customer service is open 7 days a week. Please feel free to give us a call. We look forward to hearing from you!
Was this helpful?
Thank you for voting!
< Prev
1
Next >
✖
Ask a Question
Ask our experts a question on this model and we'll respond as soon as we can.
1. Unplug unit. 2. Unscrew 2 nuts holding top in place in rear of unit using phillips head screwdriver. 3.Slide top back and remove. 4. Open door of washer and unscrew 2 screws holding in door lock unit. 5.Pull out unit from the top and install new unit reconnecting the 3 wire connections.
remove top of machine by removing 3 screws along the top edge in the back of your machine and then sliding the top back and up. Then loosen the screws holding on the control panel enough to get to the 2 screws at the top of the door panel. Next remove bottom panel by removing 2 screws along bottom edge then pulling it free from snaps. Then along the outside lip of the bellow, just inside the door, is a wire clip that is easily removed by prying it past rubber lip with a screw driver and lifting it away. Remove the door panel by removing the 2 screws you exposed by loosening the control panel and 2 more along the bottom that were exposed when removing bottom panel. After the door panel is removed and the bellow is completely exposed, you will find that it is held in place by a circular spring which wraps the whole way around the drum opening. Again it can be removed by prying it out away from the groove in which it sits with a screw driver. Now your machine is broken down as far as it needs to be. From here you can follow the directions included in your new bellow kit and put it back together by following these instructions in reverse.
removed 2 screws and removed top access cover. removed 2 screws and removed front access cover. removed 4 retaining pins (one with nammer and punch because it was stuck) connected lower ends of new shocks with plastic pins, extended each shock to slip fit and connected upper ends to wash tub mounts. Reinstalled panels. I wish I could say that it all went well from there but......when the shocks broke, apparently the hit the motor took was enough to cause an electronic failure of the speed cycle control chip. Now Im waiting for that part.