This an authentic OEM 40-Watt replacement light bulb, used in a number of household appliances. It is specially designed to withstand extreme temperatures, which is why these replacement bulbs are mos...
This 18 ml bottle of white appliance touch-up paint is used to cover scratches or marks on your appliance. The white touch-up paint can be used on refrigerators, microwaves, ranges, clothes dryers, an...
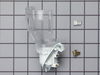
This evaporator fan motor is located in the back of the freezer, and circulates air over the refrigerator coils. These coils will convert the heat into cool air, which is then circulated.
NOTE: ...
This is a replacement crisper drawer for your refrigerator. The drawer is approximately 24 inches long, 11 inches wide, and 12 inches tall. It is made of clear plastic and is sold individually. The cr...
This kit includes the motor, fan blade, wire harness and screws.
NOTE: The manufacturer has changed the product to appear different than the original, but will still function the same as the origin...
The process to repair was very simple, I removed the back of the refrigerator to expose the motor area. I then removed three screws that held the condenser motor in place. once it was loose I detactched the electrical harness and removed the old motor. I then placed the new motor in place and secured it with the screws and reattached the new electrical harness that came with the new part. Once completed I reviewed it to make sure I didn't miss anything. I then replaced the cover over the motor area and enjoyed my success in repairing my own appliance with no added cost for labor, which would have been expensive I'm sure. The part purchased came with clear and consice instructions very easy to follow.
First I removed the two screws that secure the guard in bottom back of the freezer and removed it . Next I removed the two screws that secure the guard on the back wall of the freezer and removed it. There are three wires connected to the motor, I unplugged those and removed the two screws that secure the motor and removed it. I swapped the grommets, blade and support bracket from the old motor. I put it back together in reverse steps and its working great. My mother-in-law can,t stop thanking me ! I saved her at least $400 to buy a new fridge. Thank You, Brian Miner
I used a flat-head screwdriver to pop out the old light rocker switch. Then, I unplugged the wires, plugged them into the new light rocker switch, and then popped the new switch into the hole. That's it! Lights began working again.