79032639311 Kenmore Range - Overview

Diagrams for 79032639311

See every part. Know exactly what you need.

Enter a part description. DIY Heroes keep it simple, eg. "belt" or "pump".

Search filter:
Clear Filter
Your search term must have 3 or more characters.
LP Conversion Kit – Part Number: GRLP4
$82.62
In Stock
LP Conversion Kit
★★★★★
★★★★★
(10)
Part #GRLP4
The LP conversion kit is used in ranges
Meat Probe Sensor – Part Number: 5304504202
$145.14
In Stock
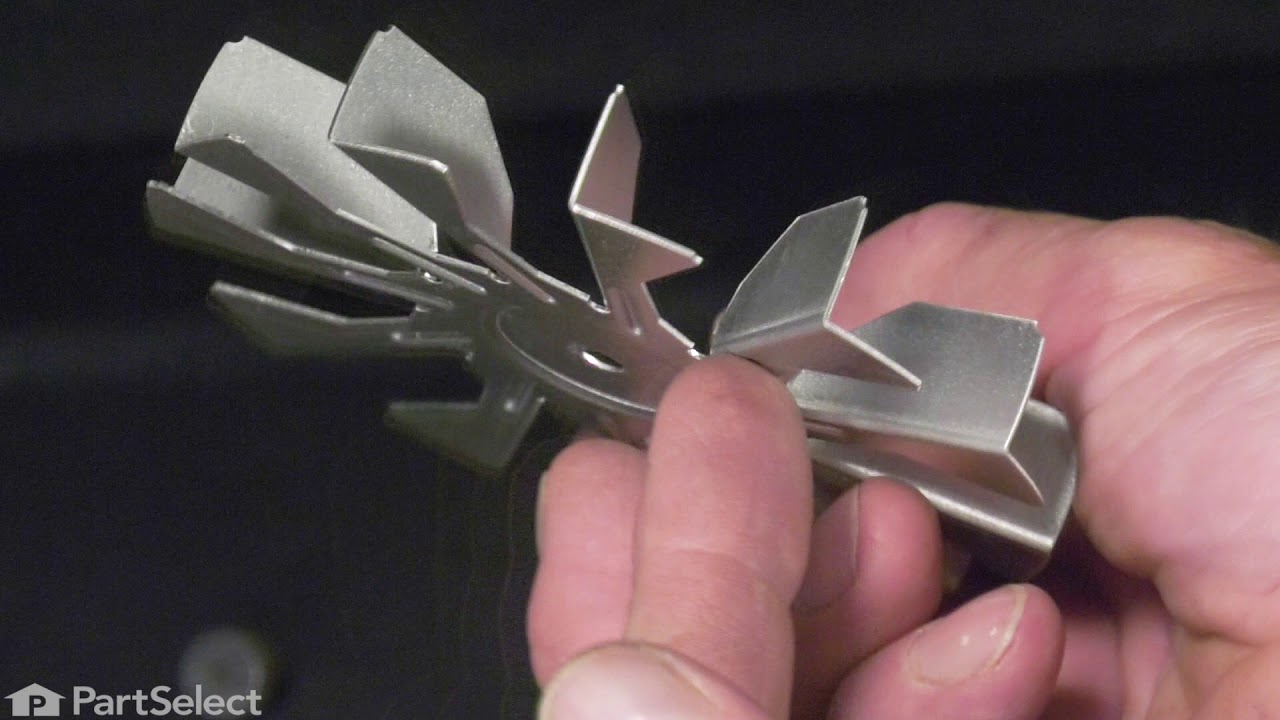
Convection Fan Blade – Part Number: 318398302
$43.07
In Stock
Convection Fan Blade
★★★★★
★★★★★
(5)
Part #318398302
This convection fan blade is designed for use with various makes and models of range and oven and is sold as an individual part. Made of metal and measuring approximately 4.75-inches in diameter, this genuine OEM fan blade works with the convection motor to circulate and distribute heat evenly throughout the oven. If your oven is not getting hot enough or the heat is not circulating properly, or if the fan blade in your oven has become warped, damaged, or chipped, it needs to be replaced immediately. To replace the fan blade, disconnect your range from the power and locate the fan assembly. With the appropriate screwdriver and wrench, remove any assembly covers and the securing nut from the blade. Once the nut is removed, install the new blade and secure it and re-install the cover.
CAP – Part Number: 5304508441
$52.38
In Stock
CAP
★★★★★
★★★★★
(2)
Part #5304508441
Sold individually. This part helps the flame to spread for even heat. Also protects your burner head from spills.
Igniter, Broil – Part Number: 5303935059
$132.46
In Stock
Igniter, Broil
★★★★★
★★★★★
(6)
Part #5303935059
This genuine OEM oven broil igniter kit is designed to reliably ignite the gas burner, restoring proper heating performance to your appliance. Featuring a durable flat ceramic construction with an integrated half-shield, it helps protect the igniter while ensuring consistent ignition. The included 18-inch wire leads provide flexibility for installation, making it a convenient replacement for a worn or failed igniter. Ideal for resolving issues such as slow preheating, failure to ignite, or lack of heat, this component helps restore efficient and dependable oven operation.
Fan Blade Retainer Nut – Part Number: 316136600
$39.95
In Stock
Igniter/Orifice Mounting Screw – Part Number: 316240600
$26.95
In Stock
Igniter/Orifice Mounting Screw
Part #316240600
This part is the igniter/orifice mounting screw for your cooktop or range. It is approximately ½ an inch in length and is made of metal. The mounting screw connects the orifice to the cooktop. If the orifice is loose, or the screw is missing, this is the part that will replace it. This part is sold individually and is a genuine OEM part sourced directly from the manufacturer.
Door Spacer – Part Number: 318165800
$36.95
In Stock
Door Spacer
Part #318165800
Left Front Orifice - 9.5K – Part Number: 316527500
$38.00
In Stock
Left Front Orifice - 9.5K
★★★★★
★★★★★
(1)
Part #316527500
This orifice is a replacement fuel-delivery component designed to regulate gas flow to a burner. It plays a critical role in maintaining proper flame size and efficiency and is commonly replaced when flow becomes restricted or uneven.
Leveling Leg – Part Number: 318175510
$43.37
In Stock
Leveling Leg
Part #318175510
Sold individually.
REGULATOR – Part Number: 316091711
$113.66
In Stock
REGULATOR
★★★★★
★★★★★
(3)
Part #316091711
This is a genuine use wci regulator, which works with ranges.
SCREW – Part Number: 316021109
$29.95
In Stock
SCREW
Part #316021109
Sold Individually.

Common Symptoms of the 79032639311

How this model fails, and the parts that fix it.

Watch our pros, then fix it yourself.
See how others fixed this model. Time, tools, difficulty, and steps that lead to victory! View More

Search repair tips from other customers using simple keywords like "replace", "fit", "remove", "inspect". DIY doesn't mean you have to do it alone!

Search filter:
Clear Filter
Your search term must have 3 or more characters.
replacing the fan on a convection oven (fan was making a vibration noise)
17 of 26 people found this instruction helpful.
  • John from Stevensville, MD
  • A Bit Difficult
  • 30 - 60 mins
  • Pliers, Screw drivers, Socket set
This was the first time replacing the fan. It is a lot easier to work in the oven compartment with the oven door removed, only two screws on the door and the hinges were released. I found that a couple of the screws were either rusted or stripped so I used a pair of pliers to remove the screws that were holding the diffuser in place. O nce there was access to the fan I found that the fan was warped and that the blades were scraping against the back wall of the oven. The next challenge was to remove the retaining nut. I used a sheet metal screw to secure the warped fan to keep it from spinning. once I figured out that you have to turn the retaining nut to the right to loosen, it came off easily. 1/2" socket with extension. When I replace the fan I used two washers for spacers to make sure that the fan would not scrape the wall of the oven. Its been tested many times and the oven does not make that horrible sound anymore.
Was this helpful?
Thank you for voting!
Original Meat Probe insulation separated on the probe end
5 of 6 people found this instruction helpful.
  • john from PITTSFIELD, MA
  • Really Easy
  • Less than 15 mins
I searched the web for a replacement and Parts Select had a picture and part number for the exact same probe. I ordered the probe and it arrived very quickly. The problem was that the probe I received didn't match the picture as shown on the web site. Instead I received a probe that was a different color and the actual probe was about 2" shorter than the one I was replacing. I called customer service and was told that the probe I received was the new version that the older version was discontinued. If they had updated their pictures on the web site I would not have ordered the probe. Parts Select customer service did apologize for the issue and offered to have me return for a refund.

I will order from Parts Select but I will call first to verify that the item pictured is the actual item being shipped. Parts Select please update the part pictures to show the actual items being sold.
Was this helpful?
Thank you for voting!
Replace igniter
1 person found this instruction helpful.
  • Edward from NORWOOD, PA
  • Really Easy
  • 15 - 30 mins
New part needed to be spliced to old connector with porcelain wire nuts then removed lower oven drawer to access the connection for igniter
Was this helpful?
Thank you for voting!