Models > 72180403402

72180403402 Kenmore Microwave - Overview

Sections of the 72180403402

[Viewing 7 of 7]

Manuals & Care Guides for 72180403402

Click to download
Keep searches simple, eg. "belt" or "pump".
Door Handle – Part Number: 5304440323
Door Handle
★★★★★
★★★★★
(4)
PartSelect #: PS979589
Manufacturer #: 5304440323
Screws NOT included.
$213.57
  In Stock
FILTER,GREASE – Part Number: 5230W1A012E
FILTER,GREASE
PartSelect #: PS12713651
Manufacturer #: 5230W1A012E
Sold individually.
$18.02
  In Stock
Light Bulb - 120V 30W – Part Number: 6912W1Z004B
Light Bulb - 120V 30W
★★★★★
★★★★★
(3)
PartSelect #: PS3530415
Manufacturer #: 6912W1Z004B
$20.36
  In Stock
Charcoal Filter – Part Number: 5230W1A003A
Charcoal Filter
★★★★★
★★★★★
(3)
PartSelect #: PS3527523
Manufacturer #: 5230W1A003A
This is an authentic LG charcoal filter for your microwave, sourced directly from the manufacturer. It is designed to remove odors from the air that circulate through your microwave vent. It measures ...
$53.43
  In Stock
Damper – Part Number: 4900W1A001B
Damper
★★★★★
★★★★★
(2)
PartSelect #: PS3524148
Manufacturer #: 4900W1A001B
This metal vent damper door closes off the exhaust duct when the fan is not running to stop outside air from entering the microwave unit, and opens when the fan turns on to allow air to vent away from...
$17.95
  In Stock
Air Duct Bracket – Part Number: 4810W1A151A
Air Duct Bracket
PartSelect #: PS3523851
Manufacturer #: 4810W1A151A
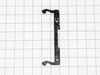
This bracket holds the metal or plastic flapper that closes off the exhaust duct when the fan is not running and opens when the fan turns on. If the exhaust fan on your microwave does not appear to be...
$27.08
  In Stock
Locker – Part Number: 4026W2A019A
Locker
★★★★★
★★★★★
(2)
PartSelect #: PS3522838
Manufacturer #: 4026W2A019A
The locker, or door latch assembly fits to the inside of the microwave door, and keeps the door closed. If the door on your microwave oven doesn’t appear to close properly, you may have a problem with...
$10.42
  In Stock
Motor, AC Synchronous – Part Number: 6549W1S013H
Motor, AC Synchronous
★★★★★
★★★★★
(1)
PartSelect #: PS3529216
Manufacturer #: 6549W1S013H
If the turntable on your microwave does not rotate, or you can hear a grinding noise, the problem may be with the motor. The motor is typically located below the floor of the oven, and is accessed thr...
$46.69
  In Stock
Micro Switch – Part Number: 6600W1K001R
Micro Switch
PartSelect #: PS3598700
Manufacturer #: 6600W1K001R
$17.18
  On Order
Spring – Part Number: 4970WRA001G
Spring
★★★★★
★★★★★
(1)
PartSelect #: PS3524607
Manufacturer #: 4970WRA001G
$10.42
  In Stock
Holder,Cook Auxiliary – Part Number: 4930W1A069A
Holder,Cook Auxiliary
PartSelect #: PS3524335
Manufacturer #: 4930W1A069A
$18.17
  In Stock
Hardware Mounting Kit – Part Number: 3861W1A043C
Hardware Mounting Kit
PartSelect #: PS3522503
Manufacturer #: 3861W1A043C
$43.71
  In Stock

Questions And Answers for 72180403402

Be the first to ask our experts a question about this model!

Common Symptoms of the 72180403402

[Viewing 5 of 5]
Won’t turn on
Fixed by
these parts
Fixing Fixing Fixing
Show All
Door not closing properly
Fixed by
these parts
Fixing Fixing Fixing
Show All
No heat
Fixed by
these parts
Fixing Fixing Fixing
Show All
Tray won’t turn
Fixed by
these parts
Fixing Fixing
Show All
Doesn’t shut off
Fixed by
these parts
Fixing Fixing
Show All
Keep searches simple. Use keywords, e.g. "leaking", "pump", "broken" or "fit".
Microwave would not rotate or heat up food.
After watching a few youtube videos, I used a phillips SD to take controll pannel off to access the switches that sense when microwave door is closed. Swapped out all 3 switched and mocrowave works like new. $20 fix (shipping included)
Parts Used:
Switch,Micro Switch,Micro
  • Joshua from WHITE LAKE, MI
  • Difficulty Level:
    Very Easy
  • Total Repair Time:
    15 - 30 mins
  • Tools:
    Screw drivers
44 of 60 people found this instruction helpful.
Was this instruction helpful to you?
Thank you for voting!
Broken Handle
Removed the retaining clip that keeps the door on, took the door off. Removed the plastic rim that is clipped into place. Removed old screws holding on handle and replaced.
Parts Used:
Door Handle
  • Brent from Bend, OR
  • Difficulty Level:
    Easy
  • Total Repair Time:
    Less than 15 mins
  • Tools:
    Screw drivers
42 of 61 people found this instruction helpful.
Was this instruction helpful to you?
Thank you for voting!
Handle was broken R&R required.
Open the door and start at the outside perrimeter of the plastic moulding by inserting the putty knife and gently prying up.I started at the 2 latches that secure the door when it closes.Work your way around to the top and bottom. I was able to leave the portion of the plastic moulding by the door hinges still intact while removing the screws for the handle and replacing with the new one.After handle is on gently snap moulding back in place.Remember start at the inside of the door in the small opening at the outter edge of the door.
Parts Used:
Door Handle
  • Frank from Punta Gorda, FL
  • Difficulty Level:
    A Bit Difficult
  • Total Repair Time:
    Less than 15 mins
  • Tools:
    Screw drivers
22 of 28 people found this instruction helpful.
Was this instruction helpful to you?
Thank you for voting!