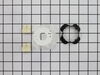
This coupling kit is located between the motor and the transmission on direct drive washers with no belt. This is the newer version and is made with new metal sleeves for added strength.
The suspension spring supports the outer tub and keeps the tub steady during loads that could cause an unbalance. If this part breaks, is worn down or has stretched out and lost its spring, it could c...
This 18 ml bottle of white appliance touch-up paint is used to cover scratches or marks on your appliance. The white touch-up paint can be used on refrigerators, microwaves, ranges, clothes dryers, an...
This white thrust spacer is made of plastic and is also commonly referred to as a retainer ring. It is used in the agitator assembly of many direct drive washing machine models. This is the retaining ...
This agitator repair kit comes with a long cam, a thrust spacer and four dogs ears (agitator cogs). This repair kit is used to move the upper agitator and it connects the base of the agitator with th...
This hose clamp extends from half an inch to an inch in diameter. It is made entirely of metal and is intended for use with Maytag brand washing machines.
$11.68
In Stock
Questions And Answers for 3RATW3005TQ0
Be the first to ask our experts a question about this model!
✖
Ask a Question
Ask our experts a question on this model and we'll respond as soon as we can.
The job looked intimidating but turned out to be very easy. First take off the water pump by removing the two clips that hold it in place. Place a shallow pan under the pump to catch the water that is in the pump and hoses. Open the hose clamps with a pair of pliers or channel locks (better) and slide the hoses off of the water pump. The motor comes off next. Unplug the electrical connector from the motor and two wires from the capacitor. Remove the two screws holding the clamps in place and then pop off the two clamps. You will need to hold up the motor with one hand while you remove the clamps or it will fall to the floor once the clamps are removed. One piece of the coupling assemble will be attached to the motor and the other will be attached to the gearcase drive shaft. If you want to clean up the mess created by the shredded rubber center piece of the coupling assembly you will have to take off the motor mounting plate. It is held on by two bolts and removing it makes installing the coupling easier but probably not necessary. Push the back half of the coupling on to the gearcase drive shaft until the shaft is flush with the face of the coupling. Install the new rubber center piece on to the coupling then re-install the motor mounting plate. Install the other half of the coupling on to the motor shaft and lift the motor up to the coupling. You have to rotate the motor shaft by spinning the fan blades until the coupling lines up so you can slide it into the other half of the coupling. Then just reattach the motor, connectors and water pump in the reverse order of disassembly.
If you load a washing machine unevenly, it will spin out of balance. But our washer seemed to make noise during the spin cycle regardless of how the load was distributed. I suspected that the suspension or balancing springs were getting tired, and ordered a replacement set.
First I disconnected the washer from the water and power supply, then I laid it on its back.
The tub rested on the back of the washer, making two of the three suspension springs relax, and they were pretty easy to pull out with pliers. After the first two were out, I had to support the tub with a couple 2x4s to relax the third suspension spring.
Installation was the reverse of removal - install the lower suspension spring, remove the 2x4s, then install the two other suspension springs.
The tub balancing spring was easy to replace, and probably wasn't the cause of the problem.
With $25 in parts and about 15 minutes, my washer spins much more quietly.
I removed the two screws on the back of the control panel. The control panel then flips back. The switch is on the left side. To remove the switch, I first detached the wire to the control panel and unscrewed the grounding wire. The new switch drops right in. I had a little trouble getting it in until I realized the washer lid had to be open. A little awkward but once it's in you can shut the lid and then I reattached the wire from the control panel and screwed in the grounding wire. Pretty easy. $20 for the part (with shipping) and 15 minutes. Way cheaper than a repairman.


 Diagram and Parts List for Admiral Washer")