Models > 3ET18NMXFW00

3ET18NMXFW00 Whirlpool Refrigerator - Overview

Sections of the 3ET18NMXFW00

[Viewing 6 of 6]

Manuals & Care Guides for 3ET18NMXFW00

Click to download
Keep searches simple, eg. "belt" or "pump".
Refrigerator Crisper Drawer – Part Number: W10854037
Refrigerator Crisper Drawer
★★★★★
★★★★★
(11)
PartSelect #: PS11731260
Manufacturer #: W10854037
$148.13
  In Stock
Touch-Up Paint - White – Part Number: 72017
Touch-Up Paint - White
★★★★★
★★★★★
(16)
PartSelect #: PS385132
Manufacturer #: 72017
This 18 ml bottle of white appliance touch-up paint is used to cover scratches or marks on your appliance. The white touch-up paint can be used on refrigerators, microwaves, ranges, clothes dryers, an...
$10.20
  In Stock
Refrigerator Door Switch – Part Number: W11384469
Refrigerator Door Switch
★★★★★
★★★★★
(27)
PartSelect #: PS12728638
Manufacturer #: W11384469
Door switch turns the light off when you close the door.
$49.07
  In Stock
Crisper Drawer Rail – Part Number: WP2163835
Crisper Drawer Rail
★★★★★
★★★★★
(15)
PartSelect #: PS11738956
Manufacturer #: WP2163835
This part goes in the center of the crisper shelf and acts as a support.
$33.28
  In Stock
Replacement Ice Maker – Part Number: 4317943
Replacement Ice Maker
★★★★★
★★★★★
(10)
PartSelect #: PS358591
Manufacturer #: 4317943
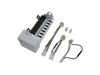
***NOTE: Ice maker does NOT come with the bail or shut off arm. You must order them separately if required. It does come complete with flat and round plug wiring harness, the mounting hardware, and th...
$187.53
  In Stock
Hinge Bracket – Part Number: WP2183805
Hinge Bracket
★★★★★
★★★★★
(3)
PartSelect #: PS11739061
Manufacturer #: WP2183805
This part is used to support the hinge.
$13.68
  In Stock
Screw – Part Number: WP681249
Screw
PartSelect #: PS11743743
Manufacturer #: WP681249
Sold individually.
$6.91
  In Stock
Crisper Drawer - Clear – Part Number: W10856580
Crisper Drawer - Clear
★★★★★
★★★★★
(3)
PartSelect #: PS11731329
Manufacturer #: W10856580
This is a replacement crisper drawer for your refrigerator. The drawer is approximately 24 inches long, 11 inches wide, and 12 inches tall. It is made of clear plastic and is sold individually. The cr...
$136.15
  In Stock
Water Fill Cup and Bearing – Part Number: WP628356
Water Fill Cup and Bearing
★★★★★
★★★★★
(1)
PartSelect #: PS11743318
Manufacturer #: WP628356
This icemaker water inlet cup is three inches long. It is all white in color and is made of plastic.
$51.52
  In Stock
End Cap Trim Piece – Part Number: WP2156006
End Cap Trim Piece
PartSelect #: PS11738928
Manufacturer #: WP2156006
Sold individually.
$8.51
  In Stock
Door Shelf End Cap - Left or Right Side – Part Number: WP2195916K
Door Shelf End Cap - Left or Right Side
PartSelect #: PS11739204
Manufacturer #: WP2195916K
Sold Individually.
$14.00
  In Stock
Screw – Part Number: WP489497
Screw
PartSelect #: PS11742758
Manufacturer #: WP489497
Sold individually.
$17.06
  In Stock

Questions And Answers for 3ET18NMXFW00

Be the first to ask our experts a question about this model!

Common Symptoms of the 3ET18NMXFW00

[Viewing 13 of 13]
Ice maker not making ice
Fixed by
these parts
Fixing Fixing Fixing
Show All
Light not working
Fixed by
these parts
Fixing Fixing
Show All
Leaking
Fixed by
these parts
Fixing Fixing Fixing
Show All
Door won’t open or close
Fixed by
these parts
Fixing Fixing Fixing
Show All
Ice maker won’t dispense ice
Fixed by
these parts
Fixing Fixing Fixing
Show All
Noisy
Fixed by
these parts
Fixing Fixing
Show All
Ice maker dispenses too much ice
Fixed by
these parts
Fixing Fixing
Show All
Ice maker dispenses too little ice
Fixed by
these parts
Fixing
Show All
Fridge too warm
Fixed by
these parts
Fixing Fixing
Show All
Door Sweating
Fixed by
these parts
Fixing Fixing
Show All
Not dispensing water
Fixed by
these parts
Fixing
Show All
Fridge too cold
Fixed by
these parts
Fixing
Show All
Won’t start
Fixed by
these parts
Fixing
Show All
Keep searches simple. Use keywords, e.g. "leaking", "pump", "broken" or "fit".
Ice Maker quit working, I could manually cycle unit but then the water would overflow when unit was re-filling.
I backed out the 2 top screws about a quarter inch and then removed bottem screw with a quater inch nut driver. I then lifted Ice Maker clear of the two top screws and lowered it enough to unclip the power connection with a small screwdriver. The new Ice Maker was wired correctley for my refrigeator so all I had to do wea reconnect the power connection and mount new Ice Maker on the two top screws and install the bottem screw. It took e while for the new Ice Maker to start it's cycle but after it did, it worked GREAT. Part Select service was OUTSTANDING, ordered part one day and received the next. THANKS!!!!
Parts Used:
Replacement Ice Maker
  • Max from Green Castle, IN
  • Difficulty Level:
    Really Easy
  • Total Repair Time:
    15 - 30 mins
  • Tools:
    Nutdriver, Screw drivers
584 of 619 people found this instruction helpful.
Was this instruction helpful to you?
Thank you for voting!
No Ice in the Ice Maker
I am NOT a handyman, and my family laughed at me when I said I was going to fix the ice maker all by myself. I ordered a replacement ice maker. When it arrived, I opened the box and read the instructions. It seemed easy. I removed the old ice maker, with a socket set. I then took off the shut off lever from the old one and placed it on the new one, since the new one didn't come with it. I then put the new one in place. All the parts fit perfectly. The ice machine was making ice within an hour. My family was amazed... and I got the last laugh!
Parts Used:
Replacement Ice Maker
  • Chris from Duluth, GA
  • Difficulty Level:
    Really Easy
  • Total Repair Time:
    Less than 15 mins
  • Tools:
    Socket set
195 of 224 people found this instruction helpful.
Was this instruction helpful to you?
Thank you for voting!
The Bearing Cup Assembly was broken and ice would jamb against it during the ice making cycle.
I removed the ice maker from the refrigerator, by removing one screw on the underside bracket and loosening the two screws at the top side, then lifting the ice maker off the loosened screws. I then unplugged the electrical harness that supplies power from the refrigerator to the ice maker. I then disassembled the ice maker by removing the front cover which is snapped in place, then removing two recessed screws at the front. I removed the broken part, I then reassembled the ice maker with the new part. I replaced the two recessed screws at the front and snapped on the cover. Then I reinstalled the ice maker in the refrigator by plugging in the harness, slipping the ice maker over the loosened screws in the refrigerator and replacing the screw that was removed from the underside bracket. Tightening all the screws completed the project.
Parts Used:
Water Fill Cup and Bearing
  • David from Chester, CA
  • Difficulty Level:
    Really Easy
  • Total Repair Time:
    Less than 15 mins
  • Tools:
    Nutdriver, Screw drivers
107 of 133 people found this instruction helpful.
Was this instruction helpful to you?
Thank you for voting!