These agitator directional cogs are commonly referred to as dog ears. They come four to a package and are usually used with direct drive washing machines.
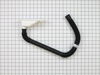
This pump is intended for use with washing machines that do not have belts. This drain pump has two ports for water to pass through: a large one, and a smaller one.
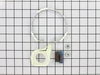
The suspension spring supports the outer tub and keeps the tub steady during loads that could cause an unbalance. If this part breaks, is worn down or has stretched out and lost its spring, it could c...
A worn clutch can cause a slower spin speed which will leave your clothes wet after a cycle. This clutch assembly comes with brake cam driver, blue spring for large capacity washers and black spring f...
This 18 ml bottle of white appliance touch-up paint is used to cover scratches or marks on your appliance. The white touch-up paint can be used on refrigerators, microwaves, ranges, clothes dryers, an...
This white thrust spacer is made of plastic and is also commonly referred to as a retainer ring. It is used in the agitator assembly of many direct drive washing machine models. This is the retaining ...
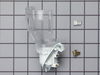
This agitator repair kit comes with a long cam, a thrust spacer and four dogs ears (agitator cogs). This repair kit is used to move the upper agitator and it connects the base of the agitator with th...
First pry off the cap of the agitator. Then using a socket remove the bolt that holds the plastic cup in place. Remove this cup by prying it loose from the two tabs that hold it in place. Once this cup is removed you can get to the broken cogs. Slip the new cogs into the underside of the cup, and slide the cup back down in the agitator housing using the slots on the side for a guide. (You may want to remove the entire agitator and assemble everything upside down, then flip it all back over to mount, so the cogs don't fall out). Tighten the bolt, snap the cap back in place on top of the agitator and your'e done. Easy repair.
The hardest part of this job was pulling the machine away from the wall so the hoses could be disconnected and the machine flipped onto it's back. Putting the machine on it's back does two things. It drains the water left in the bottom of the tub so it won't pour out onto the motor when the old pump is removed, and gives the necessary access to the pump. Once the machine is on it's back you remove the hose clamps with a pair of pliers and disconnect the hoses. The pump is secured to the motor with a pair of spring steel retaining clips which are easily popped off by hand. Once the clips are removed, the pump is in your hand. Put the new pump in place, replace the retaining clips and hoses, and you're done. This has to have been the easiest repair I've ever done. I wish cleaning gutters was this easy.