Models > 1106007800

1106007800 Kenmore Dryer - Overview

Sections of the 1106007800

[Viewing 5 of 5]
Keep searches simple, eg. "belt" or "pump".
Light Bulb - 40W – Part Number: 8009
Light Bulb - 40W
★★★★★
★★★★★
(28)
PartSelect #: PS884734
Manufacturer #: 8009
This an authentic OEM 40-Watt replacement light bulb, used in a number of household appliances. It is specially designed to withstand extreme temperatures, which is why these replacement bulbs are mos...
$14.96
  In Stock
Condenser Fan Motor Kit – Part Number: 833697
Condenser Fan Motor Kit
★★★★★
★★★★★
(16)
PartSelect #: PS395284
Manufacturer #: 833697
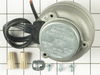
This condenser fan motor operates in a clockwise fashion and carries carries 2W and 115V. It comes with screws, a mounting nut for the blade and a cushion. This part provides forced-air cooling for the condenser coil.
$86.76
  In Stock
Thrust Washer – Part Number: WP233520
Thrust Washer
PartSelect #: PS11740482
Manufacturer #: WP233520
This washer is 3/4 inches in diameter.
$10.14
  In Stock
Screw, 8/18 x 3/8 – Part Number: WP90767
Screw, 8/18 x 3/8
PartSelect #: PS11746840
Manufacturer #: WP90767
This screw is sold individually.
$6.91
  In Stock
Hex Nut – Part Number: WP488130
Hex Nut
PartSelect #: PS11742711
Manufacturer #: WP488130
Part may differ in appearance, but functions same as original.
$12.19
  In Stock
Front Top Lock – Part Number: WP18776
Front Top Lock
PartSelect #: PS11738705
Manufacturer #: WP18776
This part is used to secure the top panel to the cabinet. Sold individually.
$16.82
  In Stock
Clamp-Motor – Part Number: WP660658
Clamp-Motor
PartSelect #: PS11743369
Manufacturer #: WP660658
This clamp is used to secure the drive motor.
$14.19
  In Stock
Screw – Part Number: WP681414
Screw
PartSelect #: PS11743744
Manufacturer #: WP681414
This screw is sold individually.
$9.89
  In Stock
High Limit Thermostat – Part Number: WP696818
High Limit Thermostat
PartSelect #: PS11743802
Manufacturer #: WP696818
L200-40F
$65.55
  Special Order
Door Cable – Part Number: WP230131
Door Cable
PartSelect #: PS11740194
Manufacturer #: WP230131
This dryer door cable is intended for use with spring part number PS343422. This cable is compatible with many of Whirlpool/Kenmore's brands of gas and electric clothes dryers.
$12.55
  In Stock
Pressure Regulator – Part Number: WP4454571
Pressure Regulator
PartSelect #: PS11742618
Manufacturer #: WP4454571
This valve will automatically cut off the flow of gas when it reaches a certain pressure.
  No Longer Available
SEAL-DOOR – Part Number: W11613302
SEAL-DOOR
PartSelect #: PS16744945
Manufacturer #: W11613302
Adhesive sold separately.
$32.06
  In Stock

Questions And Answers for 1106007800

Be the first to ask our experts a question about this model!

Common Symptoms of the 1106007800

[Viewing 12 of 12]
Noisy
Fixed by
these parts
Fixing Fixing Fixing
Show All
Fridge too warm
Fixed by
these parts
Fixing
Show All
Freezer section too warm
Fixed by
these parts
Fixing
Show All
Fridge runs too long
Fixed by
these parts
Fixing
Show All
Door won’t close
Fixed by
these parts
Fixing Fixing
Show All
Fridge and Freezer are too warm
Fixed by
these parts
Fixing
Show All
Will Not Start
Fixed by
these parts
Fixing
Show All
Will not agitate
Fixed by
these parts
Fixing
Show All
Burning smell
Fixed by
these parts
Fixing
Show All
Leaking
Fixed by
these parts
Fixing
Show All
Spins slowly
Fixed by
these parts
Fixing
Show All
Too warm
Fixed by
these parts
Fixing
Show All
Keep searches simple. Use keywords, e.g. "leaking", "pump", "broken" or "fit".
Sometimes the condenser fan would start causing the refrigerator to overheat.
Unplug the appliance.
Removed the screws holding the back panel.
Removed the fan blade.
removed 3 screws holding the condenser fan.
Remove the 3 metal brackets attached to the fan.
(First note which studs the brackets are attached to. Attach the 3 metal brackets to the new fan. (New screws were supplied)
Cut and strip the wire about two inches from the fan.
Cut and strip the new wire. I cut the new wire in half (about 6 inches.) Connect the two wires, twist and used 2 wire nuts. Tie wrap the wire to the wire harness. Mount the new fan (three screws)
Screw the back panel back on.
Mount the new
Parts Used:
Condenser Fan Motor Kit
  • Tom from Franklin, WI
  • Difficulty Level:
    A Bit Difficult
  • Total Repair Time:
    15 - 30 mins
  • Tools:
    Nutdriver, Pliers
180 of 204 people found this instruction helpful.
Was this instruction helpful to you?
Thank you for voting!
noisy fan motor
rmv panel (5min) rmv fan/motor 3 screws (10 m) cut wire 2in from motor, re route remainder of wire to front so can strip for wire nuts. ( 10m) attach old fan to new motor, place in old opening ,3 screws, a little fussy to align, ( 15m ) route and strip wire from new motor , zip ties work well, wire nuts , plug in fridge vola, no noise, close up, reverse panel. ( 20m). i also took time to clean grilles with small vac and damp rag, ( looks and sounds like new) bob Wi.
Parts Used:
Condenser Fan Motor Kit
  • robert from nashotah, WI
  • Difficulty Level:
    A Bit Difficult
  • Total Repair Time:
    30 - 60 mins
  • Tools:
    Nutdriver, Socket set
37 of 45 people found this instruction helpful.
Was this instruction helpful to you?
Thank you for voting!
Dryer door cable broken
1. Remove the lint filter. Then remove 2 screws at the lint filter housing.

2. At the back of the dryer, remove 2 screws that restrain the hinges for the dryer top. Do NOT remove the hinges.

3. Remove the front lower access panel. It snaps at the top and hinges at the bottom. It can be slipped off the hinges.

4. Remove 2 screws at the bottom of the main front panel

5. The front of the dryer top is held in place by two plastic clips. Use a flat blade screwdriver (with a rag wrapped around the tip to minimize paint damage) to pry the top up at each front corner. Then tilt the top up to just past vertical. You now can see the top of the spring that is connected to the door cable.

6. Open the dryer door. Use a putty knife to pry up the plastic plug that holds the cable in place at the door. Remove the old cable from the door and insert the new one. Be sure the cable end without a hole goes into the dryer door. Replace the plastic plug.

7. Feed the new cable through the main front panel and close the door.

8. Loosen but do NOT remove two screws that hold the main front panel to each side panel. Tilt the bottom of the front panel out about 2 inches.

9. Working through the gap between the main front panel and the side, hook the spring into the hole in the cable end.

10. Working through the open top and the gap on the side, move the spring+cable up to the top. Pass the upper end of the spring through the rectangular hole in the top of the main front panel and hook the end into the small hole there.

11. Repeat for other cable as needed.

12. Reassemble all parts. You may need to hold the top of the drum up as you move the main front panel back into place. Install the main front panel lower screws before tightening the upper screws.
Parts Used:
Door Cable
  • George from Rochester Hills, MI
  • Difficulty Level:
    Easy
  • Total Repair Time:
    30 - 60 mins
  • Tools:
    Nutdriver, Screw drivers
37 of 46 people found this instruction helpful.
Was this instruction helpful to you?
Thank you for voting!