This an authentic OEM 40-Watt replacement light bulb, used in a number of household appliances. It is specially designed to withstand extreme temperatures, which is why these replacement bulbs are mos...
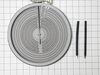
This is a heating element compatible with various makes of ranges and ovens and is sold as an individual part. Measuring 20.5-inches wide and 20.25-inches (with terminals) long, this heating element i...
This 18 ml bottle of white appliance touch-up paint is used to cover scratches or marks on your appliance. The white touch-up paint can be used on refrigerators, microwaves, ranges, clothes dryers, an...
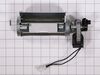
Whirlpool Genuine OEM W11107275 Range Cooling Fan Motor.
Possible Repair Solution For:
Will not start, takes too long to cool
Please Note: This is intended as a guideline only, as other items c...
This is a multi-use and multi-appliance screw. It can be used on a microwave, refrigerator, range/oven, air conditioner, dehumidifier, washer, or dryer. The measurements of this screw are 8 x 1/2 inch...
The light socket on your electric range connects the power source to the light bulb. If your oven light is malfunctioning, you may need to replace the light socket. The light socket is located in the ...
Ask our experts a question about this model and we'll get back to you as soon as possible!
2 questions answered by our experts.
< Prev
1
Next >
Sort by:
Search filter:
Clear Filter
Your search term must have 3 or more characters.
Keep searches simple. Use keywords, e.g. "leaking", "pump", "broken" or "fit".
Sorry, we couldn't find any existing answers that matched.Try using some different or simpler keywords, or submit your new question by using the "Ask a Question" button above!
Richard
March 28, 2023
I have a Whirlpool range. The front left triple burner stays on high when switched on. Can you tell me the part number for the infinite switch. It is difficult to figure out which infinite switch is for the triple front left burner. Also do you have installation instructions?
Thank you
For model number YWEE745H0FS1
Hi Richard, thank you for contacting us. The infinite switch, part number PS12114485, controls the left front triple burner of your cooktop.
The installation instructions are following.:1. Unplug the power
2. Open the oven door and use a Phillips head screwdriver to unthread the screws securing the control panels’ lower cover
3. Remove the cover.
4. Unthread the two screws securing the control panel to the frame.
5. Place a towel on the cooktop surface.
6. Detach the control panel.
7. Rest on the towel and pull off the left front surface element switch control knob.
8. Unthread the two screws securing the control knob bezel and the switch
9. Use a flathead screwdriver to help disconnect the three wire connectors to fully remove the old switch.
10. Install the new switch by following the same instructions in reverse order.
We hope this helps!
Hello Debbie, thank you for your question. We have researched the model you have provided, and part number PS16543518 is the correct part for your unit. We hope this helps!
I numbered every part. ex: 1 L., for first part removed left side. I used a magic marker to circle the holes and wrote the number of screws used on the part, set the srews in a separete place, so that I new where these screws went to. The cleanup was pretty time consuming, but I was able to keep my stove, when every repairman I called to fix my stove told me I was better off buying a new stove. ($600.00 stove 2 years old)Please Note: The insulation blanket needed for the entire stove is two pieces, the sides and top are one part # and the bottom and back, are another part #. I did not know this. I just purchased the top and sides. I got lucky, the back and bottom were still in good shape. So I guess I should have read the description of the part more carefully to see what it covers, before I ordered it. It took two people two hours to do the work, it was really nice to have an extra set of eyes, to remember what direction pieces of metal from the stove went. I would do it all over in a heart beat instead of buying a new stove.
Took 2 screws under front edge of smooth top. Unscrewed ground wire from back of smooth top unit. Unplugged 2 wire bundles, from back. Took bad element out , put in new one. Put back together. About 10 min's tops. Easy peasy.
Socket Lite come with clips attached to the outside of the housing. After you unhook the 3 lead wires that are attached to the unit. All you have to do is push in on the clips and release the unit. Then you snap in the new unit. Attach the 3 wire leads, put a oven bulb in the socket end, and the install the light cover