This dryer repair kit consists of five commonly replaced dryer parts: one multi-rib belt (part #661570V and measures 93 1/2 inches long), four drum support rollers, one idler assembly, nine tri-rings,...
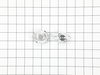
This Idler Pulley includes the tri-ring and gasket and everything included here is manufacturer-certified. This part maintains correct tension on the drive belt in order to spin the drum properly. If ...
This drum support roller is sold individually. Most dryers require two. The tri-rings are included. This is a drum support roller for a dryer. It is a genuine replacement part. The part includes the d...
The Drive Belt is a 93 1/2" belt which wraps around the dryer drum to allow tension and movement. If broken the dryer will not turn properly, or there may be loud noises. The part is rated as "medium"...
This thermostat may differ in appearance, but functions the same as the original part. This part controls the temperature of the inside of the dryer drum and prevents the dryer from overheating.
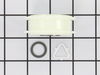
If you notice that your dryer is noisy or will not tumble, you may need to replace the tri ring. This part is triangular, and is less than an inch in size. Tri rings can be found both on the idler pul...
The idler pulley wheel is now sold with this arm. This idler pulley is for dryers.
Idler pulley maintains correct tension on the drive belt to spin the drum.
Also known as Thermal Cut-Off kit. The thermostat acts as a safety mechanism that keeps the dryer from overheating and the fuse is like a backup system - it's set to trip at a higher temperature than...
This is the moisture sensor for your dryer. It helps detect the amount of moisture in your clothes during the dryer cycle. If you notice your clothes are still wet after an automatic dryer cycle is do...
This 18 ml bottle of white appliance touch-up paint is used to cover scratches or marks on your appliance. The white touch-up paint can be used on refrigerators, microwaves, ranges, clothes dryers, an...
$10.21
In Stock
Questions And Answers for WED72HEDW1
Ask our experts a question about this model and we'll get back to you as soon as possible!
4 questions answered by our experts.
< Prev
1
Next >
Sort by:
Search filter:
Clear Filter
Your search term must have 3 or more characters.
Keep searches simple. Use keywords, e.g. "leaking", "pump", "broken" or "fit".
Sorry, we couldn't find any existing answers that matched.Try using some different or simpler keywords, or submit your new question by using the "Ask a Question" button above!
Sherry
December 31, 2019
Will not heat on any of the settings. Can i make the repairs?
For model number WED72HEDW1
Hello Sherry, thank you for your question. There are a few parts we would recommend testing to determine the issue. They are High Limit Thermostat and Thermal Cut-Off Kit Part Number: 279973, Thermostat, Internal-Bias Part Number: WP8577274, Thermostat Part Number: WP8557403, and Dryer Heater Element Part Number: WP8544771. Most of the time these heating issues are caused by one or more thermostats. The heating element is less common. Testing the thermostats are easy. Using a multimeter, Set your multimeter to the R X 1 setting. Take each of your meter's probes and touch one to each terminal. You are testing for continuity, and you should receive a reading of either zero or infinity. At room temperature, testing the thermostat should produce a reading of zero. But if a thermostat is tested when it is heated to its limit, a reading of infinity should be produced. We strongly recommend that you test your thermostat at room temperature. If the test you conduct with your thermostat does not produce these results, then you should replace the component. I hope this helps. Thank you and have a great day!
Was this helpful?
Thank you for voting!
Doug
March 20, 2023
How do i replace the fan? a piece of vacuum feel into lint filter slot and broke some of the plastic fan blades.
I it worth fixing and if so how difficult is it?
Ca you send a video clip.
For model number WED72HEDW1
Hello Doug, thank you for contacting us. We are providing you with the instructions that will help you replace the blower wheel.
1- Unthread the rear screws securing the top panel and slide the top panel back.
2- Unthread the control panel housing mounting screws and remove the control panel.
3- Remove the four lower mounting screws securing the front panel.
4- Open the door and remove the screws securing the top panel, and also unthread the top mounting screws.
5- Unthread the screws securing the control board support bracket.
6- Unthread the screws to release the lower support bracket and unthread the front bulkhead mounting screws.
7- Unthread the belt from the pulley and motor shaft.
8- Unthread the mounting screws and remove the blower cover.
9- Use a wrench to secure the motor shaft and a drive socket to loosen the blower wheel by rotating it clockwise.
We hope this helps, good luck with your repair!
Was this helpful?
Thank you for voting!
Steve
September 23, 2023
Dryer attempts to start then turns off immediately drum turns by hand vent and filter clean. What could cause this?
For model number WED72HEDW1
Hello Steve, thank you for reaching out. According to our research, there seems to be an error with the door switch, part number PS11753511. We hope this solves your problem!
Push control to start dryer tries to start drum turning then immediately stops.
Replaced door switch but did not correct the problem. Drum turns freely by hand.
For model number WED72HEDW1
Hello Steve, thank you for the question. Based on the description that you have provided, we would recommend checking the thermal fuse, part number PS11766766. We hope this sorts out your problem!
The issue was the idler pulley. First I began opening up the front panel based on a youtube video but soon realized the model was slightly different and required a lot more items to remove. I saw the pulley in the back with nothing in the way so I put the front panel crap back on and removed the rear panel. There it was, very simple to remove and replace. I'm not looking forward to drum rollers though. Hopefully they're aren't as difficult as they appear.
I asked for advise, looked around and priced heating elements and thermostats. This was the best combo offered for the price given. It was shipped and received it very quick. Installed it and 5 minutes later, she was running like a champ!
First I removed back and top of dryer, then the support braces holding the drum, after that I took the drum out and the blower covers and cleaned the whole dryer of lint and other debris. Installed the new belt and then reassembled the dryer.


 Diagram and Parts List for Whirlpool Dryer")