Models > PDT760SSFSS

PDT760SSFSS General Electric Range - Overview

Sections of the PDT760SSFSS

[Viewing 6 of 6]
Keep searches simple, eg. "belt" or "pump".
Drum Bearing Slide - White (Sold individually) – Part Number: WE1M504
Drum Bearing Slide - White (Sold individually)
★★★★★
★★★★★
(34)
PartSelect #: PS755842
Manufacturer #: WE1M504
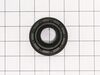
This authentic, white Drum Bearing Slide, also known as the bearing drum slide, glide, or pad, is a plastic, easy-to-install part for your dryer. It replaces the dryer's front drum slide to allow for ...
$11.80
  Special Order
Drum Bearing Slide - Green (Sold individually) – Part Number: WE1M1067
Drum Bearing Slide - Green (Sold individually)
★★★★★
★★★★★
(6)
PartSelect #: PS6447706
Manufacturer #: WE1M1067
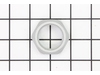
This original equipment manufacturer Drum Bearing Slide is a plastic, green, easy-to-install part for your dryer. It replaces the dryer's front drum slide to allow for easier movement. You'll know if...
$20.17
  Special Order
Drive Belt – Part Number: WE03X29897
Drive Belt
★★★★★
★★★★★
(15)
PartSelect #: PS16542496
Manufacturer #: WE03X29897
This Drive Belt is 89.5" long and comes in black, featuring four ribs on the inside for a better grip. This is a long belt that wraps all the way around the dryer drum, around a tension pulley, and th...
$38.35
  Special Order
Dual Radiant Element - 9 Inch – Part Number: WB30T10133
Dual Radiant Element - 9 Inch
★★★★★
★★★★★
(19)
PartSelect #: PS2321567
Manufacturer #: WB30T10133
The dual radiant element for your range or cooktop provides the heat that you cook with. It is found under the main cooktop. If your element will not heat, you will need to replace it with this part. ...
$159.04
  Special Order
Door Strike – Part Number: WE1X1192
Door Strike
★★★★★
★★★★★
(2)
PartSelect #: PS266893
Manufacturer #: WE1X1192
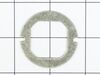
TThe door strike for your dryer is mounted on the dryer frame that the door shuts onto. It fits into the door catch on the door and keeps the door closed. If the door strike is damaged or missing, the...
$10.90
  Special Order
Lens – Part Number: WB25T10041
Lens
★★★★★
★★★★★
(2)
PartSelect #: PS1020380
Manufacturer #: WB25T10041
This part is a replacement lens for your oven or range. The lens is red in color, and when the elements are turned on, the light behind the lens will turn on to inform the user that the element is, in...
$11.80
  Special Order
Broil Element - 240V – Part Number: WB44K10002
Broil Element - 240V
★★★★★
★★★★★
(5)
PartSelect #: PS249236
Manufacturer #: WB44K10002
This broil element is found on the roof of the oven.
$133.49
  Special Order
Push-to-Start Switch – Part Number: WE4M416
Push-to-Start Switch
★★★★★
★★★★★
(2)
PartSelect #: PS3487190
Manufacturer #: WE4M416
This switch is used to activate the dryer.
$23.21
  Special Order
Temperature Sensor – Part Number: WB21X22134
Temperature Sensor
★★★★★
★★★★★
(2)
PartSelect #: PS10059162
Manufacturer #: WB21X22134
This temperature sensor detects the temperature within the oven cavity.
$48.99
  Special Order
LEG LEVELER – Part Number: WB02K10182
LEG LEVELER
PartSelect #: PS2339673
Manufacturer #: WB02K10182
$11.80
  Special Order
Door Switch – Part Number: WE4M415
Door Switch
★★★★★
★★★★★
(1)
PartSelect #: PS2344321
Manufacturer #: WE4M415
A door switch is a simple on/off mechanism that prohibits the dryer from operating when the door is open.
$39.78
  Special Order
RECEPTACLE PUSH-IN – Part Number: WB08T10026
RECEPTACLE PUSH-IN
★★★★★
★★★★★
(3)
PartSelect #: PS752188
Manufacturer #: WB08T10026
This part is the replacement light socket for your oven. The oven light socket provides power to the light, and at the same time holds the light bulb in place.
$14.50
  Special Order

Questions And Answers for PDT760SSFSS

Be the first to ask our experts a question about this model!

Common Symptoms of the PDT760SSFSS

[Viewing 16 of 16]
Noisy
Fixed by
these parts
Fixing Fixing Fixing
Show All
Element will not heat
Fixed by
these parts
Fixing Fixing Fixing
Show All
Marks left on clothes
Fixed by
these parts
Fixing Fixing
Show All
Little to no heat when baking
Fixed by
these parts
Fixing
Show All
Door won’t close
Fixed by
these parts
Fixing Fixing
Show All
Oven not heating evenly
Fixed by
these parts
Fixing Fixing
Show All
Drum Not Spinning
Fixed by
these parts
Fixing
Show All
Little to no heat when broiling
Fixed by
these parts
Fixing Fixing
Show All
Oven is too hot
Fixed by
these parts
Fixing
Show All
Leaking
Fixed by
these parts
Fixing Fixing Fixing
Show All
Will Not Start
Fixed by
these parts
Fixing Fixing Fixing
Show All
Won’t Start
Fixed by
these parts
Fixing Fixing Fixing
Show All
Door won’t close
Fixed by
these parts
Fixing
Show All
Touchpad does not respond
Fixed by
these parts
Fixing
Show All
Lid or door won’t close
Fixed by
these parts
Fixing
Show All
Will not drain
Fixed by
these parts
Fixing
Show All
Keep searches simple. Use keywords, e.g. "leaking", "pump", "broken" or "fit".
Drum belt broke
Removed the front Dryer panel. Left drum in place and lifted it up slightly to get access to motor drive. Slipped belt in place and put panel back on.
This was a first attempt ever at fixing an appliance and it was no big deal.
Parts Used:
Drive Belt
  • Adrian from Middletown, MD
  • Difficulty Level:
    A Bit Difficult
  • Total Repair Time:
    30 - 60 mins
  • Tools:
    Screw drivers
187 of 267 people found this instruction helpful.
Was this instruction helpful to you?
Thank you for voting!
Oven would go in to a F2 Error
Removed six 1/4" hex nuts on rear of oven. Then through front/inside removed a single 1/4" hex nut to actually remove sensor. Unplug sensor connector, remove. Reversed steps, push oven back in place and plugged in. Tested oven function.
Parts Used:
Temperature Sensor
  • Peter from stamford, CT
  • Difficulty Level:
    Really Easy
  • Total Repair Time:
    15 - 30 mins
  • Tools:
    Nutdriver
143 of 209 people found this instruction helpful.
Was this instruction helpful to you?
Thank you for voting!
Dryer would not start
The end repair was very simple and took minimal effort. The time and difficulty was all in the testing. I disassembled the dryer and removed the drum and then hard wired each thermo-fuse to determine where the fault was. After test all of those I was stumped. When I opened the door the light would not come on so I assumed it was a power fault closer to the source. However after all of my testing I couldn't find anything wrong. I then removed the light bulb and realized it was burned out which led me to the door switch being the fault. I removed the switch and soldered the three wire together and the dryer started right up! All I had to do was order a new $15 part, unsolder the wires and plug them in. Would have been so much simpler if that light bulb hadn't of been burned out causing me to over think my diagnosis. This was my first major appliance repair and I did it with only the help of the parts diagram provided on the website.
Parts Used:
Door Switch
  • Joshua from Dallas, TX
  • Difficulty Level:
    A Bit Difficult
  • Total Repair Time:
    1- 2 hours
  • Tools:
    Pliers, Screw drivers, Socket set
88 of 131 people found this instruction helpful.
Was this instruction helpful to you?
Thank you for voting!