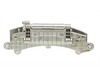
This pump helps expel water from the washing machine and is activated after the spin speed is maintained for a specific period of time. This part is used on front load models.
This 18 ml bottle of white appliance touch-up paint is used to cover scratches or marks on your appliance. The white touch-up paint can be used on refrigerators, microwaves, ranges, clothes dryers, an...
Sold individually. These shock absorbers keep the washer from vigorous shaking during its cycles. This shock absorber is for washers.
Shock absorber absorbs the vibrations and movements of the oute...
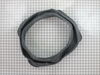
This is the replacement bellow clamp for your washer. It approximately 16 inches in diameter and is sold individually. The bellow clamp goes around the bellow in your washer and holds it in place on t...
This hose attaches to water pump assembly.
NOTE: As per the manufacture if the washer has an Eco Ball, it's no longer needed when the new hose is installed.
$47.85
In Stock
Questions And Answers for MHWE400WJ01
Ask our experts a question about this model and we'll get back to you as soon as possible!
2 questions answered by our experts.
< Prev
1
Next >
Sort by:
Search filter:
Clear Filter
Your search term must have 3 or more characters.
Keep searches simple. Use keywords, e.g. "leaking", "pump", "broken" or "fit".
Sorry, we couldn't find any existing answers that matched.Try using some different or simpler keywords, or submit your new question by using the "Ask a Question" button above!
Loretta
October 14, 2022
We require a new solinoid. The numbers we have detected on ours at the moment (which is defective) are:
C-25/5/09 (presuming that's a date)
33090043
461970254851
120V 50/60Hz
309X 90
Not sure what the part number would be so as to reorder.
Thanks for your help!
Loretta
For model number MHWE400WJ01
Hi Loretta,
Thank you for your question. The part number listed under your model number for the water inlet valve is PS11752082. If you need help placing an order for it, customer service is open 7 days a week and anyone will be happy to assist you. Please feel free to give us a call. We look forward to hearing from you!
Hi,
We are looking for bearings for this washer and possibly housing as well. Can you help identifying the part numbers? Thank you!
For model number MHWE400WJ01
Hello Remedios, thank you for your inquiry. The bearing you are looking for does not come separately and comes as a part of the outer tub, part number PS11703210. Customer service is available 7 days a week if you need help placing an order!
The first step is to remove the retainer ring that holds the outside of the bellow in place. To do this, Open the washer door as far as you can to get it out of the way. look underneath of the front of the bellow on the outside of the washer where it meets the door. Put your head almost on the floor and look up. You will find a spring streached about 3" connected to a small diameter wire (1mm.) that runs all the way around the outside portion of the bellow. Use a small screwdriver or other to pull and pry the spring away from the rubber bellow. Be careful not to damage the spring or ring. Once you have grip on it, pull it carefully toward you then up and off of the bellow.
The front portion of the bellow is now free and can be peeled off. Start at any point and pull the rubber bellow in toward the opening of the washer, it comes off easily. When you get to the detergent outlet on the upper left side, grab the plastic tube and carefully pull the bellow from around it. There is no adhesive or clamp holding this in place, just friction. Remove the rest of the front portion of the bellow. Push as much of the bellow into the washer as possible to get it out of the way.
Once this is off comes the slightly tricky part. Look up at the top right portion of the bellow that is still attached. You may need to feel with your hand but you should be able to see it. You are looking for the screw/nut end of a giant hose clamp. This hose clamp goes around the entire bellow and the secures it to the portion that holds the basket. This is where the stubby screw driver comes in handy. There is not nearly enough room for a standard one and a nut driver or wratchet are too big. The nut will be pointing down and will need to be replaced the same way. Loosen the hose clamp almost all of the way, not necessary to have the hose clamp come completely apart. You can now remove the entire hose clamp from around the bellow by pulling it forward. You will need to remove the hose clamp from the washer. To do this, squeeze it in from the sides about 6", don't kink it. Push it down toward the floor between the basket and the metal front panel. You will now be able to remove it from the top of the opening and be able to pull the bottom portion out. Pull the old bellow completely out, very easy to do.
Time to install the new bellow. Figure out which side goes in and which faces out. The big hint is that the water inlet is on the upper left side. You will notice at the top of the bellow on the portion that goes inside of the washer, you will find a small triangular shaped tab about 1/4" high. This is your centering mark. This will be at the very top. If you keep this at the top, everything will line up perfectly.
Slip the bellow over the edge of the portion that holds the basket where you removed the old one. I started at the top and worked left so I could install the detergent inlet tube. Pull this through the bellow carefully. It doesn't take a lot of force. As you are pressing the bellow on this lip, you will notice that there is a 1/2" high back stop all of the way around. This is great because as you press it on, there is a positive stop and you can't go further than necessary. Continue to press it in all of the way around.
Now it is time to install the Hose clamp. Un bend anything that might have bent on the clamp. With the nut at the top or top right with the nut facing down to the floor while holding it vertically, squish it slightly inward, put the bottom portion in first then the top portion. Orient is as it was when you took it off. Slide it around the bellow. You will feel a positive stop. Grab the stubby screwdriver and tighten down the hose clamp. I did about a medium force when tightening. It doesn't take a lot of force.
Now it is time to pull the remaining part of the bellow out of the basket and fit it into place. Press it around the outside portion of the opening so it hooks over the lip. This w
(1) First I unpluged the washer then I removed the water from the tube with a water vac.(2) Then I removed the three (3) screws that holds the front panel, using a Torx T-20 socket. ( this is a front load washer ). The panel is below the loading door. (3) I packed towels under the washer. (4) I slowly removed the cleanout in the front of the pump, using the water vac to catch the water as it leaked out. (5) I removed the wiring to the motor. (6) I removed the screw that holds the pump in place with a Torx T-20 socket. (7) I pulled the pump forward so the clamps that hold the drain hose and discharge hose could be removed using the hose clamp pliers. ( they come off much easier then they go back on ). (8) I tested the pump and found it would run but was making a lot of noise and running slow. (9) To reinstall start with number (7) and work backwards to number (1) skipping (3) and (4). Don Kramer Wichita, Kansas
Don't know how they managed to get out of the washer tub, but we found a quarter, dime and penny in the "lint" filter (called the "Cap" in the PartSelect details). The penny managed to get into the impeller and took out 3 1/2 of the 4 impeller blades.
Replacement is very simple, about a 15-20 minute job Be sure the machine is unplugged for safety.Remove the three (3) screws holding the lower front panel and remove the panel. The pump assembly is a white unit about the middle of the opening (the original pump itself was black, the new one is white). Unscrewing the large cap will allow any residual water to drain out (we used a wet/dry shop vac to get most of the water out of the tub first). Following the wires going to the pump, there is a cover over the wiring connector that easily pops up and the connector can be pulled out. Directly below the unit is a screw with a Torx head that has to be removed, then two (2) hoses held with compression hose clamps that need to be removed with pliers. The unit will slide out of the base of the washer. There is a wiring harness in front of this assembly that can be popped loose on one side or the other to get the unit out.
Reversing the steps gets everything back in place.
NOTE: A notice came with my new pump stating that a tab needed to be removed on the wiring connector. It is easily removed by hand.
By the way - that was the most expensive penny I've ever owned! Pockets in jeans are now required to be turned out in our house before they are allowed in the washer!


 Diagram and Parts List for Maytag Washer")