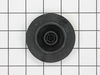
The fold away tine pivot or clip holds the tine rows in place. This part is made of gray plastic and is approximately 3 and a half inches in length. Some dishwasher models will have fold away tine row...
$14.00
In Stock
Order within the next 10 hrs and your part ships today!
This part is essential in your dishes getting clean during the wash cycle. If there is any debris or a tear in the filter, it can cause extra buildup and, therefore, causing dirty dishes.
$173.94
In Stock
Order within the next 10 hrs and your part ships today!
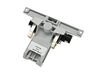
This is the replacement convertible tine pivot for your dishwasher. It is made of gray plastic and is approximately 4 inches long and 1 inch wide. The convertible tine pivot allows the tine row to eit...
$13.90
In Stock
Order within the next 10 hrs and your part ships today!
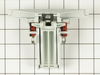
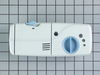
The docking station is located on the water supply tube at the far back. It provides water to the upper and middle spray arm and also includes the flappers.
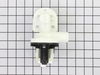
This part is the replacement wash arm cap, also known as the spray arm nut, for your dishwasher. It is made of white plastic and is approximately ½ an inch in diameter. The wash arm cap fastens the lo...
$14.73
In Stock
Order within the next 10 hrs and your part ships today!
Order within the next 10 hrs and your part ships today!
Questions And Answers for MDB8751BWS
Ask our experts a question about this model and we'll get back to you as soon as possible!
1 question answered by our experts.
< Prev
1
Next >
Sort by:
Search filter:
Clear Filter
Your search term must have 3 or more characters.
Keep searches simple. Use keywords, e.g. "leaking", "pump", "broken" or "fit".
Sorry, we couldn't find any existing answers that matched.Try using some different or simpler keywords, or submit your new question by using the "Ask a Question" button above!
Norm
September 30, 2021
How do I replace the bottom door seal?
For model number MDB8751BWS
Hello Norm, Thank you for the question. There is a groove on the bottom of the door that the gasket gets slid into. The old Gasket pulls out, and the new slides into its place. We hope this helps!
I Followed others' instructions already posted to replace the whole handle assembly. In particular, use a big screwdriver placed against the bottom of the handle and whack the grip with the palm of your hand to get the handle to move back to the open position so you can open the door and start the job. I am no handyman, but this fix was easy, about 30 minutes in all, most of which was spent figuring out which breaker to pull so as not to get shocked. One note of caution: use the correct screwdriver attachment (not a Phillips head or regular, but a star or something- see I am not a handyman but I do have a $15 screwdriver set that just paid for itself 10 times over!).
Remove the 8 or 9 torx screws holding the inner and outer door assembly together (leave the bottom screws in), lift the old handle assembly out, transfer the switches to the new handle assembly, and reassemble door.


.gif "SUPPLEMENTAL INFORMATION Diagram and Parts List for Maytag Dishwasher")