Models > GUAP240EM1WW

GUAP240EM1WW General Electric Washer - Overview

Sections of the GUAP240EM1WW

[Viewing 6 of 6]
Keep searches simple, eg. "belt" or "pump".
GRID ASM – Part Number: WE22X35337
GRID ASM
PartSelect #: PS16762559
Manufacturer #: WE22X35337
This is a replacement lint filter slide for your dryer. It is approximately 14 inches long and 5 inches wide. It is made of white plastic and is sold individually. The slide mounts to your dryer and a...
  No Longer Available
Door Strike – Part Number: WE1X1192
Door Strike
★★★★★
★★★★★
(2)
PartSelect #: PS266893
Manufacturer #: WE1X1192
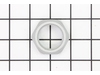
TThe door strike for your dryer is mounted on the dryer frame that the door shuts onto. It fits into the door catch on the door and keeps the door closed. If the door strike is damaged or missing, the...
$10.90
  Special Order
Drum Glide Bearing - White (Sold individually) – Part Number: WE3M51
Drum Glide Bearing - White (Sold individually)
PartSelect #: PS4704230
Manufacturer #: WE3M51
$13.36
  Special Order
Push-to-Start Switch – Part Number: WE4M416
Push-to-Start Switch
★★★★★
★★★★★
(2)
PartSelect #: PS3487190
Manufacturer #: WE4M416
This switch is used to activate the dryer.
$23.21
  Special Order
DRYER BEARING SLIDE 2-PACK – Part Number: WE03X37320
DRYER BEARING SLIDE 2-PACK
PartSelect #: PS17626249
Manufacturer #: WE03X37320
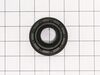
This OEM replacement dryer slide bearing is white in color, and approximately 3 inches long. The slide bearings are supportive linings for your dryer. If they have eroded, or are damaged, the drums wi...
  No Longer Available
Door Switch – Part Number: WE4M415
Door Switch
★★★★★
★★★★★
(1)
PartSelect #: PS2344321
Manufacturer #: WE4M415
A door switch is a simple on/off mechanism that prohibits the dryer from operating when the door is open.
$39.78
  Special Order
Lid Lock & Switch Assembly – Part Number: WH44X10288
Lid Lock & Switch Assembly
★★★★★
★★★★★
(2)
PartSelect #: PS3496878
Manufacturer #: WH44X10288
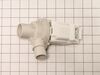
The door latch lid lock is to lock the door on your washer when the appliance is in use. Your washer will not start if your door is not locked. If your latch is broken, you may not be able to start a ...
$134.05
  Special Order
HANDLE DOOR – Part Number: WW03L00411
HANDLE DOOR
PartSelect #: PS12583299
Manufacturer #: WW03L00411
$21.19
  In Stock
Order within the next 5 hrs and your part ships today!
BELT - WH1M1073 – Part Number: WW01F00345
BELT - WH1M1073
PartSelect #: PS9864414
Manufacturer #: WW01F00345
$17.96
  In Stock
Order within the next 5 hrs and your part ships today!
STRAP ASSEMBLY 24 – Part Number: WH01X20438
STRAP ASSEMBLY 24
PartSelect #: PS9494520
Manufacturer #: WH01X20438
$22.51
  Special Order
DOOR LATCH - WE1M900 – Part Number: WW02L00037
DOOR LATCH - WE1M900
PartSelect #: PS9864477
Manufacturer #: WW02L00037
$9.59
  In Stock
Order within the next 5 hrs and your part ships today!
GRID – Part Number: WW01L01159
GRID
PartSelect #: PS11722053
Manufacturer #: WW01L01159
$25.10
  In Stock
Order within the next 5 hrs and your part ships today!

Questions And Answers for GUAP240EM1WW

Ask our experts a question about this model and we'll get back to you as soon as possible!

1 question answered by our experts.
  • 1
Sort by:
Sorry, we couldn't find any existing answers that matched.Try using some different or simpler keywords, or submit your new question by using the "Ask a Question" button above!
Gail
November 27, 2023
What part likely needs replacing? The washing machine will not complete a cycle without repeatedly pressing start button. This started as occasional advancing to frequent.
For model number GUAP240EM1WW
PartSelect logo
Hi Gail, thank you for reaching out. We have found that the issue is with the selector switch, part number PS3499720. The cycle selector switch lets you choose the laundry center cycle settings. We would recommend checking the switch to fix the issue. We hope this information is useful!

Was this helpful?
Thank you for voting!
Related Parts:
  • 1

Common Symptoms of the GUAP240EM1WW

[Viewing 9 of 9]
Noisy
Fixed by
these parts
Fixing Fixing
Show All
Door won’t close
Fixed by
these parts
Fixing
Show All
Leaking
Fixed by
these parts
Fixing Fixing Fixing
Show All
Won’t Start
Fixed by
these parts
Fixing Fixing
Show All
Marks left on clothes
Fixed by
these parts
Fixing Fixing
Show All
Will Not Start
Fixed by
these parts
Fixing Fixing
Show All
Touchpad does not respond
Fixed by
these parts
Fixing
Show All
Lid or door won’t close
Fixed by
these parts
Fixing
Show All
Will not drain
Fixed by
these parts
Fixing
Show All
Keep searches simple. Use keywords, e.g. "leaking", "pump", "broken" or "fit".
Dryer would not start
The end repair was very simple and took minimal effort. The time and difficulty was all in the testing. I disassembled the dryer and removed the drum and then hard wired each thermo-fuse to determine where the fault was. After test all of those I was stumped. When I opened the door the light would not come on so I assumed it was a power fault closer to the source. However after all of my testing I couldn't find anything wrong. I then removed the light bulb and realized it was burned out which led me to the door switch being the fault. I removed the switch and soldered the three wire together and the dryer started right up! All I had to do was order a new $15 part, unsolder the wires and plug them in. Would have been so much simpler if that light bulb hadn't of been burned out causing me to over think my diagnosis. This was my first major appliance repair and I did it with only the help of the parts diagram provided on the website.
Parts Used:
Door Switch
  • Joshua from Dallas, TX
  • Difficulty Level:
    A Bit Difficult
  • Total Repair Time:
    1- 2 hours
  • Tools:
    Pliers, Screw drivers, Socket set
88 of 131 people found this instruction helpful.
Was this instruction helpful to you?
Thank you for voting!
The Dryer would not start
Doing some simple troubleshooting with the volt-ohm meter I determined that the door switch was failed.

The replacement door switch restored the motor circuit keeping my dryer in action.
Parts Used:
Door Switch
  • David from Curtice, OH
  • Difficulty Level:
    Really Easy
  • Total Repair Time:
    Less than 15 mins
  • Tools:
    Pliers
59 of 102 people found this instruction helpful.
Was this instruction helpful to you?
Thank you for voting!
Deflector was covered in burnt something.
Deflector has 3 bolts attaching it. They require a star wrench. Had to purchase same to do the repair. Removed the bolts(they are sheet metal type screws(bolts). Installed the deflector and started dryer. Loud rubbing sound noted. Shut off and checked the drum and noted it was not running concentrically. Removed deflector and the found the 3 screws actually retained the drum to drive. Had to make alignment pins to allow proper alignment of the drive, drum, and deflector. Once the pins were used during installation of the deflector everything worked correctly. Turned on dryer and it operated normally.
Had I had the proper tools the repair would probably have taken 30 minutes or less.
Parts Used:
DIFFUSER
  • Richard from San Antonio, FL
  • Difficulty Level:
    Difficult
  • Total Repair Time:
    1- 2 hours
  • Tools:
    Wrench set
38 of 56 people found this instruction helpful.
Was this instruction helpful to you?
Thank you for voting!