This Drive Belt is 89.5" long and comes in black, featuring four ribs on the inside for a better grip. This is a long belt that wraps all the way around the dryer drum, around a tension pulley, and th...
TThe door strike for your dryer is mounted on the dryer frame that the door shuts onto. It fits into the door catch on the door and keeps the door closed. If the door strike is damaged or missing, the...
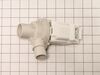
This part is the replacement high-limit thermostat or safety thermostat for your dryer. The high-limit thermostat is found on the upper right-hand side of the heater housing, and it cuts off power to ...
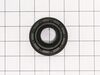
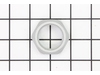
This is a replacement O-ring for the drum bearing retainer on your dryer. The drum bearing is found at the back of the dryer drum. The O-ring is designed to create a seal on the drum bearing. The O-r...
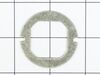
This OEM replacement dryer slide bearing is white in color, and approximately 3 inches long. The slide bearings are supportive linings for your dryer. If they have eroded, or are damaged, the drums wi...
A door switch is a simple on/off mechanism that prohibits the dryer from operating when the door is open.
$39.78
Special Order
Questions And Answers for GTUN275EM2WW
Ask our experts a question about this model and we'll get back to you as soon as possible!
4 questions answered by our experts.
< Prev
1
Next >
Sort by:
Search filter:
Clear Filter
Your search term must have 3 or more characters.
Keep searches simple. Use keywords, e.g. "leaking", "pump", "broken" or "fit".
Sorry, we couldn't find any existing answers that matched.Try using some different or simpler keywords, or submit your new question by using the "Ask a Question" button above!
Donna
February 24, 2020
No power going to washer but dryer works fine what part do i need to get the washer going again
For model number GTUN275EM2WW
Hi Donna,
Thank you for your question. If the washer is not working, there are some parts that you will need to check to see which one is causing the issue. You will need to check the electronic control board and the door latch lid lock. To test the door latch lid lock you will need to test it with a multi-meter. Unplug your washing machine. Remove the cabinet or top panel and locate the lid switch. After finding the switch, begin by ensuring that no levers or actuators are damaged or sticking and that the switch is being activated mechanically when the lid is closed. If no issues are found when performing the above checks, remove the switch and set your multi-meter to the Rx1 setting. While pressing and holding the switch button, place the probes on the switch’s terminals, you should receive a reading of zero. If you receive a different reading, you will need a replacement lid switch. For the electronic control board, you will need to check it for signs of damage, wear and burn marks. If it shows any of these signs, it will need to be replaced. We hope this helps. Thank you and have a great day.
Was this helpful?
Thank you for voting!
Terri
February 5, 2023
Washer fills up with water, clicks to start washing, then immediately shuts off.... Push the start button, turns on and immediately shuts off
For model number GTUN275EM2WW
Hi Terri, thank you for the question. We would recommend checking the lid lock switch assembly, part number PS3496878, and the control board, part number PS5573578. These are the probable culprits. Good luck with your repair!
My stackable washer and dryer fills up with water, then it engages, then quickly shuts off. Thank you!!
For model number GTUN275EM2WW
Hello Teri, thank you for the question. According to our research, you may need to check the timer, part number PS11721520, to fix the issue. We hope this solves your problem!
Was this helpful?
Thank you for voting!
Terri
February 14, 2024
Need to replace the switch down by the motor. The switch is square, less than 5 inches long. It has 2 prongs hanging from the bottom of the switch where a wire is attached to each prong.The orange switch is to the left of the motor belt. I need this part. Thank you kindly!
For model number GTUN275EM2WW
Hello Terri, thank you for contacting us. The switch you are looking for is not sold separately, it comes with the fork support assembly, part number PS3501444. We hope this information helps!
Removed the front Dryer panel. Left drum in place and lifted it up slightly to get access to motor drive. Slipped belt in place and put panel back on. This was a first attempt ever at fixing an appliance and it was no big deal.
It was actually my father, he doesn't use the internet. He thought that because the dyer got real hot and then shut off he thought the thermostat wasn't working and the high temp shutoff was okay. He went through the manual and found the part and took it out. He called the service number but they wanted $50 dollars plus shipping. I saw it was a Thermo-disc part so I tried the manufacture's website but I couldn't match the numbers on the back to their part numbers. I tried several other sites and your site was the cheapest. It was real easy to use the web site and diagrams to find the right schematic and part. I ordered it online and it was delivered in 2 days with the regular shipping. When he first put it in the dyer didn't turn on. He found no power coming out of the timer so he cleaned the contacts and it worked. Thanks for making the ordering so easy.
The end repair was very simple and took minimal effort. The time and difficulty was all in the testing. I disassembled the dryer and removed the drum and then hard wired each thermo-fuse to determine where the fault was. After test all of those I was stumped. When I opened the door the light would not come on so I assumed it was a power fault closer to the source. However after all of my testing I couldn't find anything wrong. I then removed the light bulb and realized it was burned out which led me to the door switch being the fault. I removed the switch and soldered the three wire together and the dryer started right up! All I had to do was order a new $15 part, unsolder the wires and plug them in. Would have been so much simpler if that light bulb hadn't of been burned out causing me to over think my diagnosis. This was my first major appliance repair and I did it with only the help of the parts diagram provided on the website.


 – Part Number: WE3M51")


")


