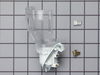
This Refrigerator Air Filter is a white 1.8x3.2" plastic filter which neutralizes odor and bacteria in the air. It should be replaced every six months at a minimum. Refer to your user manual and model...
$27.50
In Stock
Order within the next 11 hrs and your part ships today!
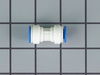
This is an OEM replacement ice and water filter for your refrigerator. In side-by-side refrigerators, it is found in the top right corner or the bottom left grille. In bottom-freezer refrigerators, th...
This 18 ml bottle of white appliance touch-up paint is used to cover scratches or marks on your appliance. The white touch-up paint can be used on refrigerators, microwaves, ranges, clothes dryers, an...
$10.21
In Stock
Order within the next 11 hrs and your part ships today!
This twenty-five watt microwave light bulb is two and a half inches long. It has a small, screw-in base and it carries 120V. This item sells in a quantity of one, though many microwaves require two.
$21.82
In Stock
Order within the next 11 hrs and your part ships today!
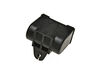
If your refrigerator or freezer is too warm, or making noises, you may need to replace the fan blade. The fan blade attaches to the evaporator motor, which is in the freezer section, to help circulate...
$47.36
In Stock
Order within the next 11 hrs and your part ships today!
Order within the next 11 hrs and your part ships today!
Questions And Answers for GSF26C4EXW02
Ask our experts a question about this model and we'll get back to you as soon as possible!
4 questions answered by our experts.
< Prev
1
Next >
Sort by:
Search filter:
Clear Filter
Your search term must have 3 or more characters.
Keep searches simple. Use keywords, e.g. "leaking", "pump", "broken" or "fit".
Sorry, we couldn't find any existing answers that matched.Try using some different or simpler keywords, or submit your new question by using the "Ask a Question" button above!
Jamie
February 8, 2020
The freezer and fresh food isn’t cold enough...temperature is set on 3 the highest? i think it’s the compressor relay but can’t find one to replace it...need to know where i could find it or could it be something else?
For model number GSF26C4EXW02
Hi Jamie. It may be the capacitor linked below. Thank you for your question and good luck with your repair.
Hello Leo, Thank you for contacting us. I have researched the model you have provided and have found the part you are looking for is PartSelect Number PS2580944. All prices and availability are shown on the site. We hope this helps.
This thermistor of the refrigerator l did a test to temperature of 38f to 6.70 Ohms is good or bad?
For model number GSF26C4EXW02
Hello Leo, Thank you for contacting us. You can let the sensor warm up to room temperature. With the sensor warmed up to room temperature the sensor should read approximately 6.2K Ohms at 68°F. With the thermistor submerged is a glass full of ice water, the sensor should be very close to 32°F which should read approximately 16.3K Ohms. If the values that you are getting are far off from these readings, then the sensor is bad and should be replaced. Hope this helps!
What are the specific diemensions for this particular model of Whirlpool refrigerator?
For model number GSF26C4EXW02
Hello Robert, Thank you for your inquiry. We show the measurements as 35 7/16 inches wide, 69 1/4 inches wide and 34 1/8 inches deep. We hope this helps.
Was this helpful?
Thank you for voting!
< Prev
1
Next >
✖
Ask a Question
Ask our experts a question on this model and we'll respond as soon as we can.
I knew the chances of all the freon leaking out was unlikely so I looked at the wiring to the compressor and there was a capacitor and a starter/overload so i figured I would start there. I went on line and found the parts at this site and they were less than the minimum service call charge for a service tech so I figured what the heck let's give her a shot so I did give it a shot. I ordered the parts and they were there in less time than a service tech could come out and i installed the parts and guess what for 90.00 in parts and 15 minutes in time I repaired my refrigerator. Thanks guys, It took less time to order the parts than it did to make the repair so thanks, your website rocks and is very well designed so my hat is off to you guys!
WARNING: REPLACING THIS PART REQUIRES CUTTING AND SPLICING ELECTRICAL WIRES. RISK OF ELECTRICAL SHOCK OR FIRE. DO NOT ATTEMPT THIS REPAIR IF YOU ARE NOT EXPERIENCED WITH ELECTRICAL WIRING.
Part Info: The bi-metal strip is clipped onto the evaporator coils and is designed to regulate the defrost coil temperature. If it is not functioning properly you may notice ice buildup preventing air flow (and preventing proper refrigeration), or more rarely the freezer side may get too warm during the defrost cycle.
1: UNPLUG THE FRIDGE! If there is ice buildup, wait until the ice has melted. A box fan blowing at the ice will help melt it more quickly.
2: Remove the panel covering the evaporator coils. It's located inside the fridge, on the freezer side.
3: Un-clip the bi-metal strip from the evaporator coils.
4: Unplug the wires from the evaporator fan, defrost coil and bi-metal strip, then disconnect the main connector that is plugged into the rear wall.
5: Clip both wires to the old ( bad ) bi-metal strip. Cut close to the casing of the bi-metal strip so there are long wires to splice onto.
6: Strip 1/4 to 1/2 inches of insulation off of the ends of the wires ( depending on the size of the wire-nuts you use). Twist the bare wires slightly to prevent fraying.
7: Do the same for the ends of the wires on the (new) bi-metal strip.
8: Take the ends of the wires belonging to the (new) bi-metal strip and the wires coming from the main plug. Take the like-colored wires, and twist the bare metal ends together.
9: Twist on wire nuts, for both sets of wires. Make sure they are snug, with no bare wire showing.
10: Tape over the wire nuts with electrical tape. Tape over the wires nuts in a spiral fashion, completely covering the nut and both wires that are now spliced together. This will prevent accidental shorting.
11: Plug the main plug back into the rear wall of the fridge. Also re-connect the connectors to the evaporator fan and defrost coil. Make sure the clips on the connectors are snug to ensure a good connection.
12: Clip the new bi-metal strip onto the coils, in the same spot as before. ( Usually just after the small incoming copper tubing that connects to the coils, known as the expansion valve. That is usually the coldest spot on the coils during operation).
13: Replace the panel that covers the coils.
14: Plug the fridge back in... Now you fridge should defrost correctly. If it does not, your defrost coil could be burned out, or the control board could be faulty.
1) removed the face plate that runs 3/4 way up the back of the freezer side. a total of 8 screws. (6") 2) disconnected the three electrical connections.(30sec) 3) removed the fan of the the old evaporator fan motor (5sec) 3) removed the fan motor (1") 4) put in the new fan motor (1") 5) put on the old fan on the new fan motor(5sec) 6) reconnected the three electrical connections (30sec) 7) replaced the face plate on the back of the freezer (6") Had re-frozen meat within 1 hour.


 Diagram and Parts List for Whirlpool Refrigerator")