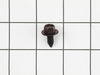
This screw is used in refrigerators. The screw can be loosened or tightened with a Phillips-head or square-head screwdriver. This screw is used to secure the refrigerator handle to the refrigerator do...
Sold individually.
This is a genuine part. The handle mounting shoulder screw (no.10 ab) is made for use with many refrigerators. The metal screw helps to fasten the handle assembly to the outer do...
Door gasket is on the inner door panel and creates a seal around the door to prevent warm air from entering the refrigerator.
Safely store any food that could deteriorate while the door is open for this repair.
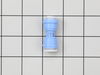
This is the replacement water filter base for your refrigerator. It is made of plastic and is mainly white in color. The water filter lines will each have a blue release collar at the top. The water f...
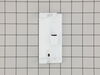
This is the replacement light switch for your refrigerator. It is white in color and is approximately 2inches long and 1 inch wide. If the light is not working or stays on, you may need to replace the...
$75.85
In Stock
Questions And Answers for EW23BC71IS0
Ask our experts a question about this model and we'll get back to you as soon as possible!
1 question answered by our experts.
< Prev
1
Next >
Sort by:
Search filter:
Clear Filter
Your search term must have 3 or more characters.
Keep searches simple. Use keywords, e.g. "leaking", "pump", "broken" or "fit".
Sorry, we couldn't find any existing answers that matched.Try using some different or simpler keywords, or submit your new question by using the "Ask a Question" button above!
Peter
March 2, 2023
The freezer drawers are showing signs of rust. Can they be removed and painted, and if so what paint do you recommend?
For model number EW23BC71IS0
Hi Peter, thank you for your inquiry. Yes, the drawers can be removed and painted. You can use the white color touch-up paint, part number PS467298, for painting the drawers. Let us know if you have further questions!
In my specific appliance the water valve is located in the bottom right hand corner looking at it from the back. To get to it I remove the thin layer of cardboard the covers the back of the fridge. I then proceeded to disconnect the 1/4" copper tubing which is the water feed coming out of the wall. Then I removed the screws that hold the valve assembly in place. I took the water valve out and removed the electrical connections as well as the plastic tubing which feed the water dispenser and the ice maker. To install the new water valve it was just a matter of reversing steps.
Even though my wife said that our icemaker broke, there was actually nothing wrong with it. It was the valve that let water flow in during the 'harvest' cycle. A real easy way to test the icemaker without voltage and current measurements, is to fill the tray by hand with a little cup of water; wait till the water freezes and see if the maker dumped the ice into the bin.
pulled fridge from wall, removed card board cover, unplug the fridge. turn the water off to the fridge. remove the water source from fridge first then remove 2 screws that hold the valve. then the wire plugs. hoses.. they were color coded.