The tumbler and motor belt in your dryer allows the drum to spin during the drying cycle. At 100 inches in length, this dryer drum belt is 3/8 of an inch wide and has five ridges. The belt is black in...
This front glide kit comes with a blue plastic glide, a brown cork pad, and two metallic rivets. Two kits are required per appliance. A rivet tool is required for this installation.
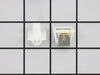
This lint filter screen is slide in styl type of Maytag filter screen. It is most typically used for the 08 and later series of Maytag gas or electric clothes dryers that appear before 1990.
Ask our experts a question about this model and we'll get back to you as soon as possible!
1 question answered by our experts.
< Prev
1
Next >
Sort by:
Search filter:
Clear Filter
Your search term must have 3 or more characters.
Keep searches simple. Use keywords, e.g. "leaking", "pump", "broken" or "fit".
Sorry, we couldn't find any existing answers that matched.Try using some different or simpler keywords, or submit your new question by using the "Ask a Question" button above!
Jennifer
January 18, 2020
How can i disconnect the dryer bell? It scares my dog to death! Thanks for your help.
For model number DE608
Hello and thank you for writing.
Step 1
Turn off and unplug the dryer. Since you need to remove the front panels and expose the electrical wiring of the dryer's buzzer you should turn the dryer off and then unplug the machine to avoid shocks. Once the dryer has been unplugged, turn its dial to the "on" setting to make sure the dryer is completely powered down.
Step 2
Locate the buzzer. The best way to locate the dryer's buzzer is to check the machine's schematic or manual. The buzzer is usually located behind the front panel of the machine. In some cases, the buzzer is located behind the dryer's back panel. Dryer buzzers are generally small black boxes that are wired to the timing device.
Step 3
Pull the buzzer's wires. The most simple way to deal with a buzzer is to pull the wires that run into the buzzer. The wires should pull free with a firm but careful tug. Once you've disconnected the wires from the buzzer simply run a good amount of electrical tape over the ends so that no live wires are exposed. If you want to get the wires out of the way, tape the wrapped wires to the top or side of the dryer panels.
Step 4
Test the machine. Once you've yanked and taped the buzzer's wires, plug the dryer back in and turn the machine on to test the buzzer. If the machine still buzzes at the end of the cycle then you removed the wrong wires. However, chances are that the machine will finish its drying with a quiet whimper instead of a loud buzz.
We hope this helps. Please contact us anytime if you require further assistance.
Was this helpful?
Thank you for voting!
< Prev
1
Next >
✖
Ask a Question
Ask our experts a question on this model and we'll respond as soon as we can.
first, I unplug the power supply of the dryer then I removed the two screws at the bottom of the dryer then pulled out the front part of the dryer,unplugged the blue & yellow wire for the on/off switch for the door,at the back of the dryer I unscrew the pannel for the belt,disconect the belt,and I unscrew the four screws on both side of the front pannel to remove the front cover of the drum. Once I removed the front cover of the drum I can now remove the drum itself to access the drum support roller. I unscrew the rollers then replace it with the new once. It was an easy job. Thank you.
Removed the front cover (screws on bottom 0f face)...removed blower cover....spring pliers to remove and install blower fan. the rest of the time was spent cleaning the inside of the shell as well as the vent. Reassembled and dryer runs better than it has for many years.
Unplugged dryer. Front came off easily. Removed front of blower. Wheel came off fairly easily - could then see that shaft of motor was circular with flattened side but inside of old wheel was rounded. New wheel popped right on. Took tumbler off so I could clean lint out more easily and get a good view of how the belt threaded through. Put the tumbler back on and reached back with both hands to thread it. Took a half dozen tries until I was sure it was seated correctly and not twisted. Put front... of dryer back on. So far (a week or so) the rumble is gone. Seems blower wheel was the cause of the rumble. Belt didn't seem worn but replaced anyhow.


 Diagram and Parts List for Maytag Dryer")