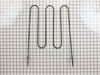
Dual Element with Limiter -9 Inch /6 Inch - 1300W 1200W.
With this element, you can adjust the size of the burner you want to use to match your pots/pans.
This is a replacement rack for your oven. The oven rack fits into grooves on the side of the oven wall, and acts as a shelf that you can place food items on when you want to cook them in the oven. Thi...
Ask our experts a question about this model and we'll get back to you as soon as possible!
4 questions answered by our experts.
< Prev
1
Next >
Sort by:
Search filter:
Clear Filter
Your search term must have 3 or more characters.
Keep searches simple. Use keywords, e.g. "leaking", "pump", "broken" or "fit".
Sorry, we couldn't find any existing answers that matched.Try using some different or simpler keywords, or submit your new question by using the "Ask a Question" button above!
Daniel
November 22, 2022
One of my radiant burner is only on at a highest temperature if you tried to adjust the temperature it wouldn't heat up. What part do I need to order for replacement. Thanks
Daniel
For model number 79094173310
Hi Daniel, thank you for reaching out. According to our research on the model, the Element Switch appears to be faulty and your model contains three Element Switches, part numbers PS3504401, PS1145040, and PS1145039. You need to verify which element switch is causing the issue. If you need help placing an order, customer service is available 7 days a week. Glad to be of help!
Element 15b (front right) isn't consistently heating. We started seeing issues when the burner was cooking too hot and we couldn't regulate heat. Now when I turn it on the burner doesn't always come on. It makes a little noise if it turning on but if you adjust the dial, it turns off. Would that be the element or thr switch?
For model number 79094173310
Hello Chris, thank you for contacting us. Based on the description, you may need to replace the infinite burner switch, part number PS1145040, to fix the issue. Before replacing the switch, you may need to check that the control knob is working properly. We hope this solves your problem!
Hello Junius, thank you for getting in touch. The compatible bake element for your model is part number PS2345216, and compatible broil element for your model is part number PS439673. We hope this is what you were looking for!
How do you switch degrees Celsius back to degrees Fahrenheit on display panel
For model number 79094173310
Hello Vinnie, thank you for reaching out. In order to change the temperature settings, you may need to follow these instructions. Press the broil button. HI will appear on the display. Press and hold the broil button until F or C appears on the display. Then press either up or down arrow button to toggle between F or C mode choices. After that, press the start button to accept the changes. The display will return to the time of the day. We hope this information is useful!
Was this helpful?
Thank you for voting!
< Prev
1
Next >
✖
Ask a Question
Ask our experts a question on this model and we'll respond as soon as we can.
We moved into our townhouse about 6 yrs ago. During the home inspection we checked the range and saw the Red light come on when we turned on each burner. After moving in we realized the large back burner did not work. The light came on but the element never got hot. I of course replaced the element but that did not work. Several years passed and we just ignored the issue. We just got by with 3 burners. Lately we realized how much easier it would be to have all four burners working. Knowing that we will be selling our townhome soon we figured we should either fix the problem or replace the range.
I didn't want to call a repair man because I didn't want to be charged a $150 to have him come out and they to pay extra for parts (and of course a 2nd visit). So I went to www.Partselect.com and typed in the model of my range. Found the diagrams for my range and saw that from the switch ran a pair of wires to a Universal Receptacle (aka Terminal Block Kit). I figured since the Red light turns on when I turn the switch on it has to be the Terminal Block.
I ordered the part from www.Partselect.com ($14.00 including shipping) and replaced the part. The burner still would not get hot. I decided to test the switch. I removed the Control Panel cover (which is secure by 2 screws just below the digital clock). Once the cover was off, I saw the Blue wires going from the switch to the Terminal Block. To test the switch, I disconnected the two Blue Wires from connectors H1 and H2 and temporarily connected them to H1 and H2 of another switch. Sure enough, when I turned the other switch the element got hot.
So I placed another order from www.Partselect.com for a replacement switch ($50 including shipping). When that part came, I flipped the electrical circuit going to the range. I then removed the Control Panel cover again. With the new switch in hand (holding it near the old switch still attached to the Control Panel, I used the pliers to pull out each wire from it's connector and place it to it's corresponding connector on the new switch. Once all the wires were connected to the new switch, I pulled the knob of the switch off then used a phillips screwdriver to remove the two screws holding the switch to the control panel. I replaced the old switch with the new one put the screws back in, replaced the knob. Turned the circuit back on and tested to make sure that the element got hot. When it did, then I replaced the Control Panel cover and enjoyed a nice dinner that was cooked in less time than we're accustomed to because of the new burner. So I spent a total of $64.00 to fix our range. Less than half the amount I would've spent if I called for a technican. And far less then buying a new range.
Partselect is a great resource for information. They have diagrams and schematics available to view and/or download. And when ordering it's a snap because there's an "Add to Cart" button next to each part it lists. So there's no confusion. I've already recommended Partselect.com to about 5 people. And will continue to do so!!
First we removed two screws under the rim of the range top to open the lid. Lifted the lid and removed the screws from the bracket that holds the elements, Be careful with the clips that hold the element in, if you break them or bend them there aren't any more! Also note which holes they were in, they are marked according to the different sizes of elements. Disconnected the wires, needed needlenose pliers to grip them...connected new element, popped it back in place, replaced bracket, closed top ...Easy peasy!!!
Repair was quite easy, as long as you have the instructions for removing the door. The screws that hold the bottom of the door to the fixed hinge are placed into the side of the hinge assembly after removal; this holds the door at a 45 degree angle for easy removal. After that, just place the door on a flat surface and dismantle the door from the inside. The inner glass is contained in a metal frame with another piece of glass; this frame comes apart easily using the clips in each side. The door assembles easily after the glass is replaced; just take your time and give yourself enough room to lay out the parts as you go. Good luck!