Ask our experts a question about this model and we'll get back to you as soon as possible!
2 questions answered by our experts.
< Prev
1
Next >
Sort by:
Search filter:
Clear Filter
Your search term must have 3 or more characters.
Keep searches simple. Use keywords, e.g. "leaking", "pump", "broken" or "fit".
Sorry, we couldn't find any existing answers that matched.Try using some different or simpler keywords, or submit your new question by using the "Ask a Question" button above!
Linda
February 3, 2020
How can i replace the gasket on a Kenmore elite gas wall oven. I can't see the model number but it was placed in a new house in 2002.
For model number 79048833901
Hi Linda. Sadly without the model number we cannot find the part. You can try contacting the manufacturer with the serial number and they may be able to help you find the model. Thank you for your question and good luck with your repair.
1 person found this helpful.
Was this helpful?
Thank you for voting!
David
May 16, 2023
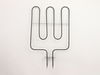
After taken off the 2 screws on the backing burner what step is next to disconnect from oven
For model number 79048833901
Hello David, thank you for your inquiry. Use the following instructions to remove the bake element from your wall oven:
1. Disconnect the power.
2. Unthread the screws holding the wall oven.
3. Remove the wall oven from the bracket.
4. Open the oven door and remove it.
5. Remove the bottom trim.
6. Remove the back cover. Locate the bake element wires and disconnect them.
5. Remove the oven rack.
6. Remove the bake element cover.
7. Unthread the screws securing the bake element to the mounting bracket.
8. Pull the bake element forward and remove it.
We hope this is what you were looking for!
Was this helpful?
Thank you for voting!
< Prev
1
Next >
✖
Ask a Question
Ask our experts a question on this model and we'll respond as soon as we can.
I pulled my unit out of the wall and noticed that the insulation around the top broiler element was a bit brown. Closer inspection revealed that the element had shorted somehow to the oven itself and caused the element to become non-functional. I tried measuring the resistance first, and it was within typical values for the other elements, but I decided to replace the element anyway.
I ordered from PD and the part arrived just a few days letter by regular shipping. I undid the screws holding in the element, undid the wire connectors and replaced the broken element with the new one. The element worked like a charm and I was back in business for cooking.
PF alarm appeared on display. Noticed clicking when cord was moved. Had arced for some time and melted original block. New part slightly different. Only has 3 lugs, old one had six. Stack using washers provided. Take note of colors before disassembly. Use caution while working through access opening. The edges are sharp. Only tools needed are phillips screwdriver, deep socket for lug nuts. Nut driver optional. Hope this is helpful.
Repair was quite easy, as long as you have the instructions for removing the door. The screws that hold the bottom of the door to the fixed hinge are placed into the side of the hinge assembly after removal; this holds the door at a 45 degree angle for easy removal. After that, just place the door on a flat surface and dismantle the door from the inside. The inner glass is contained in a metal frame with another piece of glass; this frame comes apart easily using the clips in each side. The door assembles easily after the glass is replaced; just take your time and give yourself enough room to lay out the parts as you go. Good luck!