This an authentic OEM 40-Watt replacement light bulb, used in a number of household appliances. It is specially designed to withstand extreme temperatures, which is why these replacement bulbs are mos...
$14.96
In Stock
Order within the next 9 hrs and your part ships today!
This eight-hour defrost timer will replace most other defrost timers. This device acts like a clock. It continually advances and alternates between activating the cooling cycle and the defrost heater....
$44.15
In Stock
Order within the next 9 hrs and your part ships today!
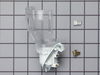
The evaporator is found in the back of the freezer. This kit comes with two mounting grommets, two sleeves (not to be used on porcelain models), two #8 mounting screws, and a push-on fan blade.
NOT...
$94.52
In Stock
Order within the next 9 hrs and your part ships today!
This is the replacement water tube kit for your refrigerator. This tubing is made of plastic, is 1/4 inch in diameter, and comes with 2 inserts. This tube may be longer than the original tube, and may...
$45.98
In Stock
Order within the next 9 hrs and your part ships today!
Removed 2 screws holding water fill tube to rear of refrigerator and pulled out, matched old part with new to make sure of proper match. Guide new fill tube thru hole, making sure it is aligned with slot in ice cube tray on inside of freezer. Install new plastic line from water pump outlet to water fill tube, check for leaks, job done.
First I removed the racks in the freezer. The rack supports on the sides lift off without tools. The evaporator cover is at the back of the freezer. 4 phillips head screws. The cover lifts up then forward to expose the evaporator, evaporator fan and duct. The duct is held by 3 hex head screws. The evaporator fan is attached to the duct with a wiring pigtail to a plug. Unplug the fan and remove the duct. The fan is held by 2 hexhead screws. The new fan is put in place and assembly is simply the reverse of disassembly. The unit is quiet and cools properly now. The new part fit perfectly.
I used a flat-head screwdriver to pop out the old light rocker switch. Then, I unplugged the wires, plugged them into the new light rocker switch, and then popped the new switch into the hole. That's it! Lights began working again.