Keep searches simple. Use keywords, e.g. "leaking", "pump", "broken" or "fit".
Sorry, we couldn't find any existing reviews that matched. Try using some different or simpler keywords.
★★★★★
★★★★★
Bernie V - June 19, 2023
Verified Purchase
Easy Repair
The video on the website associated with the part walked me through the install.
★★★★★
★★★★★
Alex L - April 20, 2023
Verified Purchase
worked and fit as expected
The part arrived quickly. The instructional video was bang on. I recommend buying the idler kit and replacing those and belt at the same time.
★★★★★
★★★★★
Brendan L - April 1, 2023
Verified Purchase
Easy easy
Worked with my dryer. I used clamps to hold it on while I glued it much easier. Very quick shipping. Thx part select!
★★★★★
★★★★★
Shoana H - November 2, 2022
Verified Purchase
It worked perfect!
The way Of making sure the part was going to fir was a bit convoluted. I imagine it would have been easier knowing the kitchenaid machines are whirlpool and should be searched for like that. But after figuring that out I found the part and it fit! Did an overhaul and the machine works great now!
★★★★★
★★★★★
KAREN S - May 12, 2022
Verified Purchase
Easy Repair after watching uTube, worked great
Worked great.
★★★★★
★★★★★
Dominic D - April 29, 2022
Verified Purchase
Easy repair
Dryer works like New and is way more quiet
★★★★★
★★★★★
COLIN J - March 2, 2022
Verified Purchase
Easy repair
The person I talked to was amazing in finding me the part I needed, even though my serial# could not be found. The part fit perfectly.
★★★★★
★★★★★
LUKAS T - May 3, 2021
Verified Purchase
Showed up quickly and worked out great.
Great part. The repair was fairly easy thanks to the helpful videos. My old seal was dammaged and had to be replaced. I would recommend having someone help hold the felt seal in place and you apply the adhesive to stick the felt seal to the drum.
★★★★★
★★★★★
John S - April 15, 2020
Verified Purchase
Fine part, but could be a mess if you're not very careful installing.
This fix requires patience and a bit of planning. Removing the old seal and very hard old glue is a painstaking process as the roll-folded seam around the outside edge of the drum is not a nice smooth surface for scrapping and sanding, but has crimps and folds, just do your best to get it cleaned up. (In the video you can see that he isn't having much success with the scrapper and it's a long way around that big drum! I tried a few different solvents as well and got nowhere with them). Fit the seal around the drum before applying any glue. Note that the seal stretches slightly for a snug fit, but will not stay in place while you're working on getting the glue on. I did it by myself (video does suggest having another person to help – a very good idea!) by using several spring clamps to help hold it in place and then worked my way around the drum applying glue in 12" max sections one at a time and replacing the clamps as I went. The glue, once tacky, is sticky and much repositioning once in place should not be counted on. Check after each section to make sure the seal still fits properly all the way around (it can stretch and if you're not careful you could easily end up with slack when it comes to the last section to glue, or conversely, not enough work with). In short, not as quick and easy as the video implies, but certainly doable.
★★★★★
★★★★★
William M - March 4, 2020
Verified Purchase
Just what the dryer doctor ordered
The video was great, and made the process easy.
< Prev
1
2
Next >
Customer Repair Stories
Average Repair Rating: 2.9 / 5.0, 24 reviews.
What's this?
< Prev
1
2
3
Next >
Sort by:
Search filter:
Clear Filter
Your search term must have 3 or more characters.
Keep searches simple. Use keywords, e.g. "leaking", "pump", "broken" or "fit".
Sorry, we couldn't find any existing installation instruction that matched.
intermittant heat
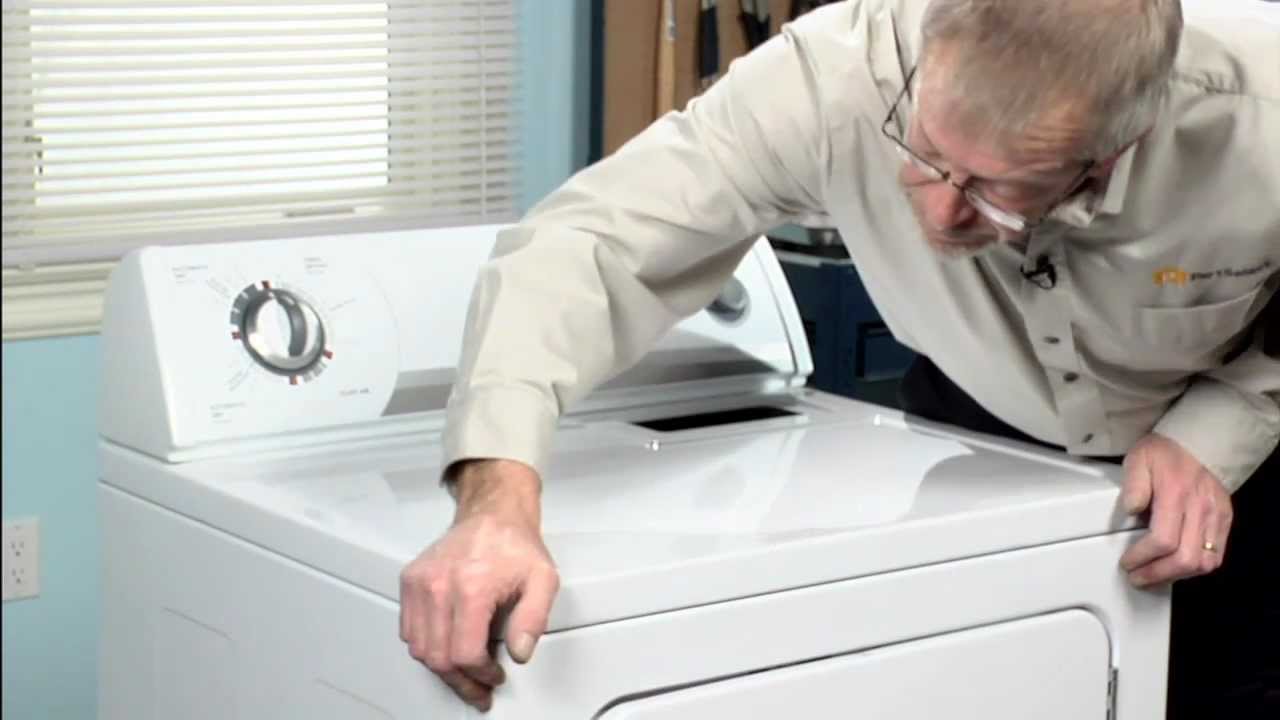
First I shut off the gas supply and disconnected the dryer vent and unpluged the unit so you can access the rear of the dryer. Then I removed the rear cover. This is where you will find your thermostats and fuses. Holding the new part next to the one to be replaced I transfer the wires one at a time so as not to get them mixed up, then unscrew the old part and install the new one. Insert a flat blade screwdriver under the top cover in the 2 front corners to unsnap it from it's clips, also at this time you need to remove the 2 screws that hold the upper part of the lint filter tube to the lid, then lift the lid to expose the drum ( I tilted the dryer back as far as the flex gas line would allow me to and rested the top lid against the wall without removing it, to many wires). Behind the front cover in the top right corner is the plug for the door switch,un-plug it and also there are 2 screws one in each corner. After that lift the front cover straight up and pull it away from the cabinet ( it has clips at the bottom to hold it in place). Reaching under the drum on the right side pull down on the belt tensioner and release the belt from the motor then you can remove the drum. Laying the drum down on it's front edge I removed the rear felt seal and took a piece of sand paper to rough up th old glue and clean off some of the felt that was still stuck to the drum. Following the directions from the seal package I put the glue around the edge of the drum and re-installed the new felt. This is a good time to clean out your dryer, while the glue sets up. A shop vac works the best, but be carefull not to suck up the money, it will help pay for the repair ( I found over a dollar in change ). At this time I also changed the coils on the gas valve, remove the 2 screws that hold the clamp and replace them one at a time. Re-install the drum with the belt on it, fold it and push it through the tensioner and put it on the motor pulley. rotate the drum to make sure that the felt is not kinked under itself, re-install the front cover bottom clips first, then the 2 screws and the plug for the door switch, pull down the lid and snap it in place, before installing the rear cover this is a good time to remove the rear cover to the lint chute and clean in there also ( it's easy to see why there are so many dryer fires). Re- install that cover and the rear cover and vent tube, turn your gas back on and check it for leaks ( even if you didn't disconnect it) plug your dryer back in and get busy catching up on the laundry that you haven't had a chance to do because your dryer broke, then smile and think about all the money you saved by doing this simple repair your self. Thanks Parts Select
After unplugging the dryer,I removed 2 bolts on the back top of the dryer, then removed the two screws in the lint box area. I used a screw driver to help force the top panel of the dryer up. When open, I removed the top screws that held the front and side panels together. I then lifted the front panel up and away from the dryer, so there would be room to take the drum out. I removed the belt from the pulley (located under the drum) and slid the drum out. I removed the old seal, cleaned up the drum and the inside of the dryer, then glued the new seal on. After the glue was dry, I put the drum back in (with the belt on the drum), put the belt back on the pulley and proceeded to put the dryer front back on. Once the front was on, I put the top back on and replaced the bolts on the back of the dryer. I plugged it in and it is working great! By the way, before this, I had NEVER attempted to repair a dryer before and I am female. If I could do it, so can anyone else willing to try :)
Other Parts Used:
Grace from Phoenix, AZ
Difficulty Level:
Easy
Total Repair Time:
30 - 60 mins
Tools:
Screw drivers, Socket set
58 of 64 peoplefound this instruction helpful.
Was this instruction helpful to you?
Thank you for voting!
Dryer making loud squealing noise when running
The (front) bearing and seal are not metal parts but a fabric and and mesh like material. It is somewhat like a fabric belt made to hold up a pair of trousers. The belt sits in a channel that goes around the door on the inside of the front panel. To get to the combination bearing/seal you remove two screws that are located under the cover of the lint trap. These have to be removed to lift the top. Then using a putty knife or screw driver you must pop the top (which snaps down on plastic clips) at the front corners. The top lifts up and folds back on hinges. The front is attached to the sides by one screw on each side near the top. A nut driver will remove then easily. Once the 2 screws are removed lift the front panel about 2 inches to disengage the front panel from the clips that hold the front attached to the sides near the bottom. When you remove the front panel the dryer drum will literally fall out so you want to get hold of it before pulling the front panel away so it isn't damaged and and doesn't damage the gas burner assembly which is under the drum to the left side. The drum is very light. I supported it with an empty shoe box while the front was off. Once the front is off you'll see the bearing/seal on the inside of the front panel and it will be obvious how to remove the old one and place the new one. There are three pegs on the front panel that receive the three holes in the fabric bearing/seal. The seal will stay in place while you remove the shoe box and put the front cover back on. The drum fits over the seal like a lid on a jar and just slides on the fabric when the drum rotates. Low tech but the drums slides easily on the bearing material and seems to last a long time.
I also did the rear dryer seal. This is similar to the front. To do this you follow the procedure above but to get to the real seal you will have to remove the drum. It will fall out on its own if the front panel is removed. The drive belt goes around the drum. It is about 3/8th of and wide and just wraps around the drum without any teeth or channels or anything. Let the belt fall to the bottom as you lift the drum forward and out of the cabinet. The drum is light. Just put it on the floor and strip off the old rear seal which is glued on. It too is fabric. Clean up the drum a little and fit the new seal on the drum. Once the seal is on the drum you can lift the edge of the fabric seal and glue the fabric flange to the drum. This becomes pretty obvious once you have the seal on the drum. If you put the glue on the drum first you will make a mess. Put the seal on properly and the lift the edge to apply the adhesive all the way around. The adhesive sets enough in a hour or so. Put the drum back in and replace the front panel. Don't forget the drive belt. It goes around the drive motor that is located on the bottom of the dryer on the right, around or over an idler pulley (my older model does not have a idler wheel but rather a bracket with a "slide" that the belt runs over that keeps sufficient tension on the belt to drive the drum. If your belt falls off the motor and the idler pulley falls out it may be confusing how the belt goes in. My idler bracket is held in slots on the bottom of the cabinet merely by the tension of the belt - no screws or anything. I suggest that you put the belt around the drum first, then the drive motor. You will have slack in the belt and it becomes a little more obvious how the idler pulley (which is mounted on spring steel) goes in and takes up that slack and keeps modest tension on the belt. The rubber side of the belt goes against the drum, the leathery side is the outside.
replaced motor and drum rear seal as well as idler wheels, the old rear drum seal was completly worn out, since I had it all apart, I replaced lint chute and trap seals and belt and tensioner. I spent less money on parts than if I would have bought a new dryer. The motor was the main problem as the bearings were shot.
Dryer sounded like it had rocks in it when running
Following the instructions that came with the parts, I removed the top off of the dryer, which was very easy, two more 5/16" screws and I had the drum out. I confess, this was my second time at this repair. 1st time I neglected to replace the rear drum seal which I strongly recommend you do while you have it open. I only replaced the 2 wheels last time and it failed very soon afterwards. Lesson Learned: Always replace the rear drum seal when you replace the support wheels!!!
Aft seal deterioated and causing brown spot on clothing due to netal to metal contact.
Removed top and front of dryer then drum and followed the instructions in the package. It was a real simple procedure. I did additional cleaning while the dryer was disassembled.
Other Parts Used:
Cleo from Laurinburg, NC
Difficulty Level:
Easy
Total Repair Time:
1- 2 hours
Tools:
Nutdriver, Screw drivers
11 of 12 peoplefound this instruction helpful.
Was this instruction helpful to you?
Thank you for voting!
the directions didn't say I needed clips to hold the felt in place while I did the glue
Once I started using a bunch of clothespins to hold the felt in place and then started gluing small sections at a time I was able to complete the task. The glue comes out of the tube very quickly so don't squeeze it a lot.
I watched all the videos with Steve. He was very helpful in his presentation of the repairs. Due to the age of the dryer every thing was replaced and was very easy to do. Thank you Steve and PartSelect for making these repairs possible and easy
Dryer belt worn out, rear seal worn replaced drum baffle
Unplugged unit and removed top and front of dryer. Removed drum and belt. noting how belt ran through the belt tension-er. Removed old felt seal from rear of drum. Replaced broken baffle, replaced rear seal. reinstalled belt. Put unit back together and test ran.
Took dryer apart. Should've started with You tube videos so I took more apart than I needed.
Got all the parts I needed from Parts select.
Fixed it and works great.
Other Parts Used:
Chris from Tucson, AZ
Difficulty Level:
A Bit Difficult
Total Repair Time:
1- 2 hours
Tools:
Nutdriver, Screw drivers
4 of 10 peoplefound this instruction helpful.
Was this instruction helpful to you?
Thank you for voting!
< Prev
1
2
3
Next >
Questions and Answers
Ask our experts a question about this part and we'll get back to you as soon as possible!
15 questions answered by our experts.
< Prev
1
2
Next >
Sort by:
Search filter:
Clear Filter
Your search term must have 3 or more characters.
Keep searches simple. Use keywords, e.g. "leaking", "pump", "broken" or "fit".
Sorry, we couldn't find any existing answers that matched.Try using some different or simpler keywords, or submit your new question by using the "Ask a Question" button above!
Rebecca
February 9, 2018
Is part number w10612022 (drum felt seal) the seal i would need for my Roper dryer? Thanks
For model number RES7646JQ0
Hello Rebecca, Thank you for your inquiry. This seal is compatible with the model number you supplied and it is the seal that goes at the back of the drum. Hope this helps!
23 people found this helpful.
Was this helpful?
Thank you for voting!
Kara
March 13, 2018
Will this fit my Whirlpool dryer
For model number WED4900XW0
Hi Kara,
Thank you for your question. Yes, this is the correct seal for your model number. Good luck with your repair.
6 people found this helpful.
Was this helpful?
Thank you for voting!
Paul Matharu
February 17, 2018
How to install on this model [600kenmore]
For model number 110.79622800
Hello Paul, Thank you for your inquiry. We have a repair video available for this part on our website and I have included the link here. It is also for a Kenmore model. Hope this helps!
https://www.partselect.com/PS8691753-Whirlpool-W10612022-Drum-Felt-Seal.htm?SourceCode=4&SearchTerm=11079622800&ModelNum=11079622800#RepairVideo
5 people found this helpful.
Was this helpful?
Thank you for voting!
Keith
July 25, 2021
Is the rear drum belt something I can install myself?
For model number LER6620PQ0
Hello Keith, Thank you for the question. We suggest watching the How to Video for the Belt, PartSelect Number PS346995. We hope this helps!
What are the product dimensions of this belt seal?
For model number LER8648LW0
Hello Brad, thank you for your question. The diameter of this is 25" and total length is 79". I hope this helps.
2 people found this helpful.
Was this helpful?
Thank you for voting!
Gerald
April 23, 2019
Will this fit Kenmore model 110.66862501?
For model number 110.66862501
Hello Gerald, Thank you for contacting us. I have researched the model you have provided and have found the part you are looking for is PartSelect Number: PS8691753. Hope this helps!
2 people found this helpful.
Was this helpful?
Thank you for voting!
Bill P
August 6, 2019
Will this felt seal belt fit my Kenmore residential dryer #110.77622600?
For model number Part Number PS8691753
Hello Bill, thank you for your question. Yes, the felt seal for your unit is PartSelect Number: PS8691753. Please enter the part number into the site for current price and availability. Good luck with your repair!
1 person found this helpful.
Was this helpful?
Thank you for voting!
Shane
November 23, 2021
How do you know if you need a new felt liner? I have a squeal that I can not seem to pin down. I have cleaned and lubricated the roller pins, I ran the motor without the drum and it was quiet. the bulkhead where the drum rides are shiny smooth.
For model number WED4800BQ0
Hello Shane, Thank you for the question. The Felt will show wear or damage when it needs to be replaced. We hope this helps!
1 person found this helpful.
Was this helpful?
Thank you for voting!
Alexander
January 13, 2020
Will this fit a 29 inch drum. Just want to be sure before I order.
For model number 11061402311
Hi Alexander. This part fits your model 11061402311. We do not have the exact specs and dimensions of most of our parts sadly. However basing compatibility on your model number is the best way to guarantee you are ordering the correct part. Thank you for your question and good luck with your repair!
1 person found this helpful.
Was this helpful?
Thank you for voting!
Kim
September 13, 2021
What is the general appearance of the mark made by faulty belt? We are seeing a cresent-shaped brown mark repeating.
For model number WED8600YW0
Hi Kim,
Thank you for your question. Before we can assist you further, we would need to know where you are seeing these brown marks. If you could resubmit your question with both this information and your model number, we would be happy to help you. If you have any questions, please let us know.
Was this helpful?
Thank you for voting!
< Prev
1
2
Next >
✖
Ask a Question
Ask our experts a question on this part and we'll respond as soon as we can.
This is a replacement bearing ring kit for your dryer. The bearing rings are found on the top and bottom lips of the dryer drum. If your dryer is unusually noisy, or the drum will not turn during operation, or if there a...


 – Part Number: WP3404162")