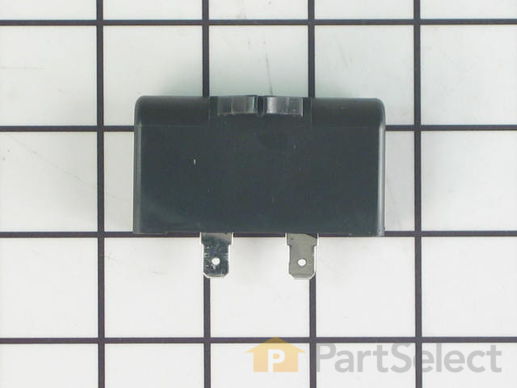
Product Description
Run Capacitor Specifications
This part helps the compressor kick on and off while maintaining a constant temperature to keep things frozen in your freezer.

How Buying OEM Parts Can Save You Time and Money
Part Videos
Replacing your Frigidaire Refrigerator Run Capacitor

Troubleshooting
This part fixes the following symptoms:
Won’t start | Will Not Start | Too warm | Freezer section too warm
This part works with the following products:
Refrigerator, Freezer.
This part works with the following products:
Frigidaire, Kenmore, Westinghouse, Gibson.
Part# 218909912 replaces these:
AP3267296, 1014579, 216787800, 7218909912
Customer Reviews
Filter By Rating:
- < Prev
- 1
- Next >
Sort by:
Search filter:
Clear Filter
Your search term must have 3 or more characters.
Keep searches simple. Use keywords, e.g. "leaking", "pump", "broken" or "fit".
Sorry, we couldn't find any existing reviews that matched. Try using some different or simpler keywords.
Nam N - December 25, 2019
Verified Purchase
repair Compressor Start Relay
The Run Capacitor is not solve the problem, this Refrigerator Compressor Start Relay Kit is my main problem.
- < Prev
- 1
- Next >
Customer Repair Stories
Average Repair Rating: 4.4 / 5.0, 6 reviews.
What's this?
- < Prev
- 1
- Next >
Sort by:
Search filter:
Clear Filter
Your search term must have 3 or more characters.
Keep searches simple. Use keywords, e.g. "leaking", "pump", "broken" or "fit".
Sorry, we couldn't find any existing installation instruction that matched.
Faulty Controller and Possibly Capacitor
After building a test box and determining the Controller was bad simply ordered parts and installed. Installation was a little difficult due to locking spades on electrical connections.
Unplug all power from freezer. Remove Bail wire from controller capacitor unit and remove from compressor by pulling STRAIGHT from compressor body to avoid bending contacts.
Use a very small instrumentation screwdriver to release locking spade on yellow and white wires. To unlock slide screwdriver in slot along wire entry to controller body while gently pulling on wire. Note position of wires and replace on new unit in same position/order. Plug new run capacitor into new controller being careful to orient capacitor to proper position (hole matches guide on controller unit). Plug newly installed controller and capacitor into condensor and replace bail wire.
Make sure timer is not in defrost mode - manually advance timer if necessary to ensure timer is in run mode. Turn temperature control to coldest setting. Plug in and hopefully enjoy the humming noise of your newly repaired and operational compressor and freezer.
Other Parts Used:
-
eric from inglewood, TN
-
Difficulty Level:A Bit Difficult
-
Total Repair Time:Less than 15 mins
-
Tools:Pliers, Screw drivers
33 of 39 people
found this instruction helpful.
Was this instruction helpful to you?
Thank you for voting!
Freezer compressor quit running causing freezer to defrost and ruin all contents.
Very simple repair. Removed the bail that holds the compressor controller and run capacitor from the compressor, removed the controller & capacitor, inserted a very small screwdriver into the controller to compress the barbs that hold the electrical wires to the controller. Plugged in the wires to the new controller in the same position as the original, plugged in the capacitor and then plugged the entire unit back onto the compressor, replaced the wire bail, plugged in the freezer and repair was complete.
Other Parts Used:
-
Kenneth from Safford, AZ
-
Difficulty Level:Really Easy
-
Total Repair Time:Less than 15 mins
-
Tools:Screw drivers
9 of 13 people
found this instruction helpful.
Was this instruction helpful to you?
Thank you for voting!
Freezer wouln't start
First I removed the clamp, pulled out the part, and diconnected the two wires on the side and a small screw. Reconnected the new part with the small screw, connected the wires and plugged the part back to the side of the motor. Whaa La, Done.
Other Parts Used:
-
Ivette from Grand Island, NY
-
Difficulty Level:Really Easy
-
Total Repair Time:Less than 15 mins
-
Tools:Screw drivers
7 of 11 people
found this instruction helpful.
Was this instruction helpful to you?
Thank you for voting!
Compressor would not start.
I watched You Tube on how to repair it the instructions that came were shit. I'm a stickler for wire colors being correct, could find that information in the instructions. Everything is on you tube I love you tube. The fix is is easy peasy. I'm not stupid eather there is nothing on that frig I could not repair if I can get parts even the compressor I can braze to. I know how it all works I never call repair people I will throw it all in the garbage if I can't get parts. That goes for TV's cars you name it. I have tools for all things.
Other Parts Used:
-
Danny from TAYLORSVILLE, UT
-
Difficulty Level:Really Easy
-
Total Repair Time:30 - 60 mins
-
Tools:Screw drivers
4 of 6 people
found this instruction helpful.
Was this instruction helpful to you?
Thank you for voting!
Compressor stopped running, freezer stopped freezing
Upon Inspection of electrical connections I found the controller connector slightly melted, so I ordered a replacement and the other parts, given the freeezers age.
Replacement efforts were close to plug and play.
Compressor powered back up And freezer is now functioning again.
Replacement efforts were close to plug and play.
Compressor powered back up And freezer is now functioning again.
Other Parts Used:
-
Joseph from BANDON, OR
-
Difficulty Level:Very Easy
-
Total Repair Time:15 - 30 mins
-
Tools:Screw drivers
2 of 2 people
found this instruction helpful.
Was this instruction helpful to you?
Thank you for voting!
Freeze would not re-start after temp rose above 23 degrees.
Unplugged the freezer. Located the Run Capacitor (next to the compressor). Removed the wire holding bracket, removed the Run Capacitor from the Start Relay. Installed the NEW Capacitor, re-installed the holding bracket. Plugged the unit in, looking at the display for the proper start-up sequence data. All is good - freezer operating for another 10+ yrs. NOTE: When removing the Run Capacitor, beware the COMPRESSOR could be HOT to the touch.
Other Parts Used:
-
Andy from GOOSE CREEK, SC
-
Difficulty Level:Really Easy
-
Total Repair Time:15 - 30 mins
-
Tools:Screw drivers
2 of 2 people
found this instruction helpful.
Was this instruction helpful to you?
Thank you for voting!
- < Prev
- 1
- Next >
Questions and Answers
Ask our experts a question about this part and we'll get back to you as soon as possible!
- < Prev
- 1
- Next >
Sort by:
Search filter:
Clear Filter
Your search term must have 3 or more characters.
Keep searches simple. Use keywords, e.g. "leaking", "pump", "broken" or "fit".
Sorry, we couldn't find any existing answers that matched.Try using some different or simpler keywords, or submit your new question by using the "Ask a Question" button above!
Jim
October 4, 2017
I replaced the evap motor due to the fan trying to start . Even after the new motor it still does the same thing. Tries to start for a long period of time . Every now and then it will start. Any ideas ?
For model number FRS23R4CW2

Hi Jim,
Thank you for your inquiry. Where the evaporator fan motor is taking a long time to start you will need to verify if the part is getting any voltage at the part's terminal leads. You will need to test it with a multimeter. If there is no voltage reaching the motor there may be a broken wire between the motor and the thermostatic control. I hope this helps. Thank you and have a great day!
2 people found this helpful.
Was this helpful?
Thank you for voting!
Ronald
April 4, 2023
What is the resistance (Ohms) check for the Run Capacitor part #PS817298, #218909912?
For model number LFFU17F5HWD

Hi Ronald, thank you for reaching out. To test the capacitor, part number PS817298, you may first discharge it, and then follow the instructions below:
1- You may use either a digital or analog multimeter. If you are using an analog multimeter, rotate the selection dial to the high setting for ohms of resistance.
2- Now calibrate the meter by pinching the leads together while adjusting the needle to read zero.
3- When using a digital model, again rotate the dial to the high setting for ohms of resistance.
4- Touch each of the probes to one terminal.
5- The meter display should display or deflect towards zero ohms and then return towards infinite resistance if the capacitor is working properly.
We hope this information is useful!
1 person found this helpful.
Was this helpful?
Thank you for voting!
- < Prev
- 1
- Next >
✖
Ask a Question
Ask our experts a question on this part and we'll respond as soon as we can.
Sorry, we couldn't find a match for "".
Here's a guide for finding your model number.
Something went wrong. Please try again later.
Your Question Has Been Submitted!
Our experts will send you an email as soon as your question has been answered.
Related Parts
Model Cross Reference
This part works with the following models:
PartSelect Number: PS817298
Manufacturer Part Number: 218909912
Manufacturer Part Number: 218909912
Brand
Model Number
Description


