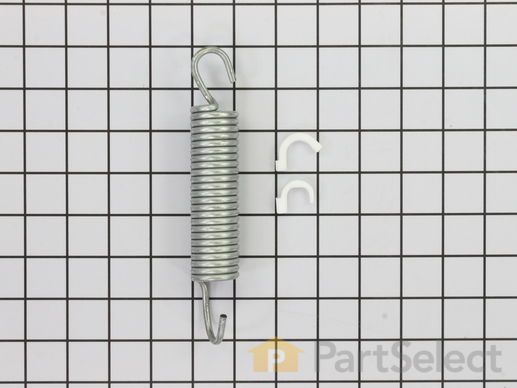
Part Location Diagram of 134144700 Frigidaire Single Spring with Insulators
See part 14 in the diagram
Replacing your Frigidaire Washer Single Spring with Insulators
( Grid squares measure 1x1 inch )
Customer Service Representative

Get in touch, we're here to help!

Daily 8am - 9pm EST

customerservice@partselect.ca

Single Spring with Insulators

★★★★★
★★★★★
2 Reviews
$68.93
  In Stock

Get this part fast! Average delivery time for in-stock parts via standard shipping: 1.8 days.

PartSelect Number PS735645
Manufacturer Part Number 134144700
Manufactured by Frigidaire
Part Videos

Replacing your Frigidaire Washer Single Spring with Insulators

Replacing your Frigidaire Washer Single Spring with Insulators
Troubleshooting
This part fixes the following symptoms:
Will not drain
This part works with the following products:
Washer, Washer Dryer Combo.
This part works with the following products:
Frigidaire, Kenmore, Gibson, Crosley.
Part# 134144700 replaces these:
AP3212517, 936912, 131277700, 131663600, 134136300
Back to Top
Customer Reviews
Average Rating:
★★★★★
★★★★★
2 Reviews
5.0
Filter By Rating:
  • 5 Stars
    2
  • 4 Stars
    0
  • 3 Stars
    0
  • 2 Stars
    0
  • 1 Star
    0
  • 1
Sort by:
Sorry, we couldn't find any existing reviews that matched. Try using some different or simpler keywords.
  • 1
Customer Repair Stories
 Average Repair Rating: 3.0 / 5.0, 13 reviews. What's this?
  • 1
  • 2
Sort by:
Sorry, we couldn't find any existing installation instruction that matched.
Inner support spring and vibration shock both broke - tub dropped down within the washer
Remove power
Remove water connections
Pull out washer to have sufficient room to access the back and the top.
Removed the top panel (4 screws at top- back)
Removed the back panel (a lot of screws)
Removed small metal retainer strip on top edge over broken spring
Removed broken spring, hung top of new one.
Pulled up tub to as I stretched out the spring to mount spring to tub
From the back, unplug and remove 2 crews holding the electronic motor control unit from lower left

For both shocks:
This was the most "difficult" part - locate the 2 plastic retainer pins holding the shock, locate the tooth (or tab) holding the pin in place and push the tab in (I had to use some leverage - its stiff plastic covered in grease - a spare screwdriver handle helps to push the tab down).

After pins are removed, shock just pulls out (weight of the tub handled by the suspension springs).

Replace with new shocks (1 pack has a pair), replace pins.

Reinstall motor control unit.

Reassemble frame. reattach water supply lines.

I had to plug in the washer, activate a cycle, then unplug/plug in the washer again.

It helps to have a screwdriver attachment for a variable speed drill to handle all of the screws.

All told - about 45 minutes, most of this spent on removing the pins.
Other Parts Used:
Shock Absorber Kit
  • Eric from Hillsboro, OR
  • Difficulty Level:
    Easy
  • Total Repair Time:
    30 - 60 mins
  • Tools:
    Pliers, Screw drivers
77 of 83 people found this instruction helpful.
Was this instruction helpful to you?
Thank you for voting!
washing tub had broken away fm 3 of 4 supports
disconnected fm water supply and electrical ckt
move washer fm beneath dryer (stacking config.)
removed back, found 2 broken shocks (round type) and 1 broken spring (left looking from back). checked online for parts and found your site. ordered and waited a few days.

back on task, removed controls (lower left corner) to reach pins, removed front lower panel, removed pins and broken remains of both shocks. removed broken spring. left remaining spring to keep tub suspended.

back on task when parts arrived. installed shocks --note that it was not clear that there are 2 shocks in each package (so i order 2 pkgs and now have 2 extra shocks --for next time it breaks away ;-)

crafted a 'hanger' with 10ga wire and 2x4 to permit tub to be supported and/or suspended without unduly stressing new components. attached both shocks being careful to follow instructions about alternating direction and orientation in relation to plastic bushing on the shock mounting points. removed remaining spring and used short length of 10ga wire to pull spring into position and lock.

re-assembled back and front cover... re-attached control circuit. moved closer to water and electrical supply and tested through 2 cycles --no problems found.

put back into position and leveled and locked.

works fine now.
Other Parts Used:
Shock Absorber Kit Single Shock Mounting Pin
  • marcia from Holden, MA
  • Difficulty Level:
    A Bit Difficult
  • Total Repair Time:
    1- 2 hours
  • Tools:
    Pliers, Screw drivers, Socket set
33 of 37 people found this instruction helpful.
Was this instruction helpful to you?
Thank you for voting!
The only problem was that the drive belt was so tight that it was two inches short from the drive shaft making it very difficult to put on by hand.
I did my best to stretch the belt out and as I wrapped it around the pulley one hand was preventing the belt from slipping off and the other hand had the screwdriver to use as Leverage to stretch and slip the belt on the other side of the pulley. One thing that I saw but didn't try was to use zip ties to temporarily hold the belt in place so it didn't slip off that may have helped.
Other Parts Used:
Shock Absorber Kit Door Strike Drive Belt - 6 ribs
  • Bret from MILACA, MN
  • Difficulty Level:
    Easy
  • Total Repair Time:
    30 - 60 mins
  • Tools:
    Screw drivers
9 of 12 people found this instruction helpful.
Was this instruction helpful to you?
Thank you for voting!
Out of balance when on final spin cycle
Had to replace one Spring on top of the tub and both shock absorbers. Anyone with even a limited amount of mechanical ability could handle this repair. Save yourself about $300 in repair cost and replace these items yourself. Spring and Shocks absorber kit cost less than $60 with shipping.

Just look at the diagram that comes with the parts, it's a piece of cake. The most difficult part is replacing the spring, she is stiff. You will need to take the top of the machine off, which is super easy, and remove the metal keeper on top of the frame rail. Get someone to help you as you will need to lift the tub and slip the spring over the frame rail.

The shocks are the easiest part of the repair, and should take less than five mins. to replace.
Other Parts Used:
Shock Absorber Kit
  • Kevin from Vancouver, WA
  • Difficulty Level:
    Easy
  • Total Repair Time:
    15 - 30 mins
  • Tools:
    Pliers, Screw drivers
7 of 9 people found this instruction helpful.
Was this instruction helpful to you?
Thank you for voting!
Tub was sagging and seal was not complete, would leak
The tub is supported by two springs and two shock absorbers. First remove the back panel of the washer. Then I placed the auto jack from my car under the tub, alongside the motor, and cranked it up, lifting the tub, until the top of the seal in the front was compressed. Then I took the top off of the washer to access the springs. There are retaining straps over the top of each spring that I had to remove to get to the springs. Pulling up hard on the spring allowed me to get a pair of pliers on the spring and pull it out of the slot it was in.

Once it was out of the slot I could remove it from the tub as well. I put the new spring in and replaced the retaining strap. Then I repeated this process on the other spring.

Once both springs were in place the tub was hanging as it should and the seal around the door was smooth all the way around. I haven't seen any more leaks since replacing the springs.
Other Parts Used:
Door Strike
  • Steven from Irving, TX
  • Difficulty Level:
    A Bit Difficult
  • Total Repair Time:
    30 - 60 mins
  • Tools:
    Pliers, Screw drivers
6 of 8 people found this instruction helpful.
Was this instruction helpful to you?
Thank you for voting!
right side tub mounting spring broke
disconnected electric and water supply. removed back cover from front loading washer. removed two screws from spring end plate on the top of the washer. replaced old spring with new spring/insulators by lifting the tub and hooking the new spring on. replaced the back cover and top spring cover plate. reconnected water supply and electric. machine is working like it did before the spring broke. very easy fix. the majority of the effort was moving the washer around to get easy access.
Other Parts Used:
  • Lisa from Phoenix, AZ
  • Difficulty Level:
    Really Easy
  • Total Repair Time:
    30 - 60 mins
  • Tools:
    Pliers, Screw drivers
6 of 6 people found this instruction helpful.
Was this instruction helpful to you?
Thank you for voting!
2 shocks and one spring broke
repair wasn't too difficult, hardest was raising the drum to engage the springs.

Steps I took:

remove the rear and front (bottom) covers. To remove the rear cover, I went ahead and took the hoses off. The bottom cover needs a good tug once the two screws are removed.

Once both covers were off, it was obvious what had to be replaced.
Pushing the notch on the shocks, removed both top and bottom pieces. Then I used books to lift the drum so that i could attach the new springs. Removed the books, installed the shocks from the top to the bottom.

Went ahead and removed the coin drop, cleaned it out, and reattached. Ran the washer two cycles to confirm the vibrations were gone. Loaded it up with towels (seemed to cause the worst vibs) and it was quiet.

Re-installed the covers and that was it.
Other Parts Used:
Shock Absorber Kit
  • Don from campbell, CA
  • Difficulty Level:
    Easy
  • Total Repair Time:
    1- 2 hours
  • Tools:
    Pliers, Screw drivers
5 of 7 people found this instruction helpful.
Was this instruction helpful to you?
Thank you for voting!
Water leaking and broken shock absorbers
Removed spring retainer straps from top of springs. Propped up tub with blocks and a wedge. Lifted out each spring and replaced. Re-attached spring retainer straps. Removed pins from shock absorbers (old/broken ones). These break due to moving washer w/out installing original foam blocks and support screws or due to age and fatigue. Pins have a retainer that must be depressed as you pull or push them out. may need to spin back and forth with pliers as you pull them. Bottom right pin won't come out w/out a hassle. Cut it in pieces with dykes and used spare pushed in from the FRONT (not the rear, as it was originally installed). Found leak was not fixed by getting the drum back up to proper height. Found bolt on tub had broken the bottom of the soap dispenser "tray". This is a 50.00 part. Made a patch from the bottom. Roughed up plastic and used silicone adhesive. After it had adhered filled from top with more silicone. Allowed 24 hrs to dry. Washer is as good as new.
Other Parts Used:
Shock Absorber Kit
  • Dan from Concord, CA
  • Difficulty Level:
    A Bit Difficult
  • Total Repair Time:
    1- 2 hours
  • Tools:
    Nutdriver, Pliers, Screw drivers
3 of 6 people found this instruction helpful.
Was this instruction helpful to you?
Thank you for voting!
Spring Ang Shock Broke
.
Other Parts Used:
  • James from North Canton, OH
  • Difficulty Level:
    A Bit Difficult
  • Total Repair Time:
    15 - 30 mins
  • Tools:
    Pliers, Screw drivers
3 of 9 people found this instruction helpful.
Was this instruction helpful to you?
Thank you for voting!
Spring broke and front loading washer made loud noise when it went into spin cycle.
Removed the back and lower panel in the front of machine. Turned it on its side to replace spring, not tools required. Then stood it up and replaced both shocks by removing plastic pins that hold them in place, no tools required. The only time you need tools is to remove the metal panels to get to the parts. Now it makes no noise and runs like a new washer. Paid $140 for the parts, a new machine would have cost over a thousand and would be one of those digital nightmares that don't last as long. This machine is 18 years old.
Other Parts Used:
Shock Absorber Kit
  • DONNA from VALPARAISO, FL
  • Difficulty Level:
    Easy
  • Total Repair Time:
    30 - 60 mins
  • Tools:
    Pliers, Screw drivers
2 of 2 people found this instruction helpful.
Was this instruction helpful to you?
Thank you for voting!
  • 1
  • 2
Questions and Answers

Ask our experts a question about this part and we'll get back to you as soon as possible!

1 question answered by our experts.
  • 1
Sort by:
Sorry, we couldn't find any existing answers that matched.Try using some different or simpler keywords, or submit your new question by using the "Ask a Question" button above!
Carol
May 9, 2019
Is there just one suspension sping on my washer or one on each side?
For model number FWT445GES2
PartSelect logo
Hello Carol, Thank you for the question. There are 1 spring on each side of the drum, so two required for the appliance. Hope this helps!

5 people found this helpful.

Was this helpful?
Thank you for voting!
  • 1
Related Parts
Model Cross Reference
This part works with the following models:
PartSelect Number: PS735645
Manufacturer Part Number: 134144700
Brand
Model Number
Description
Frigidaire
38712
Washer - WASHER
Frigidaire
38802
Washer - WASHER
Kenmore
41724182300
Washer
Kenmore
41724182301
Washer
Kenmore
41727182700
Washer
Kenmore
41727182701
Washer
Kenmore
41727182702
Washer
Kenmore
41727182703
Washer
Kenmore
41727182704
Washer
Kenmore
41729022890
Washer
Kenmore
41729042990
Washer
Kenmore
41729042991
Washer
Kenmore
41729042992
Washer
Kenmore
41729052990
Washer
Kenmore
41729052991
Washer
Frigidaire
41739012890
Washer - Stackable
Frigidaire
41739012891
Washer
Frigidaire
41739022890
Washer
Frigidaire
41739022891
Washer
Kenmore
41740032990
Washer
Kenmore
41740042990
Washer
Kenmore
41740052990
Washer
Kenmore
41740142000
Washer
Kenmore
41740412700
Washer
Kenmore
41740412701
Washer
Kenmore
41740412702
Washer
Kenmore
41740412703
Washer
Kenmore
41741042000
Washer
Kenmore
41741052000
Washer
Kenmore
41741142000
Washer
Customer Service Representative

Get in touch, we're here to help!

Daily 8am - 9pm EST

Contact Customer Service