This limiter thermostat cuts out when the temperature inside your refrigerator reaches 55 degrees Fahrenheit and kicks back in when the internal temperature drops to 20 degrees Fahrenheit.
How Buying OEM Parts Can Save You Time and Money
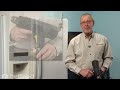
Part Videos
Replacing your Frigidaire Refrigerator Defrost Thermostat
Troubleshooting
This part fixes the following symptoms:
Fridge too warm | Freezer not defrosting | Freezer section too warm | Fridge runs too long
Keep searches simple. Use keywords, e.g. "leaking", "pump", "broken" or "fit".
Sorry, we couldn't find any existing reviews that matched. Try using some different or simpler keywords.
★★★★★
★★★★★
Darcy S - February 10, 2023
Verified Purchase
Worked as expected.
My appliance is up and running again.
★★★★★
★★★★★
Paul A - June 23, 2021
Verified Purchase
fast service/great instructions
Had absolutely no problem in replacing the part - fridge is now quiet & works great! Will keep you in mind for future repairs. Thank you.
★★★★★
★★★★★
Joseph B - June 2, 2021
Verified Purchase
Easy Repair
Great price and fast shipping. Ordered this part along with a start relay. Easy to follow video's on website. Total cost for parts was about $100, would have easily been a $400+ repair bill for service call.
★★★★★
★★★★★
Don E - March 12, 2021
Verified Purchase
Our Fridge is working properly again thanks to a new thermostat
Based on the online videos a non functioning defrost thermostat was causing the refrigerator not to cool as the cooling coil was icing up due to the auto defrost heater not turning on. The new defrost thermostat kit arrived as scheduled, it only took an hour to take out the old one( most of the time was using a hair blow dryer to melt the ice off the coil) and install the new one following the easy instructions provided. The refrigerator is working like new again, Don.
★★★★★
★★★★★
Wendel T - February 19, 2020
Verified Purchase
Worked as expected
This was an easy fix. Now the refrigerator works again.
★★★★★
★★★★★
Nick P - October 22, 2019
Verified Purchase
Good service fast delivery
The part war right. thanks
★★★★★
★★★★★
Roland S - May 14, 2019
Verified Purchase
Very easy to install. Great product, as described.
Fast shipping, fridge is back to life. Thank you.
★★★★★
★★★★★
Florent C - March 11, 2019
Verified Purchase
Easy replacement
This part did the job. Really happy
★★★★★
★★★★★
Alfred T - July 27, 2018
Verified Purchase
Satisfied..
I'm still waiting for the repair man. Thanks for the service very satisfied.
< Prev
1
Next >
Customer Repair Stories
Average Repair Rating: 3.7 / 5.0, 30 reviews.
What's this?
< Prev
1
2
3
Next >
Sort by:
Search filter:
Clear Filter
Your search term must have 3 or more characters.
Keep searches simple. Use keywords, e.g. "leaking", "pump", "broken" or "fit".
Sorry, we couldn't find any existing installation instruction that matched.
Fridge got warm and freezer coils were frosted
Fridge is a side by side. The freezer is pretty narrow for a guy with wide shoulders.
Pulled plug.
Had to remove bottom drawers then used nut driver to remove screws closest to back wall in drawer runners. Once the back screws were removed the runners could be swung up or down out of way so back cover could be removed.
Once back cover was removed thermostat was located attached to top pipe going into coil using a spring clamp.
Cut the wires just outside the crimp connectors going into thermostat. Released the spring clamp buy squeezing botton together.
Removed old badly corroded thermostat.
I wish I had attached the crimp connectors to the new thermostat wires before mounting it. Reaching way in the back, while turning shoulders verticly and trying to get the wire connectors set from both sides was awkward and uncomfortable...The biggest PIA of the whole task.
Once connected I let the fridge (thermostat) cool for 10 min. Turned the dial defrost timer to get it into defrost mode. Stupidly touched the heating element to see if it was getting warm...it was very hot.
Coils steamed...every looked like it was working. Unplugged, put back cover back on and retattached drawer mounts.
First i killed the power and water supply to fridge. Then i removed all the racks in freezer and the 1/4" screws for rack supports with nut driver. Next i removed the evaporator cover 1/4" screws to gain access. Then i removed the the 1/4" screw that holds the evaporator at the bottom and moved the evaporator outward to remove the heater element. Then i installed new heater element from the bottom of the evaporator making sure it was in the center of the evap coils. Next i replaced the defrost thermostat cutting the old wires. Then stripped and crimpped the new thermostat in place making sure of the same installed postion as removed. Next i replaced the defrost timer located at the bottom left using philips head screw driver. Next i replaced the water filter by turning it counterclockwise to remove. Then restored power and water supply. Next i tested the heater element by turning the dial on the defrost timer clockwise until it clicked and watched the element glow. Then waited for the deforst thermostat to shut off the heater. Finally i checked the evaporator drain iin the back of fridge for blockage and cleaned out completely. Repairs successful fridge good as new.
Evaporator coil freezing up, freezer and refrigerator are warm
Danger: Replacing these parts requires working with electrical wiring, be certain to unplug the refrigerator before starting work.
1. Unplug appliance 2. Empty freezer section 3. Remove shelves and Ice storage tray 4. Remove 6 screws from evaporator cover. Note: Remember where the screws with insulated washers go. 5. Use a hair dryer to melt all ice from coil Danger: To prevent injury or death from electrocution always ensure that the hairdryer does not get wet while in operation. 6. Unplug defrost heater and defrost thermostat wires Note: Thermostat is wired in series with the heater. 7. Remove screw from white plastic holder located on top of evaporator coil 8. Remove styrofoam pieces from top of coil 9. Grasp the bottom of the evaporator coil and carefully lift and pull out the bottom end a few inches 10. Remove old heater coil by pulling out from the bottom and replace with new coil Note: Be very careful when moving the evaporator, it is made of aluminum and will be very costly to repair if you damage the tubing. 11. Replace old thermostat with new thermostat 12. Re-connect thermostat and heater wiring Note: Remember to route wiring so that condensation does not gravitate to the electrical connections. 13. You can check if the heater is working by manually rotating the defrost timer clockwise. The timer dial is located on the bottom, front of the refrigerator on the freezer side. Be careful, the heater gets very hot. 14. Re-install evaporator cover 15. Re-install shelves and ice storage tray 16. Plug in the refrigerator Note: Depending on how warm your refrigerator was it may take 24 hours to return to normal operating temperatures. Note: Take your time and the job will go faster.
I checked the defrost timer (bottom front of the freezer / outside). I advanced it to send it into the defrost cycle. The heating elements in the freezer (behind the panel) did not heat up. I cut the wires going to the defrost thermostat. Turned the power back on, made sure the defrost timer was still in the defrost cycle and checked the voltage at the wires to the defrost thermostat (before the heating elements). There was power / voltage there. I jumped out / bypassed the defrost thermostat turned the power back on and the heating elements came on. The problem was the defrost thermostat. So I replaced it with a new one from PartSelect.com. How it works... When the defrost timer is advanced to the defrost cycle the switch closes sending power to the defrost thermostat. If the temperature is low enough, the defrost thermostat switch will close and sends power to the heating elements. When the temperature rises high enough about 55 degrees the switch at the thermostat will open and the heating elements will turn off (not allowing the freezer temperature to get too high, just enough to defrost the coil). The refrigerator will turn back on when the timer advances. The defrost timer will defrost every 8-12 hours.
I ordered a defrost timer and defrost thermostat from partselect.com. Parts arrived in 2 days (earlier than expected). Unplugged appliance, removed bottom cover, unscrewed 2 screws holding timer in place, unplugged timer and replaced with new part. Fastened back into place. Next removed back cover of freezer (5 screws using nut driver). Disconnected old thermostat and removed. Wires already had connectors installed. cut off the connectors with some wire left on and reconnected them to the new thermostat with the included blue wire crimps. Tried to use the shrink tube to insulate but couldn't get it snug enough. Just used electrical tape instead. Reinstalled thermostat. Reassembled cover. Plugged in and fridge and freezer are working fine again. Thanks partselect.com.
Defroster not working. Ice dams building up restricting cooling.
Not being sure which part it was, and having replaced the defrost timer already I changed all listed parts out. After 35 years they owed me nothing. I changed the control thermostat easily, I spliced in the defrost thermostat using the connectors and shrink wrap provided. The heater-defrosted element was a snap due to push/pull connectors.
Refrigerator is coopertone in color and matches the kitchen cabinets. oday the only viable option for a matching replacement is a subzero built in. Estimates for the cabinet work, subzero, electrician (to bring up to code) and plumber put the replacement at $12,000.
The unit is working like new with the replacement parts. I could have done more to isolate the faulty part but I think wholesale repacement was still a bargain.
I've fixed my Washing Machine and Drier with PartSelect parts and will continue to use them as my supplier.
Make sure unplugged the frig before doing any repair. Just like other DIYers. opened up the evaporator located inside the freezer. Replaced the defrost thermostat, there's only 2 wires, so just make sure which is positive, which is negative. Replaced the defrost timer located on the bottom front of the frig. There's on 2 screws to unscrew. All those work took me less than half hour. Turn on the frig., now it works like a champ again. Hope it will last another 10 years.
First, I unplugged the appliance. Safety, first. Than I removed the shield which was held in by screws. This covered the fan, thermometer. The defrost thermostat was taken out, with a little extra force. The wires on the defective part were no longer attached to the part. The instructions were easy to follow in replacing the defrost thermostat. I stripped the coating on the wire, attached it with the enclosed electical bugs. The assy was able to follow, and the part went back on. The refrigerator is working perfectly. I couldn't have done it without the help in diagnosing the problem and with the speedy delivery of the new part. Thanks for all your help and the ease of the installing the new part!
Other Parts Used:
debra from new washington, OH
Difficulty Level:
Really Easy
Total Repair Time:
15 - 30 mins
Tools:
Nutdriver, Pliers
11 of 13 peoplefound this instruction helpful.
Was this instruction helpful to you?
Thank you for voting!
The fridge motor was running constantly and the fridge was warm inside
I secured the power to the fridge. I took the metal panel which covers the cooling coils in the freezer off by removing the the 6 sheet metal screws. I used a standard hair dryer to melt the ice block which had formed due to the failure of the defrost timer. I replace the defrost timer, which was located behind the left front wheel of the unit. Finding the timer was the hardest part of the job. Since I was having trouble with the defrost cycle I also decided to replace the defrost thermostat due to its age. The most important item I would like to share is once all the work is done and the panel is back in the freezer, the power is restored take a straight slot screw driver and give the defrost timer about an eighth of a turn clockwise to ensure it starts. Then mark it with a sharpe and check it in 3 or 4 hours to make sure it is running. I did not do this on the one I installed and the freezer did not go into the defrost cycle. Once I got the timer started, well the ice cream stay frozen. BE SURE NOT TO WORK ON YOUR EQUIPMENT WITH IT PLUGGED INTO POWER SOURCE!!!
Ask our experts a question about this part and we'll get back to you as soon as possible!
3 questions answered by our experts.
< Prev
1
Next >
Sort by:
Search filter:
Clear Filter
Your search term must have 3 or more characters.
Keep searches simple. Use keywords, e.g. "leaking", "pump", "broken" or "fit".
Sorry, we couldn't find any existing answers that matched.Try using some different or simpler keywords, or submit your new question by using the "Ask a Question" button above!
Thomas
February 23, 2018
Can the defrost thermostat be checked with an ohm meter. I have no continuity at ambient temp. Do i have to cool it down or heat it up to check the continuity?
For model number FRS26ZRFW3
Hi Thomas, Thank you for the question, The best way to do this is to remove the thermostat from the refrigerator so you can control the temperature of the sensor. You can let the sensor warm up to room temperature. With the sensor warmed up to room temperature the sensor should read approximately 6.2K Ohms at 68°F. With the thermistor submerged is a glass full of ice water, the sensor should be very close to 32°F which should read approximately 16.3K Ohms. If the values that you are getting are far off from these readings, then the sensor is bad and should be replaced. Hope this helps!
9 people found this helpful.
Was this helpful?
Thank you for voting!
Deb
April 15, 2018
Hello! My problem is our freezer keeps defrosting. The temp. In the freezer ranges from 21 to 40 degrees. It took 3 days for it to make ice cubes. What is your opinion on fixing it. It's 10 years old. Thank you in advance
For model number FRT18HS6JB4
Hi Deb,
Thank you for your question. There are a couple of parts that you could check to see if they are working correctly. You should take look at your defrost timer, your defrost thermostat, and your run capacitor. You can test all of those parts with a multi meter to make sure that they are working. If they are, you might have to check your cold control thermostat for your freezer. It could be that part that is causing the wrong temperatures in your appliance. I hope that helps. Good luck with your repair.
5 people found this helpful.
Was this helpful?
Thank you for voting!
Daniel
August 31, 2022
Mon frigidaire givré tellement que les produit dans la partie bas du frigidaire vienne à gelé dois-je changer le timer et le thermostat du congélateur
For model number FRT22RGCW1
Hello Daniel, Thank you for the question. We suggest testing the Defrost Thermostat. The best way to do this is to remove the thermostat from the refrigerator so you can control the temperature of the sensor. You can let the sensor warm up to room temperature. With the sensor warmed up to room temperature the sensor should read approximately 6.2K Ohms at 68°F. With the thermistor submerged is a glass full of ice water, the sensor should be very close to 32°F which should read approximately 16.3K Ohms. If the values that you are getting are far off from these readings, then the sensor is bad and should be replaced. We hope this helps!
Was this helpful?
Thank you for voting!
< Prev
1
Next >
✖
Ask a Question
Ask our experts a question on this part and we'll respond as soon as we can.