This part helps to keep the dryer running as quietly as possible.
How Buying OEM Parts Can Save You Time and Money
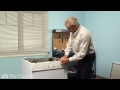
Part Videos
Replacing your Frigidaire Dryer Front Lower Drum Seal
Troubleshooting
This part fixes the following symptoms:
Marks left on clothes | Noisy
This part works with the following products:
Dryer, Washer Dryer Combo.
This part works with the following products:
Frigidaire, Kenmore, Gibson, Tappan.
Part# 5303283286 replaces these:
AP2143044, 456, 5303283286, 616044-000
Customer Reviews
Average Rating:
★★★★★
★★★★★
5 Reviews
4.8
Filter By Rating:
5 Stars
4
4 Stars
1
3 Stars
0
2 Stars
0
1 Star
0
< Prev
1
Next >
Sort by:
Search filter:
Clear Filter
Your search term must have 3 or more characters.
Keep searches simple. Use keywords, e.g. "leaking", "pump", "broken" or "fit".
Sorry, we couldn't find any existing reviews that matched. Try using some different or simpler keywords.
★★★★★
★★★★★
Seven Gables B&B C - May 15, 2023
Verified Purchase
Easy repair
Part fit as expected
★★★★★
★★★★★
Zina B - March 11, 2023
Verified Purchase
Easy repair
The part arrived in time. Installation was easy thanks to the attached video.
★★★★★
★★★★★
Martin H - April 28, 2021
Verified Purchase
On time and as stated
Part did arrive within delivery time and in good condition. I viewed on of their site videos on how to install the seal and all went smooth. This is the second time I have purchased a part from Part Select and if needed will do so again. Very hassle free from start to finish.
★★★★★
★★★★★
Bernhard H - February 12, 2021
Verified Purchase
Stackable dryer drum felt seal
Photo helped as there was no part number (machine too old) Was delivered 5 days earlier than predicted!
★★★★★
★★★★★
Jacques A - September 21, 2018
Verified Purchase
Work as expect
My dryer is almost brand new! Thanks
< Prev
1
Next >
Customer Repair Stories
Average Repair Rating: 2.8 / 5.0, 66 reviews.
What's this?
< Prev
1
2
3
Next >
Sort by:
Search filter:
Clear Filter
Your search term must have 3 or more characters.
Keep searches simple. Use keywords, e.g. "leaking", "pump", "broken" or "fit".
Sorry, we couldn't find any existing installation instruction that matched.
Brown spots on clothing
I was getting brown spots on my clothing since I bought this used dryer. Went to partselect.com Fine with me, but not my wife and daughter! Anyway, after ruling out rust, I ended up here and found Randy's story - without it, I'd be lost! Basically, the felt seal crushes over time, and clothing gets caught in the gap stuck against this nasty old brown felt and leaves a mark.
Replacing the belt was a very good idea, though as mentioned, the drum support bearing is just a "nice to do" - not necessary, but it gives you the excuse to re-grease it (I used a thick Molly impregnated grease from my motorcycle).
The only other advice I can give is that I used a chisel to scrape off the old felt - it came off in very little time, and I didn't end up needing to really do much cleaning of the drum afterwards. Just use a sharp one you're not afraid to dull - it'll be metal-on-metal contact.
Using the spring-loaded clamps that you can get from the hardware store was also a huge help - it just needs to keep the upper glide stuck to the drum for the 30 minutes for the glue to cure - I used 6, but 3 would work. The bottom seal doesn't need them as the felt will tend to stick to the drum when the glue is applied.
You might not NEED to replace the lower seal, but I'd suggest it. It's cheap enough, and this job is "not fun" enough that it only adds a few minutes total - good insurance that you do a complete job.
You also might want to get some aluminum foil tape and re-tape your blower extension tube - mine was ripped off from moving from house to house over the years.
clothes got caught , burned and ripped on front of drum
I felt ,if I was going to replace the top drum glide and lower basket seal, I might as well replace the belt ,bearing assembly and the idle pulley assembly and avoid having to replace these sooner than later. All of the parts showed alot of wear and the belt like all drive belts, should be changed every 5-6 years. DISCONNECT ELECTRICITY and GAS LINES 1.popped top by pushing and prying at front /top clips about 2-3in. in from side edges. lifted it off 2. removed the front panel by removing the 2 top front screws from the inside, then the two lower screws from the front after removing the small white plastic hole covers. disconnected the multiplug electric connector top right. set panel aside. 3.remove small back panel.and loosened belt.(observe belt path and idle pulley assy. 4. lifted drum and slid it out the front. 5. using socket, removed rear plastic bearing housing and replaced the same. be careful of observing the small ball bearing and the small piece on outside back panel. replace the same. you wil probably need a second set of hands to hold the piece on the outside when screwing in the screws from the inside. 6. unscew the "bearing" from the rear of the drum and replace with new one.(the screws are self-tapping and go in HARD!!) 7. apply lubricant liberally to plastic bearing holder 8. place new belt around drum(rubber side against drum cloth side out. 9. idle pulley assy. is removed by removing spring and just sliding assy out of holder. replace with new 10. replace drum and belt 11. take front panel and remove top drum glide and lower basket seal.( i marked where the two seal/glide come together with a marker ) 12. scrape and remove as much felt and possible. I then used "goo gone" to remove all the glue. clean well and using the provided high temp adhesive reattached glide and seal. 13. reassemble and enjoy your NEW? dryer
Dryer making squeeking sounds and clothes getting caught in drum causing brown spots
I followed others suggestions with numbered steps and listened to others suggestions about replacing other parts while in the dryer. I took the dryer apart and cleaned it out well. I used acetone to remove the glue from the felt and Drum Glide at the top of the Drum. It worked much better than Goo Gone. By doing the clean up and evaluation one day, I ordered all the parts that I saw were worn or difficult to get to. I replaced the Heating Element only because the old one was very brittle and to get to it again would be difficult. Also, I followed other's advice to photograph the parts before removing. It was easy to remember how things went if I had a photo to refer to.
When the parts arrived it only took about 30 minutes to install them all because the glue removal, lint removal, and parts removal had been done another day. I should add that I am a 66 year old woman and found the job quite simple. Excellent web site. Thanks to others for the step-by-step instructions. Oh, to hold the Drum Glide and felt in place while the glue cured, clothes pins work great. I let the glue cure overnight to make sure that it was really secure.
retainer around drum dryer was wore, back bearing squeeks
I look up on the internet on how to disassemble dryer to get to the parts needed. Took off top, found screws to take off front. Removed existing drum riding seal and lower seal. Used laquer thinner to remove excess glue. Cleaned throughly with soap and water. Reapplied new seals.
At the same time removed drum and parts in the back of the dryer for ball bearing. great, expeditious help from your store. Thank you
Clothes became hung between dryer drum and drum seals.
Once the seals have worn out, clothes started to get hung up. This would essentially ruin the clothes that became stuck. To replace is pretty straight forward and the hardest part is removing the glue and residue from the previous seals. In Summary: 1. Unplug the dryer 2. Use the putty knife to open the top of the dryer, there are two spring clips to depress by placing the putty knife in the gap between the top of the dryer and the front panel. About four inches from either side... 3. Remove the two screws that go from the side panels into the front, one screw on either side of the drum about 8 inches from the top, phillips head screws.. 4. The face will come off and the drum will drop a bit, no big deal. 5. Disconnect the electrical connection in the top of the dryer. There is a harness connector at the top right of the dryer and one tie wrap holding it loosely . 6. Remove the old seals... Not the general location of the top seal and mark the ends with a sharpy on the lip of the dryer face... This way you know where to reinstall the new seal. You have to glue it back on and won't get too many chances to glue it down.
7. Let the work begin. Remove the old glue and residual seal material from the lip. I used a sander in some places, a razor blade in a holder in some, and a wire brush in a drill in others. The wire brush did the best job but wouldn't reach everywhere.
8. After you've cleaned the lip off. Begin by putting some glue, liberally, around the location for the top seal with the plastic pieces on it. I used some spring clamps to hold it in place after gluing. You'll be turning the face over to put the bottom seal on and need it to be in place firmly.
9. Put some more glue on the lip and being placing the lower seal. Use a spring clamp every 12-18 inches to hold the seal and make good contact. I pulled my seal tight as I put it in place. Not too tight to compress but tight enough that I had 4 inches to cut off after I made it all the way around.
10. Leave the clamps on the seal for 10 - 15 minutes. Longer if you can. Once you replace the front of the dryer, all those fumes are in the dryer and any clothes that you dry right away will smell like that if you don't let the glue cure. I didn't have a lot of time so I waited 15 minutes and replaced the dryer front, then I ran the dryer on low heat for one complete cycle to help the glue setup.
11. Replacing the front is just reverse operation of removal. Be sure to pay attention to the tabs at the bottom of the front dryer panel. They are attached to the lower dryer panel and you need to lower the front panel over them so they'll hold it tightly.
12. You'll need to slightly lift the dryer drum to get it to line up with the new seals on the front panel. It may be a slightly tighter fit with the new seals, you'll know when you have it in correctly. Press the front panel back inward and replace the two screws you removed earlier. Reconnect the wiring harness and replace the tie wrap you cut. Put it back to similar tightness that it was when you cut it out earlier.
13. Lower the top panel and snap it back down into the front panel.
14. Plug it back in and test it.
There are steps I've overlooked I'm sure... Such as thoroughly cleaning the lint trap in the front panel while you have it removed... and vacuuming out the dryer itself with the front off. Not to mention examining the other wear items on the dryer such as the belt and roller assembly. Or the rear bearing and carrier. Did I mention Cleaning out the dryer? All that lint in the duct work hinders your dryers ability to operate effectively.
After reading other posts on this page I learned that these symptoms are very common for older dryers when the felt bearings ("seals") are worn out. I replaced the top and bottom felt strips (the top one has plastic wear pads which had completely worn away on my machine). I also took the time to replace the rear plastic bearing and the belt (pretty cheap parts). In addition, after opening up the dryer I found that one of the wire pigtails connectors was black and melted from arcing (bad connection). I replaced the bad connectors with crip-on connectors from Radioshack ($2). Incidentally, I bought lifetime supply of high temp wheel bearing grease: one tub for $7... and used about a teaspoon, but hey, that's still cheap. The hardest part was cleaning off the old felt adhesive, I used nail polish remover to soften the old glue and scrapped of 80% with a screw driver... good enough! I held the new felt on with duct tape until the glue dried.
I suggest watching the installation video for the rear bearing replacement I found on this website. It showed me where the screws are and the trick for lifting up the back of the tub using the belt to disengage the rear bearing. It was a snap.
I wish I had searched the problem down several years earlier...
Finally got sick of stained clothes when a new set of cotton sheets got stained. My wife was on the verge of ordering me to get a new dryer. After spending 15 minutes googling (why didn't I do this years before..!?!) I found the answer. Old, worn drum glide!
As with other reader stories, since I gotta take the thing apart to replace the drum glide, may as well replace the belt and lower glide.
Read the other stories for detailed repair instructions. It's not hard, but it does take an extra pair of hands and some patience.
Take the opportunity to clean the inside of the dryer (you have a lot of lint in there, I expect) to prevent fire. Also clean your duct vents. Better safe than sorry!
I first watched the video. Had I not done that, I probably would have started looking for a new dryer. The repair is simple and I feel like now I could repair just about anything on the dryer.
Dryer was leaving marks on the clothes and they were getting stuck in the rim around the door .
Let me start by saying that I am a stay-at-home mommy of 2-year-old twin girls so if I can do this, you can too. 1. I disconntected the dryer from the outlet. 2. Then I had to pop open the top of the dryer. I had to wedge a screwdriver underneath the top lid (towards the front corners) in order to open the top. 3. Looking into the dryer from the top I could see a few screws I needed to remove that were along the sides of the drum. After removing the screws, I was able to remove the front panel of the dryer exposing the drum. 4. The seal that I needed to repair was located on the front panel. I had to remove the old seal (I had to scrap to get some of it removed). 5. I applied the adhesive then attached the upper and lower seals. 6. I let the seals dry for a few minutes then replaced the ront panel. In replacing the panel, the seals need to fit around the drum. You need to be careful in fitting the drum so that the seals remain intact and not pushed out of place. 7. Then, I simply replaced the screws to the front panel and secured the top lid back in place. FYI: I did have a problem with the lower seal, in placing the drum over the seals, the lower was pushed out of place without me knowing. A few days later, the dryer was making a noise and clothes were still getting caught. After opening the dryer and examining the seal, I needed to reattach the seal. I was out of the adhesive but was able to use Gorilla glue (can withstand any temperature once it is dry). Works good as new now. FYI: I also have to add that the actual replacing of the seals did not actually take 2 hours but since the dryer was opened, I took advantage and thoroughly cleaned the inside of the dryer.
This job is easier than you think and is basically the same procedure for most dryers. This dryer is actually made by Frigidaire. Wife priced a new dryer at Lowe's and the salesman actually told her if she has someone to do the work for free (which was me), then he would fix the old dryer and not buy a new one. This was the salesman at Lowe's saying this. Move dryer to an open area that has plenty of workroom. Remove small back panel (2 screws) and reach in and remove belt from pulley. Use a flat screwdriver or butterknife to push tabs in on both upper front corners of the dryer. Top will pop up and then lift up and gently pivot it backward where it is out of the way. Remove two top inside screws and wires from run button on front panel and the front panel will just fold down to the floor. Pull the drum upwards to pull the rear bearing out of the holder and the drum will come out through the front, not the top of the dryer. It will be a tight fit, but is not hard to remove. Before doing anything else, thoroughly clean everything you can put your hands on, including the blades of the blower wheel. I tested the thermostat switches and they were all okay, but the heating element was actually fried. You could see where it had burned. Unplug the wires from the element and thermostat and remove heating pan from the back and put in new heating element/pan the same way and attach wires. Remove the top and bottom felt gasket from the front panel and scrape as much felt off with a flat blade screwdriver as you can. Follow directions on tube of glue and then glue new felt gaskets on in the same spot as the old ones were. The glue needs to sit for a minute or two to get tacky and then the felt gaskets will hold. I pressed hard all around for a couple of minutes to make sure it was glued down. Put some grease, standard lithium grease will work fine, on the back ball bearing and holder, and slide drum in and make sure the back ball bearing is seated in holder. Slide new belt on drum and then lift front panel back off the floor and onto front of drum. Re-attach two front screws and the two wires for the run button inside the loading door. Go to the back panel and put some grease on the belt pulley shaft and re-attach belt. Close back panel. Go back to the top and rotate drum by hand to verify that it turns freely and there is nothing binding it. Swing top of dryer down and snap it shut on both top corners and you're done. I ran it empty for about 20mins to make sure the glue dried sufficiently and it was good to go. The parts for this at Sears were almost double the price that PartsSelect had them for. Thanks again to PartsSelect. I am recommending you to all of my friends who do their own repairs!
Ask our experts a question about this part and we'll get back to you as soon as possible!
5 questions answered by our experts.
< Prev
1
Next >
Sort by:
Search filter:
Clear Filter
Your search term must have 3 or more characters.
Keep searches simple. Use keywords, e.g. "leaking", "pump", "broken" or "fit".
Sorry, we couldn't find any existing answers that matched.Try using some different or simpler keywords, or submit your new question by using the "Ask a Question" button above!
Kevin
October 9, 2019
There is a big gap at the top of the front seal. Clothes have gotten stuck and it smells like something is burning. Do I need a new front lower seal?
For model number FSE748GFS1
Hi Kevin,
Thank you for your question. If there is a gap at the top and the clothes are getting stuck and you have a burning smell, the seal may be worn and you will need to replace it. I hope this helps. Thank you and have a great day!
3 people found this helpful.
Was this helpful?
Thank you for voting!
Sergiy
January 30, 2023
Are part numbers PS460194 and 5303937183 identical or interchangeable? It is Kenmore dryer
For model number 970C8004200
Hello Sergiy, Thank you for contacting us. The part numbers PS460194 and 5303937183 are two different parts for different parts. We have researched the model you have provided and have found the part you are looking for is PartSelect Number PS460194. We hope this information helps!
1 person found this helpful.
Was this helpful?
Thank you for voting!
Sergiy
January 30, 2023
I need to replace both: Upper Drum Glide part #PS470317 and Front Lower Drum Seal part #PS460194 on Kenmore Dryer.
Upper Drum Glide comes with adhesive. Will this adhesive cover putting on both the glide top portion and the lower felt?
For model number 970C8004200
Hello Sergiy, thank you for your question. Yes, the High Temperature Adhesive 5308027429 should be enough to cover both the upper and lower felt pieces. We are pleased to have been able to help.
1 person found this helpful.
Was this helpful?
Thank you for voting!
Steve
May 7, 2018
Regarding the scorching of clothes, isn't there a thermostat in the dryer that can be adjusted to either run the dryer hotter or cooler?
For model number FDE336RES2
Hi Steve,
Thank you for your question. The temperature on your dryer cannot be adjusted. For information on each dryer setting for your dryer, you will need to consult your owner's manual. I hope this helps. Thank you and have a great day!
1 person found this helpful.
Was this helpful?
Thank you for voting!
Steve
May 5, 2018
I'm getting scorch marks on clothing when using this dryer. Also, the metal rotating drum is very hot to touch. A dryer has to be hot to dry clothes, but is it normal that the inside of the drum, wherein the clothes are placed, is so hot that one could burn their finger if the metal was touched at the end of the drying cycle? It definitely isn't normal that clothes are being scorched! What part do i need to replace to fix this issue?
For model number FDE336RES2
Hi Steve,
Thank you for your question. If your dryer is getting too hot, your dryer may be running to hot because of a clogged vent. It may also be running too hot, if you are overloading the dryer. This can also lead to scorch marks on your clothes because the dryer cannot tumble properly and the clothes stay in contact with the heated drum. I hope this helps. Thank you and have a great day!
Was this helpful?
Thank you for voting!
< Prev
1
Next >
✖
Ask a Question
Ask our experts a question on this part and we'll respond as soon as we can.
This kit includes one bearing, one ball shaft, one ball bearing, one ball bearing retainer, a small tube of high temperature lubricant, and installation screws.