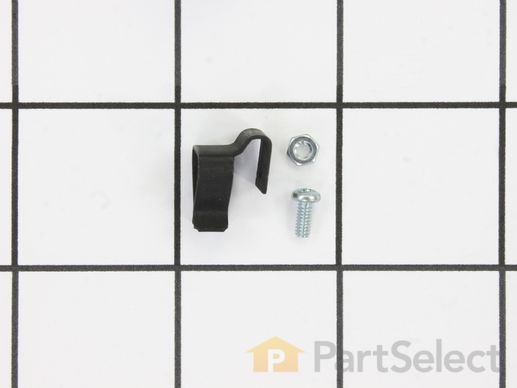
Part Location Diagram of 814103 Whirlpool Surface Burner Stabilizer Clip Kit
See part 13 in the diagram
( Grid squares measure 1x1 inch )
Customer Service Representative

Get in touch, we're here to help!

Daily 8am - 9pm EST

customerservice@partselect.ca

Surface Burner Stabilizer Clip Kit

$15.05
  Special Order
PartSelect Number PS389114
Manufacturer Part Number 814103
Manufactured by Whirlpool
Product Description

Surface Burner Stabilizer Clip Kit Specifications

This kit contains one clip, a screw, and a nut.
How Buying OEM Parts Can Save You Time and Money

How Buying OEM Parts Can Save You Time and Money

Troubleshooting
This part fixes the following symptoms:
Element will not heat
This part works with the following products:
Range, Cooktop, Microwave Oven Combo.
This part works with the following products:
Whirlpool, Roper, KitchenAid, Kenmore.
Part# 814103 replaces these:
AP2963492, 3155, 3148789, 3148790, 814103
Back to Top
Customer Repair Stories
 Average Repair Rating: 4.2 / 5.0, 8 reviews. What's this?
  • 1
Sort by:
Sorry, we couldn't find any existing installation instruction that matched.
Surface elements quit working
Drilled out old and broken hold down clips, installed new ones(4). Cut old wires attached to surface plug in block, striped wires, and attached new plugin kit(4), warmed up heat shrink with a hair dryer, put in new drip bowels, the stove is like new.
I ordered the parts on line early one morning, the next day they were at my door and installed that day, everything that I ordered was there, and fit properly.

Way to go Part Select.com

Jon
Other Parts Used:
Chrome Drip Bowl - 8 inch Drip Bowl - 6 Inch Surface Burner Plug-In Block Kit
  • Jon from Oakley, CA
  • Difficulty Level:
    Easy
  • Total Repair Time:
    15 - 30 mins
  • Tools:
    Pliers, Screw drivers, Wrench set
234 of 319 people found this instruction helpful.
Was this instruction helpful to you?
Thank you for voting!
Needed to replace chrome drip bowls and replace one of the hold down clip since previous owner used incorrect drip bowls and put pressure on the hold down clip.
Pulled out the electric element from the range, replaced the new drip bowl on three of the burners and then replaced the electric element pushing it into the hold down clip. On the fourth burner, I removed the electric outlet, the previous incorrect drip bowl and had to drill out the broke off hold down clip that was no longer there. Next I placed the new hold down clip in position, alligned and fed the little screw through the hold down clip. I used a vice grip to hold the nut in place and with a screw driver tighened the nut. I placed the drip bowl in place, attached the electric element and slipped it into the new hold down clip. Everything went smoothly and I experienced an excellent repair job. We received prompt service and had no problems. I just hope the used appliance that we bought works now. It looks great. It is for a rental unit.
Other Parts Used:
Chrome Drip Bowl - 8 inch Drip Bowl - 6 Inch
  • Donna from Petaluma, CA
  • Difficulty Level:
    Really Easy
  • Total Repair Time:
    Less than 15 mins
  • Tools:
    Screw drivers, Wrench (Adjustable)
212 of 413 people found this instruction helpful.
Was this instruction helpful to you?
Thank you for voting!
Burner was arching or not heating up.
I followed the instructions on removing the existing burner, recepticle, and section of wire. Then followed same instructions for reinstalling above new parts. The instructions were simple and straight forward. The only gluich was that I had to drill out the rivets holding in the old hold down clips. I drilled these out with an 1/8" bit on the burner side off the opening.
Other Parts Used:
Surface Burner - 8 Inch - 2600W Surface Burner Plug-In Block Kit
  • Scott from Pleasant Valley, CT
  • Difficulty Level:
    Really Easy
  • Total Repair Time:
    30 - 60 mins
  • Tools:
    Pliers, Screw drivers
13 of 16 people found this instruction helpful.
Was this instruction helpful to you?
Thank you for voting!
replacing the hold down clip for the burner
Started out removing the old clip that didnt hold burner element down anymore. It was a bit rough, since i was taking off a rivet. I used the screwdriver to carefully wedge the edges of the rivet upward so that i could get the wire cutters underneath it enough to snap the head off. After some fanagling for about 20 minutes, i popped it off. The rest of the repair went like cake, and i am soooo thankful that the replacement part i ordered from you included a screw and a nut. Next time, if there is a next time, this repair could be done in 2 minutes. THANK YOU FOR SAVING THANKSGIVING AND A $100 REPAIRMAN SERVICE COST FOR A $10 PART!!!
Other Parts Used:
  • Roseanne from North Syracuse, NY
  • Difficulty Level:
    A Bit Difficult
  • Total Repair Time:
    15 - 30 mins
  • Tools:
    Pliers, Screw drivers
5 of 7 people found this instruction helpful.
Was this instruction helpful to you?
Thank you for voting!
bad element and burner clips were broken
Pulled out the stove and unplugged. Removed the back of the oven and removed the element connections. Removed the two screws holding the element in place and installed the new one.
Removed the remaining parts of the old clips and installed the new ones. Very easy
Other Parts Used:
Bake Element - 2600W 240V Oven Door Spring
  • Robert from Cincinnati, OH
  • Difficulty Level:
    Really Easy
  • Total Repair Time:
    15 - 30 mins
  • Tools:
    Nutdriver
4 of 19 people found this instruction helpful.
Was this instruction helpful to you?
Thank you for voting!
old stabilizer clip was broken
I removed surface burner and drip pan from stove. Then drilled out the remaining part of the old stabilizer clip. Once clip was removed I installed the new stabilizer clip with the screw and nut that came with the clip. Then I placed the drip pan back into position and installed the burner and locked it into the new clip.
Other Parts Used:
  • Phillip from Pekin, IL
  • Difficulty Level:
    Really Easy
  • Total Repair Time:
    Less than 15 mins
  • Tools:
    Screw drivers
3 of 4 people found this instruction helpful.
Was this instruction helpful to you?
Thank you for voting!
Clips worn/broken
I had to remove the original clips (broken or damaged). This was the hardest part -- the clips were held on by rivets (not screws), so I had to pound/punch them out (using care so not to damage the stove top). Once I punched the rivet out all that remained was a small hole, I just used the small nut and bolt that came with my stablizer clip kit and mounted the new clips. Everything worked out fine.
Other Parts Used:
  • Joseph from Irmo, SC
  • Difficulty Level:
    Easy
  • Total Repair Time:
    15 - 30 mins
  • Tools:
    Pliers, Screw drivers
2 of 3 people found this instruction helpful.
Was this instruction helpful to you?
Thank you for voting!
Clip was broken, plug in connector end bad on burner
lifted up burner and pulled it free from its connection, then removed drip pan. used my cordless drill to drill out broken stabilizer clip. cleaned up chips from the drill process before installing new clip. installed clip with enclosed screw and nut. I then installed the new burner by lining it up with the connection under the cook top pushed it place and lowered it into the stabilizer clip. Then I turned the burner on to try it out, but I waited for about one hour before turning on the burner because it was cold from being outside.
Other Parts Used:
Surface Burner - 8 Inch - 2600W
  • Phillip from Pekin, IL
  • Difficulty Level:
    Really Easy
  • Total Repair Time:
    Less than 15 mins
  • Tools:
    Screw drivers
0 of 1 people found this instruction helpful.
Was this instruction helpful to you?
Thank you for voting!
  • 1
Questions and Answers

Ask our experts a question about this part and we'll get back to you as soon as possible!

1 question answered by our experts.
  • 1
Sort by:
Sorry, we couldn't find any existing answers that matched.Try using some different or simpler keywords, or submit your new question by using the "Ask a Question" button above!
Cynthia
October 21, 2017
How many stabilized do you need on one burner? Looks like three? Thanks
PartSelect logo
Hello Cynthia, thank you for contacting us. You would just need to replace the same ones you have for your model. If it has 3 you would just need 3 for each one. Hope this helps!

1 person found this helpful.

Was this helpful?
Thank you for voting!
  • 1
Related Parts
Model Cross Reference
This part works with the following models:
PartSelect Number: PS389114
Manufacturer Part Number: 814103
Brand
Model Number
Description
Whirlpool
4RF302BXDW0
Range - Freestanding, Electric
Whirlpool
4RF310PXDQ0
Range - Electric
Whirlpool
4RF315PXDQ0
Range - Freestanding, Electric
Whirlpool
4RF315PXDW0
Range - Freestanding, Electric
Kenmore
664RF3020XYN1
Range
Kenmore
664RF3020XYN2
Range
Kenmore
664RF3020XYW0
Range
Kenmore
664RF3020XYW1
Range
Kenmore
664RF3020XYW2
Range
Roper
FEC330BL0
Range - Freestanding 30" Electric, Conventional
Roper
FEC330BW0
Range - Freestanding 30" Electric, Conventional
Roper
FEP310BL0
Range - Freestanding 30" Electric, Conventional
Roper
FEP310BL1
Range - Freestanding 30" Electric, Conventional
Roper
FEP310BW0
Range - Freestanding 30" Electric, Conventional
Roper
FEP310BW1
Range - Freestanding 30" Electric, Conventional
Whirlpool
FEP310YL0
Range
Whirlpool
FEP310YL1
Range
Whirlpool
FEP310YL2
Range
Roper
FEP310YW0
Range - Electric
Roper
FEP310YW1
Range - Electric
Roper
FEP310YW2
Range - Electric
Roper
FEP320BL0
Range - Freestanding, Electric
Roper
FEP320BL1
Range - Freestanding, Electric
Roper
FEP320BW0
Range - Freestanding, Electric
Roper
FEP320BW1
Range - Freestanding, Electric
Whirlpool
FEP320YL0
Range
Whirlpool
FEP320YL1
Range
Whirlpool
FEP320YL2
Range
Roper
FEP320YW0
Range - Freestanding, Electric
Roper
FEP320YW1
Range - Freestanding, Electric
Customer Service Representative

Get in touch, we're here to help!

Daily 8am - 9pm EST

Contact Customer Service