Keep searches simple. Use keywords, e.g. "leaking", "pump", "broken" or "fit".
Sorry, we couldn't find any existing reviews that matched. Try using some different or simpler keywords.
★★★★★
★★★★★
Kettia L - December 14, 2023
Verified Purchase
Easy repair
Fast and works great
★★★★★
★★★★★
SIVARAJ S - June 1, 2023
Verified Purchase
Easy repair and great parts
It took one week for delivery and the part was good. It came with the repair methods in mail too. It was working in good condition now
★★★★★
★★★★★
Jherrad C - May 28, 2023
Verified Purchase
What the doctor ordered!
This was the part causing all the noise! Using the handy videos supplied on this website, replacement was a breeze. Anyone can do it. Saved us a good chunk of change on buying a new dryer. So yourself a favor, and fix your own appliances
★★★★★
★★★★★
Steven N - May 5, 2023
Verified Purchase
Rollers
So far I'm happy with the parts I ordered came faster than expected
★★★★★
★★★★★
Mike L - April 12, 2023
Verified Purchase
Perfect Replacement
Bought to fix an Amana dryer that was squeaking like crazy. Works like a dream now!
★★★★★
★★★★★
Howard C - March 24, 2023
Verified Purchase
Dryer drumroller
Fixed noisy dryer. Easy to install. Appreciated the link to the install video.
★★★★★
★★★★★
Curtis B - March 1, 2023
Verified Purchase
Worked as expected
Fun to replace
★★★★★
★★★★★
Matthew C - December 30, 2022
Verified Purchase
Worked like a charm!
Parts came quickly, and using the youtube video I was able to complete the repair easily. I was having a repetitive thumping sound when drier was spinning -- almost like there was a shoe in the drum. I replaced both rear drum support rollers and it completely solved the issue.
★★★★★
★★★★★
Stephen M - October 13, 2022
Verified Purchase
easy fix, just as shown in the video
Your original-equipment parts were sturdy-- unlike the poorly made copies I had to replace. The dryer sounds like new again
★★★★★
★★★★★
Bill K - August 29, 2022
Verified Purchase
successful repair
Ordered a new dryer. That day my present dryer goes on the fritz. Part Select troubleshooting helped my diagnose the problem, the video gave me the confidence to do the repair and 48 hours later the parts were here. A little effort, some cussing and and hour later the dryer was completely vacuumed clean and working perfectly. Very impressed.
< Prev
1
2
3
Next >
Customer Repair Stories
Average Repair Rating: 3.2 / 5.0, 102 reviews.
What's this?
< Prev
1
2
3
Next >
Sort by:
Search filter:
Clear Filter
Your search term must have 3 or more characters.
Keep searches simple. Use keywords, e.g. "leaking", "pump", "broken" or "fit".
Sorry, we couldn't find any existing installation instruction that matched.
Wife told me Dryer would make a funny sound, then stop + had an a funny smell as well. The Electric motor that drove the unit was overheating and locking up, It was time to be replace.
The best part of my repair was I had everything back in service in 3 days. And one of these days was to consider just buying a new dryer. Had parts overnited and all parts fit and easy to replace.
1) Removed back - 6 screws 2) Removed dryer vent - 2 screws on top, 3 on bottom 3) Popped the top open 4) Removed Front of dryer cabinet - 2 screws 5) Removed Belt 6) Removed Drum 7) Cleaned up all lint 8) Pop off motor retainers front and back Here is the tricky part for me. 9) Removed vent fan on back of motor. I did not know that the back of the fan was square, and you could put an open ended wrench on it to hold it while you also have a vice grip on the front motor shaft. Then its a simple left to loosey operation. I first tryed to turn the fan blade to take it off, but proved to be to tight. 10) Repeat backwards to reassemble
While I had it apart I also replaced the Drum support rollers & Installed a new belt. Not that diffucult of a repair Good Luck, was certainly better than buying a new one at + $300.00 at Black Friday rates.
Nutdriver, Screw drivers, Socket set, Wrench (Adjustable), Wrench set
425 of 472 peoplefound this instruction helpful.
Was this instruction helpful to you?
Thank you for voting!
Squeaky dryer
My wife had been complaing about excessive noise from our 25 year old dryer so after DISCONNECTING the dryer from the wall outlet I popped the top panel loose @ the front with a screw driver @ each front corner @ took a look. No cause was visible so I removed the rear cover & still nothing so I laid the dryer on it's back to remove the front cover. First the 2 wires to the door switch were disconnected then the 2 screws @ the top corners that hold the front panel to the side panels were removed. The front panel then slid up & lifted off exposing the front of the drum, belt & support pulleys. Upon inspection I found the bottom support pulley sleeve bearing to have worn out. Both pulleys were replaced because they only come as a pair now along with the tensioner pulley (idler pulley), the belt & the rear lip seal on the drum since it had a 4" section missing from the edge @ one point (all of these were the original components). Replacing the rear drum seal took the most time because the old adhesive had to be removed. I did this first so the glue could set while I installed the new pulleys & belt. By the time they were installed, the glue had set enough & I could continue the re-assembly. We now have a 25 year old dryer that sounds like it's new & @ a fraction of the cost
I Looked on internet sites for this type of problem. Most sites said the support rollers could cause this. I found your site PartSelect and with help of your diagrams of the machine ordered the parts I thought were needed plus other parts that might cause the problem. With machine torn down I replaced the rollers. I had also ordered the main drive belt and idler assembly with the rollers and these also needed replacement. It is a good idea to order other suspect parts when doing this type of repair since you can return the parts not needed. Your return policy is great.
Very easy once I figured out how to open it up to see what was the matter. 1 Remove power. 2 Open the lint filter cover and remove the 2 Phillip screws. 3 Pry the front of the top cover up to separate the cover from the plastic clips that secure to the top front panel. 4 Remove the 2 nut screws securing the top of the front panel to each side cover. 5 Pull front panel out slightly to detach wiring from the cover switch. 6 Pull front panel straight up and set aside. 7 Remove drum belt from tensioner and motor pulley under the drum. 8 Remove drum by pulling it toward the front between the 2 sides. 9 Locate the 2 support rollers and their mounting shafts. Change the shafts at this point if they are worn. (Mine were OK) 10 Remove the support bracket from the shaft if present. 11 Remove the plastic triangular retainer from the shaft and slide the old wheel off of the shaft. 12 Clean the shaft from any bearing debris. 13 Replace the rollers and retainers. 14 Insert drum through the front side panels making sure the seal on the rear of the drum is centered around the opening and not folded inside the opening. 15 Place the belt on the drum and thread the belt through the tensioner and around the motor pulley. 16 Position the front cover on the lower clips on each of the sides. 17 Re-attach the 2 wires for the cover switch. 18 Pull the drum up so the opening on the drum and front cover align. 19 Screw together the side panels to the front panel using the 2 hex headed screws. 20 Check for binds by rotating the drum several times by hand. 21 Press the front of the top panel down toward the front panel to engage the plastic clips attaching the top to the front. Watch for the lint filter housing alignment as you push the top panel down. 22 Replace the 2 screws to attach the lint filter to the top cover. 23 Plug in machine and test.
Good luck, It s not as bad as it sounds.
Other Parts Used:
Gary from Canton, CT
Difficulty Level:
Easy
Total Repair Time:
15 - 30 mins
Tools:
Nutdriver, Pliers, Screw drivers
56 of 62 peoplefound this instruction helpful.
Was this instruction helpful to you?
Thank you for voting!
Ravages of time and 7 children.
Dryer was making a thump-thump sound as it turned and door had to be held shut with a prop rod or it would pop open all the time.
First I reviewed the exploded diagrams of my model on the PartSelect website. I kept referring to it as I went.
Two screws held the console down, I removed those and disconnected all the wiring to the console and set the console aside. I popped the top from the front after removing the ground wire that the console had hidden. Oops ... forgot the screws holding the filter enclosure to the top panel. I removed them, then the top came off of the rear hinge-like things.
I turned the drum by hand and confirmed that it was "thump-thumping". There were two internal screws that held the front panel and door to the side panels, I removed them and then the front panel/door assembly buckled away from the drum slightly. I had to disconnect the wires from the door switch and remove the wire retainer from the front panel.
The front panel/door lifted slightly and came off of retainers to the side panels near the floor. The drum was now suspended on the two rollers, belt tensioner pulley, and motor pulley. I removed the belt from the tensioner and motor and removed the drum.
I could see that one of my drum support wheels had a chunk melted or gashed out of it. Every time the divoted portion contacted the drum, it made a thump. I also noticed all the stuff that the kids had dumped in the dryer by lifting the front of the top panel, thinking it was a good hiding spot. The stuff included crayons, beads, assorted spare change, and a package of peanuts that had broken open.
I took this opportunity to vacuum out the interior of the dryer. Wow.
One of drum support roller axles has a front support. Both are bolted into the interior panel with a washer and nut. I wanted to remove both axles to replace the support wheels, so I crawled behind my dryer (by climbing over my washing machine).
I had to remove the flexible vent and the rear panel cover to access the roller axle nuts. But one of the axle nuts was covered by the dryer filter enclosure, so I had to take it loose. Boy am I glad that I did. It was chock full of caked together lint and more crud that the kids had shoved down the filter hole when the filter wasn't in place. I cleaned it and removed the axle nuts.
I had to remove and replace these funky little plastic triangles that acted as retainers for the drum support wheels. It was difficult and I eventually had to use pliers to help. I swapped drum support wheels, installed the new plastic triangles and reinstalled the axles, filter enclosure, back panel, and flexible duct (this involved all sorts of tools and several trips back and forth over my washing machine).
I installed the drum, making sure the felt was not bent the wrong way and that the drum support wheels were in the drum groove. To rethread the drum belt I had to lay on the ground and hold the drum in position with my foot while guiding the belt with two hands. Once the belt was properly threaded, the drum would dangle in position, but I used the prop rod to support if firmly while I worked on the front panel.
The front panel was in sorry shape. I replaced both hinges, cleaned the area between the door and the front panel that cannot be reached easily, and replaced the door support wires and guides, reattaching their springs. I also replaced the door retention hardware. (Note: pliers recommended by my poor cut fingers).
I installed the front panel to the side panels by sliding it onto the two lower supports while holding the drum in position. I reconnected the door switch and wire retainers. I screwed the upper screws from the side panels to the front panel.
I popped the top panel back in place, routing the wiring through and reconnecting the grounds. I rewired the console and slid it back into position. I screwed down the console and reattached the filter enclosure to the top panel.
We discovered that the front of the dryer popped off after removing screws at the bottom of the front panel. The tumbler seal had rotted away, the drum support rollers were frozen and the belt had broken. My husband did most of the work. I assisted, this was a 2 man job. We removed the old seal glue with Goo Gone, we put the new seal on with both of us working on it using clothes pins. Then we glued the new seal with one of us holding the seal up while the other put the glue under it. My husband replaced the drum support rollers, got the idler pulley ready and put the belt around the drum. He lifted and I guided the tumbler (drum) into position. I held the drum while he installed the idler pulley assembly. I kept holding the drum while he got the front panel, put it in position and re-connected the electrical wires on it. Once we had that done he was able to install the front panel. Then came the moment for the test drive, and what do you know but it worked!! We didn't have to spend $$ for a new dryer, it cost us some time (probably around 5 hours total, taking apart, ordering parts and putting together), and a little over $100!! We were happy!
Followed the simple directions provided. Suggest dis-assembling the dryer before ordering the parts as it was then I discovered that the idler wheel was bad and the belt was cracking. The idler wheels should be replaced in pairs. When the unit is dis-assembled is an excellent opportunity to vacuum out the lint from all of the interior areas of the dryer. The new motor wiring was different from the old motor. The instructions should be more clear as the old motor wires were not marked. There were two red wires and two black wires in the motor wire harness. Since I have prior experience with motors I was be to determine which of the red and black wires were the primary power leads - someone with less experience may have a problem with this. Suggest changing one wire at a time and install the motor in the motor mount until the wires have been installed.
Nutdriver, Pliers, Screw drivers, Socket set, Wrench set
35 of 641 peoplefound this instruction helpful.
Was this instruction helpful to you?
Thank you for voting!
dryer drum not turning and no air circulating
replaced motor and drum rear seal as well as idler wheels, the old rear drum seal was completly worn out, since I had it all apart, I replaced lint chute and trap seals and belt and tensioner. I spent less money on parts than if I would have bought a new dryer. The motor was the main problem as the bearings were shot.
Dryer sounded like it had rocks in it when running
Following the instructions that came with the parts, I removed the top off of the dryer, which was very easy, two more 5/16" screws and I had the drum out. I confess, this was my second time at this repair. 1st time I neglected to replace the rear drum seal which I strongly recommend you do while you have it open. I only replaced the 2 wheels last time and it failed very soon afterwards. Lesson Learned: Always replace the rear drum seal when you replace the support wheels!!!
Ask our experts a question about this part and we'll get back to you as soon as possible!
19 questions answered by our experts.
< Prev
1
2
Next >
Sort by:
Search filter:
Clear Filter
Your search term must have 3 or more characters.
Keep searches simple. Use keywords, e.g. "leaking", "pump", "broken" or "fit".
Sorry, we couldn't find any existing answers that matched.Try using some different or simpler keywords, or submit your new question by using the "Ask a Question" button above!
Doyle
July 20, 2017
I purchased this kit and am ready to do the repair but what else do you suggest me “checking out” while I’ve got the machine opened up? It’s an older dryer and id rather get it all done in one go.
Hi Doyle, we recommend replacing the pulley and the belt when you replace the rollers. There is a maintenance kit for this, and it is part number 4392065. It includes all three replacement parts mentioned above. Best of luck with this repair!
51 people found this helpful.
Was this helpful?
Thank you for voting!
Jole
July 20, 2017
I keep having to replace my drum rollers what is going on… am I doing something wrong or is there another problem im not addressing?
Hello Jole, if your drum rollers keep failing we recommend replacing the left WPW10359270 and the right WPW10359269 drum roller shaft. Please let us know if you have any further questions!
16 people found this helpful.
Was this helpful?
Thank you for voting!
Nadrina
July 20, 2017
After hearing a thumping sound in my dryer I replaced the support rollers and idler pulley using this kit but I’m still hearing the noise, what next?
Hello Nadrina, great question! If you have already replaced your support rollers and idler pulley and are still having no luck, we recommend checking your blower wheel and the tumbler. With the blower wheel, you are checking to make sure there is nothing caught in it, or that it is not damaged. With the tumbler, you are checking to make sure it is not out of round. I hope this helps!
14 people found this helpful.
Was this helpful?
Thank you for voting!
Maurice
February 5, 2019
Today I received the rear drum support roller kit, part number ps347627, that I ordered for our Whirlpool dryer model number le7800xsn1 with a serial number of m74107427. Unfortunately the packet did not contain any instructions and I have not received an answer to the questions I submitted on january 29, 2019 at the time I ordered the parts. Before I begin to install the new rollers I would like you to tell me what product would be best to use to thoroughly clean the gummy substance off of the drum support roller shafts. Also, I expect the original grease is what eventually got gummy so I would like to know what product should now be used to re lubricate the parts when I re assemble the dryer using the new rollers.
For model number LE7800XSN1
Hello Maurice, Thank you for the question. You can just use a mild dish soap to remove any build up. When replacing the shaft and roller, grease is not required. Here are a few links on how to install the roller and shaft. Hope this helps!
https://www.youtube.com/watch?time_continue=439&v=Ku3rkNErqTA
https://www.youtube.com/watch?v=4QIHirXRzpA
14 people found this helpful.
Was this helpful?
Thank you for voting!
Robert
December 17, 2019
I need the axles that go with the rollers.Mine have worn in spots.
For model number Kenmore series 80
Hello Robert, thank you for your question. The shafts are Drum Support Roller Shaft - Right Side
PartSelect Number: PS11753705, and Drum Roller Shaft - Left Side PartSelect Number: PS11753706. Please enter the part number into the site for current price and availability. Good luck with your repair!
9 people found this helpful.
Was this helpful?
Thank you for voting!
John
January 21, 2019
My renter's told me the 2 yr old dryer is making a sound like there are shoes tumbling around inside but there are none of course. Would this be the rollers? And if so is there a specific repair kit you recommend?
For model number WED4800XQ3
Hello John, Thank you for contacting us. I have researched the model you have provided and have found the part you are looking for is PartSelect Number PS347627. The only way to know for sure is to check the rollers for wear or damage. Hope this helps, good luck with this repair!
6 people found this helpful.
Was this helpful?
Thank you for voting!
Nico
May 14, 2019
Does this kit or any part of this dryer mode contain teflon?
For model number LER3622PQ0
Hello Nico, Thank you for the question. Very sorry but the manufacture did not provide us with the material the parts are made of. For more specialized assistance or to speak with someone about this, I would suggest calling the manufacturer of the appliance directly. Hope this helps!
6 people found this helpful.
Was this helpful?
Thank you for voting!
Tim
March 6, 2019
How much is your cheapest rear roller shafts are for a Whirlpool dryer please give me a good deal i'm gonna buy the rollers to i can't afford more than 45 dollars for both or at the top roller shaft i guess it's the left side the high side
For model number WGD5840SWO
Hello Tim, thank you for inquiring. The Left Side Drum Support Roller Shaft is PS11753706 and the Right Side Drum Support Roller Shaft is PS11753705.
5 people found this helpful.
Was this helpful?
Thank you for voting!
Gary
April 10, 2019
How do you replace the drum pulley shafts. Mine are warn out.
For model number 87576100
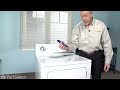
Hi Gary, thank you for your question. We have a video for installation on these parts above in the part information. Here is the direct link: https://youtu.be/4QIHirXRzpA. Good luck with your repair.
5 people found this helpful.
Was this helpful?
Thank you for voting!
JOHN
November 28, 2017
I need instructions for roller replacement for single cabinet washer/dryer combo.Whirlpool serial #m43626604 model # lt5000xmno thanks john
For model number LT5000XMW0
Hi John,
Thank you for your question. There is a video listed with the part you have referenced in your question to us on how to install them. I hope this helps. Thank you and have a great day!
5 people found this helpful.
Was this helpful?
Thank you for voting!
< Prev
1
2
Next >
✖
Ask a Question
Ask our experts a question on this part and we'll respond as soon as we can.


 – Part Number: WP3404162")


