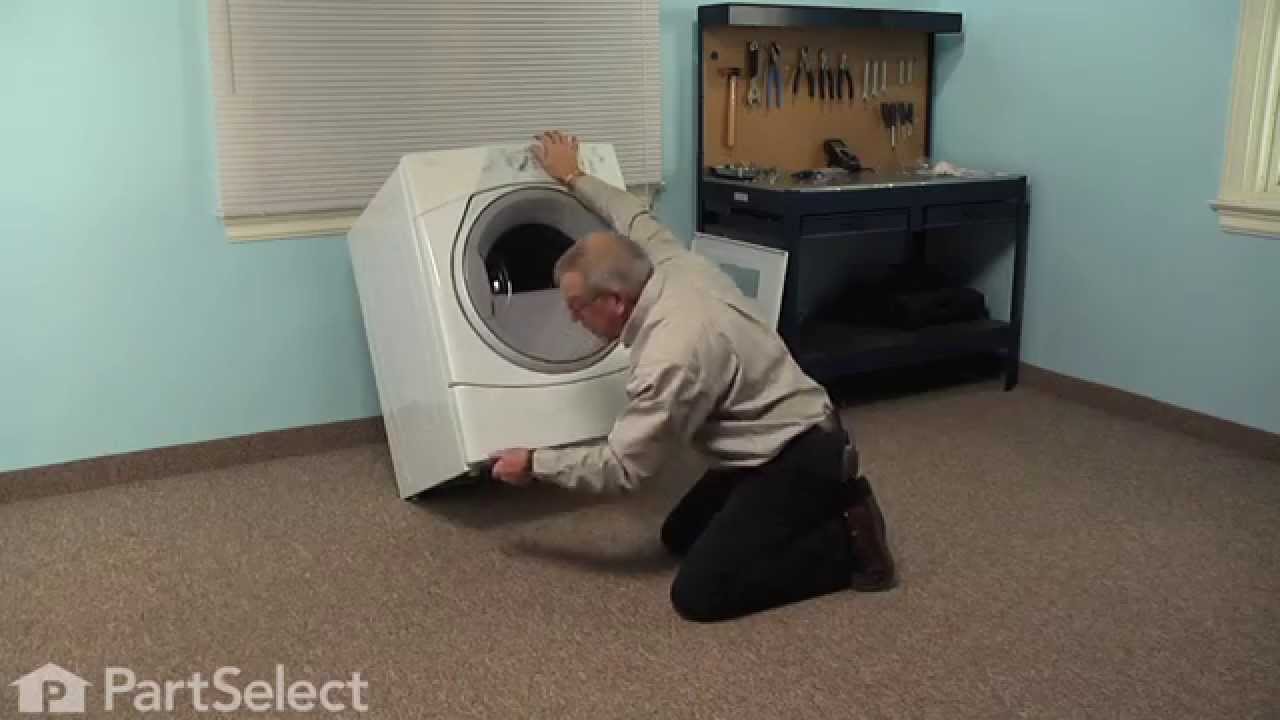
This Idler Pulley includes the tri-ring and gasket and everything included here is manufacturer-certified. This part maintains correct tension on the drive belt in order to spin the drum properly. If damaged or broken the dryer will not dry properly, will not tumble properly, or may not even start. Installation is rated as "Medium" difficulty. This part is located on the dryer drum, around the tension pulley. Refer to your user manual and model number for repair instructions and to ensure this part is right for you. For this repair project, the tools needed are a Phillips screwdriver, 1/4 inch nut driver, putty knife, small flat blade screw driver, and needle nose pliers.
Keep searches simple. Use keywords, e.g. "leaking", "pump", "broken" or "fit".
Sorry, we couldn't find any existing reviews that matched. Try using some different or simpler keywords.
★★★★★
★★★★★
Christelle H - 6 days ago
Verified Purchase
Worked as expected
The part was shipped fast, my drier is now functional
★★★★★
★★★★★
Rob N - February 13, 2024
Verified Purchase
Tight spot repair
This part fixed my squeaky dryer. Thanks to youtube and partselect I didn't need to buy a new dryer.
★★★★★
★★★★★
Tom M - January 1, 2024
Verified Purchase
Easy repair
The part arrived without delay and was easy to install. The dryer runs a lot quieter now!!
★★★★★
★★★★★
Chris M - September 6, 2023
Verified Purchase
Simple fix
Part was an exact match, super easy to install. Fixed in 10 minutes
★★★★★
★★★★★
Venessa C - August 24, 2023
Verified Purchase
The part was exactly what was needed
The lady that assisted me on the phone was very knowledgeable and helpful. She made the transaction very easy . 5 stars for the customer service I received.
★★★★★
★★★★★
Gerry C - July 10, 2023
Verified Purchase
Proper part
Easy to replace, fit properly, it's been a couple of months since install and still functioning perfectly.
★★★★★
★★★★★
Bernie B - June 11, 2023
Verified Purchase
The part was an exact fit!
The part worked great, thank-you!
★★★★★
★★★★★
Christopher B - April 17, 2023
Verified Purchase
fixed a noisy dryer easy fix took 20 minutes
good service
★★★★★
★★★★★
Benoît D - April 13, 2023
Verified Purchase
Fitted perfectly
Thanks to the video, Installation was a breeze and now my dryier is not making noise anymore.
★★★★★
★★★★★
Aaron M - April 7, 2023
Verified Purchase
Not quite exact
Wasn't exactly the same as what came off and it fit a little tight on the shaft. Been using for a week now and works great so giving it 4 out of 5 due to the small fitment issue
< Prev
1
2
3
Next >
Customer Repair Stories
Average Repair Rating: 3.7 / 5.0, 29 reviews.
What's this?
< Prev
1
2
3
Next >
Sort by:
Search filter:
Clear Filter
Your search term must have 3 or more characters.
Keep searches simple. Use keywords, e.g. "leaking", "pump", "broken" or "fit".
Sorry, we couldn't find any existing installation instruction that matched.
Belt Wheel was broken at axle. Terrible noise.
Removed the top and back of dryer with screw socket. It was quite easy. Then, I removed the broken wheel by releasing the tension spring. I replaced the wheel. The toughest part was re-threading the belt. But, even that was simple. The dryer runs smoothly and quietly again!
1) Disconnected power cord from wall. 2) Disconnected vent hose from back of dryer. 3)Removed dryer rear panel. 4)Disengaged tension spring on idle wheel arm. 5) Removed worn idle wheel. 6)Installed new Idler wheel assembly. 7) Vacuumed dust from rear of dryer (optional, recommended). 8) Reinstalled rear cover, vent hose and power cord. Easy repair 15-30
Other Parts Used:
GREGORY from Wilsonville, OR
Difficulty Level:
Easy
Total Repair Time:
15 - 30 mins
Tools:
Nutdriver, Pliers, Screw drivers
60 of 71 peoplefound this instruction helpful.
Was this instruction helpful to you?
Thank you for voting!
TOb stopped turning after a week or so of high pitched "squeals" coming from inside the dryer.
I recommend you order the idler pulley as soon as you start to hear the unusual noise indicating metal against metal. Replace the idler pulley before it fails and possibly causes more damage to the drive system. Simply removed the power cord at the back of the dryer and then the multiple screws holding the back panel in place as well as the clip holding the exhaust vent in place. You may need to remove the top panel to access a few of these screws. A diagram of the belt routing is in the paperwork I found behind the front lower panel of the dryer. This too is easily removed with just a few screws.
Other Parts Used:
Robert from Princeton, WV
Difficulty Level:
Really Easy
Total Repair Time:
Less than 15 mins
Tools:
Nutdriver, Screw drivers
29 of 33 peoplefound this instruction helpful.
Was this instruction helpful to you?
Thank you for voting!
Idler Pulley broke
I disconnect the power, then the vent pipe. I removed the back panel of the dryer to access the pulley and removed the belt. Replaced the back and put everything back together.
Other Parts Used:
Keith from Richmond, VA
Difficulty Level:
Really Easy
Total Repair Time:
15 - 30 mins
Tools:
Socket set
21 of 26 peoplefound this instruction helpful.
Was this instruction helpful to you?
Thank you for voting!
idler pully sqwieling
once the back is off remove belt from tentioner and remove v clip. smooth shaft with wd-40 and scotch brite , then install new idler replace v clip and your done !!!
Other Parts Used:
Jerry Duty from Fort Walton Beach, FL
Difficulty Level:
Really Easy
Total Repair Time:
Less than 15 mins
Tools:
Screw drivers
19 of 24 peoplefound this instruction helpful.
Was this instruction helpful to you?
Thank you for voting!
Dryer starts with loud squeak initially. Eventually there was a loud clank and dryer stopped.
Rather than remove the front panels, door, control panel and drum, I noticed 1/4" metal screws on the back panel. There were approximately 6 holding the back panel in place. I did have to remove the top panel as well before removing the back. Once removed I had complete access to the broken idler pulley assembly. I immediately saw the broken pulley. I installed the new one with very little effort. Reset the belt according to instructions from the video. Reassembled, plugged in, hit start and enjoyed the sweet sounds of success. All told it took me about 20 minutes from start to finish.
I moved the dryer to a location where I could get to both the front and back sides. I opened the back by first removing the top cover and then the back. It requires either a Phillips head screwdriver or a quarter inch socket. In addition, it requires removing the four power wires which connect to the computer. If you are unfamiliar with the wiring layout, take a photo with your cell phone which you can then refer to when re-assembling. Once the back was removed, I saw that the belt was still intact, but the pulley which provides tension to the belt was frozen. Take a photo of the belt route between the motor and the pulley. Try to get the spring position in the photo. Remove the belt from the pulley by reducing the tension and then sliding the belt out (this assumes the belt is not broken). The pulley arm is held in place by a single bolt which can be removed by a socket set. Remove the arm with the pulley attached. Examine the pulley to figure out why it is frozen. In my case, the pulley had been frozen for some time and the belt had actually chewed through the pulley and was sliding (polishing) on the pulley axle? I used a pair of pliers to loosen the destroyed pulley by rotating it back and forth over the axle while gripping the arm the axle is attached to. As it loosened up I worked it off the axle. I used a cloth to clean the axle of grime from the belt, pulley, and dryer lint. The new pulley comes with a washer and triangular plastic "fastener". First you put on the washer, then the pulley and then you secure it on the axle by sliding the triangular fastener over the axle so it sits in a small grove near the end of the axle. Then put the pulley arm back by replacing the bolt. Make sure you do not overtighten the arm since it is intended to rotate about the bolt. If the dryer belt breaks, the spring will pull the arm down and throw a cutoff switch. Its operation should be obvious. Once the arm is back in place, refer to your photo and replace the spring (this can be tricky and frustrating, particularly if you don't use something like needle nose pliers). Once the spring is in place, depress it and re-install the dryer belt. Refer to the photo you took earlier if you've forgotten how the belt was routed. Then re-install the dryer's back panel, re-attach the electric wires (again refer to the photo you took earlier), and re-attach the top cover. You might want to test your handiwork at this point before you reconnect the dryer vent
My dryer starter squeaking in December 09 and the repairman told me that it would cost between $200-$500. I did not let him fix it as this machine is only 3 years old. When the part finally broke in April 10, I was ready to junk this and just buy a used dryer. My husband went on line and quickly figured out the part he would need to do the repairs. It cost under $20.00. Now my dryer is fixed and running and there are no squeaks. Thank you
Other Parts Used:
Kim K from Hurst, TX
Difficulty Level:
Really Easy
Total Repair Time:
15 - 30 mins
Tools:
Screw drivers, Wrench (Adjustable)
15 of 18 peoplefound this instruction helpful.
Was this instruction helpful to you?
Thank you for voting!
Loud sreeching and vibration
I just followed the videos I received with the order and everything went really well. This dryer was a little different than the video, but the process was the same. The HE3 does require 4 drum rollers and I had only ordered 2. However, there was only one bad roller, so I installed both on the back of the drum. The two front rollers are pretty easy to get to if they go bad. The idler pulley was completely worn out with an 1/8 inch groove worn off to one side. PartSelect made this an easy project!
Ask our experts a question about this part and we'll get back to you as soon as possible!
25 questions answered by our experts.
< Prev
1
2
3
Next >
Sort by:
Search filter:
Clear Filter
Your search term must have 3 or more characters.
Keep searches simple. Use keywords, e.g. "leaking", "pump", "broken" or "fit".
Sorry, we couldn't find any existing answers that matched.Try using some different or simpler keywords, or submit your new question by using the "Ask a Question" button above!
Wes
July 20, 2017
Replacing my idler pulley and I feel like it might be too small. The other one comes off and on easily however this one is giving me a lot of trouble. I hate to say I might’ve got the wrong one, but when I went in store they said it is the correct one for my model. So do you have any tips to make this installation easier
Hello Wes, we recommend replacing the idler pulley and the idler bracket together as one assembly. You can order the kit here W10837240. I hope this helps.
24 people found this helpful.
Was this helpful?
Thank you for voting!
Nic
July 20, 2017
Replacing the idler pulley bc of excessive squealing. Does this repair need lubricant? It looks like on my old one there was lubricant but just wanted to make sure before I put it on
Hi Nic, you can only use a dry lubricant in dryers, examples of this would be baby powder, or corn starch. However, for this repair you do not necessarily need lubricant, as they are normally assembled dry. Best of luck with this repair.
14 people found this helpful.
Was this helpful?
Thank you for voting!
Julian
July 20, 2017
I confirmed that this is the idler pulley for my make and model dryer before buying it. But when it arrived its thinner and a little bigger around- is it safe to use???
Hello Julian, this idler pulley was recently redesigned by the manufacturer, which is why it looks different. However, it will still work for your model. Please let us know if you have any further questions!
10 people found this helpful.
Was this helpful?
Thank you for voting!
Bob
March 6, 2019
The video you show on replacing my part shows a different dryer than what i have.
Hello Bob, thank you for your question. The idler pulley is used on many different styles of dryers. The dryer might be different but the installation video should provide the same instructions for your unit. I hope this helps!
7 people found this helpful.
Was this helpful?
Thank you for voting!
Robert
May 21, 2019
Does the idler pulley come with the washer and tri ring when you purchase it ?
For model number 110.87731700
hello Robert, Thank you for the question. This is the idler pulley with tri-ring and gasket as seen in the picture. Hope this helps!
6 people found this helpful.
Was this helpful?
Thank you for voting!
Barry
January 10, 2018
While observing my dryer drum i noticed that the belt wanders forward (toward door). At this point the drive motor stalls causing dryer to stop until the motor cools. If i move the belt backwards the dryer functions normally. My thought was that i may need to replace the belt and/or the pulley assembly. Can you please help me? Barry grimm
For model number GEQ8858JQ1 (electric)
Hi Barry,
Thank you for your question. Based on what you described, it sounds like the belt may be worn and stretched and it may be replaced. I would also check the pulley to see if it securely fastened. If it is worn or damaged you will need to replace it. I hope this helps. Thank you and have a great day!
6 people found this helpful.
Was this helpful?
Thank you for voting!
Charlie
August 19, 2019
My dryer squeaks for the first 30 seconds or so. Sometimes more often then others especially when it first comes on. I assume it's the belt tensioner pulley or possibly the drum rollers. I bought the whole kit with the pulley, belt, and rollers. I'm hoping you have a video or at least some tips on replacing it before I tear into it. I've done it on an older dryer before but nothing this new.
For model number WED8500DC1
Hello Charlie, Thank you for the question. I would suggest watching the how to video. Hope this helps!
https://www.youtube.com/watch?v=3WteoIPe-PE
5 people found this helpful.
Was this helpful?
Thank you for voting!
Tim
July 18, 2019
Have a Whirlpool cabrio dryer. Ordered the idler pulley part # 279640. Wheel is a little bigger in dia. But this is no problem. But i can't get to slide on pulley bracket arm. The center opening visually appears the same as the one i took off. But i can't even force it on. New idler center opening is to tight.
For model number WED5600XW0
Hi Tim, thank you for your question. I would suggest taking a look at our installation video here: https://youtu.be/y011lnwfx6Q. If that is not enough you might have to buy the whole part already assembled. I have linked the part below for you. Good luck with your repair.
Hi i have a Whirlpool cabrio i need the tensioner and pulley. Does w10837240 fit my model? Thank you for your help.
For model number Wgd5600xw1
Hello Ruben, thank you for inquiring. Yes, this Idler Pulley with Bracket part number PS11726337 (manufacturer's part number W10837240) is the correct replacement for your model. Good luck with your repair!
4 people found this helpful.
Was this helpful?
Thank you for voting!
Jesse
December 17, 2019
How do i access the idler pulley? The lower panel clips do not want to release. Thank you.
For model number 11069822800
Hello Jesse and thanks for writing.
For your convenience, we have attached the link to your manual with repair instruction. We hope this helps. Good luck with your repair
https://partselectcom.azureedge.net/assets/manuals/CB0964EF63134A82F3987C95C0572A2DF9B5EACD.pdf
2 people found this helpful.
Was this helpful?
Thank you for voting!
< Prev
1
2
3
Next >
✖
Ask a Question
Ask our experts a question on this part and we'll respond as soon as we can.
The Drive Belt is a 93 1/2" belt which wraps around the dryer drum to allow tension and movement. If broken the dryer will not turn properly, or there may be loud noises. The part is rated as "medium" difficulty to insta...
Model Cross Reference
This part works with the following models:
PartSelect Number: PS334244
Manufacturer Part Number: 279640