Get in touch, we're here to help!
1-866-883-8386
Monday to Saturday
8am - 9pm EST
Product Description
Bearing and Seal Kit Specifications
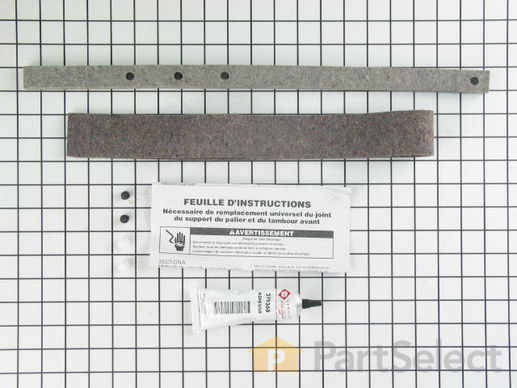
This front bearing and seal kit comes with the adhesive.

How Buying OEM Parts Can Save You Time and Money
Part Videos
Replacing your Kenmore Dryer Bearing and Seal Kit

Troubleshooting
This part fixes the following symptoms:
Noisy
This part works with the following products:
Dryer, Washer Dryer Combo.
This part works with the following products:
Kenmore, Whirlpool, Roper, Estate.
Part# 279264 replaces these:
AP2955120, 2720, 237636, 239068, 239249, 239255, 239309, 239422, 279082, 279264, 296644, 297422, 297786, 29778600, 299807, 299895, 299996, 337345, 337562, 337961
...
Show more
, 337963, 341458, 341927, 342820, 349462, 349464, 8066123, 8066124
Show less
Customer Reviews
Filter By Rating:
- < Prev
- 1
- Next >
Sort by:
Search filter:
Clear Filter
Your search term must have 3 or more characters.
Keep searches simple. Use keywords, e.g. "leaking", "pump", "broken" or "fit".
Sorry, we couldn't find any existing reviews that matched. Try using some different or simpler keywords.
Stuart M - May 22, 2022
Verified Purchase
Moderate repair with the right tools...
Seems easy from video, but depending on length of time older bearing and seal (46 years!) were on, can become a chore. I ordered eight (8) clamps, and applied the seal first as that area was clean and did not require adhesive de-cleaning. Applying the clamps first for the seal to adhere, then doubling up the seal and reapplying the clamps saved me the trouble (after 5 hrs.) of trying to "fold up" the seal to fit the front assembly back to the drum. The bearing (as in video) was easier to replace once I had removed a great portion of 'old' adhesive, previously applied to the 'old' bearing. Braced the front against my leg and positioned the bearing & seal to mesh with the drum, then closed and fastened shut with the two screws. Overall, it would be a much harder job repair without the 'clamps.' but the kit has everything else.
- < Prev
- 1
- Next >
Customer Repair Stories
Average Repair Rating: 2.8 / 5.0, 2 reviews.
What's this?
- < Prev
- 1
- Next >
Sort by:
Search filter:
Clear Filter
Your search term must have 3 or more characters.
Keep searches simple. Use keywords, e.g. "leaking", "pump", "broken" or "fit".
Sorry, we couldn't find any existing installation instruction that matched.
Drum was binding because of worn bearing supporting front of dryer drum
First I unplugged the dryer for safety, then I removed the top of the dryer, then removed the 2 hex head screws holding the font door panel onto the dryer. Then I disconnected the door safety switch. the rest was cake. I removed the old bearing and cut the new bearing and seal to the exact size of the old one. I used contact cement to glue the new bearing and seal into place. Reassembly was a breeze. End of job. Success!!!
Other Parts Used:
-
Leslie from Townsend, GA
-
Difficulty Level:Easy
-
Total Repair Time:1- 2 hours
-
Tools:Nutdriver, Pliers, Screw drivers
23 of 35 people
found this instruction helpful.
Was this instruction helpful to you?
Thank you for voting!
Rust marks on clothing
Our dryer was leaving rust marks on our clothes that looked like a brown pencil mark. It turns out that the rear drum seal in our dryer was absorbing gunk over the years and we had to change it. It was a fairly easy fix but did require pulling the dryer almost completely apart. While we had it apart we changed this as well.
Anyone with a socket stet and screw driver can get it all apart.
On our machine, start by removing the 2 screws that hold the lint filter neck to the top of the machine (under the flap).
Then pry the top of the machine up in the front. It will pop up and you can fold it back.
Then you will need to remove 2 bolts and undo the plug.
From there you can pull the front off and get to the drum.Make sure you note how the belt tensioner comes out (under the drum) and how the belt is routed. It's quite basic.
After you get the drum off, peel the old seal(s) off and put the new seal(s) on as directed.
Pretty easy and our clean clothes stay clean now.
Other Parts Used:
-
Patrick from Manor, TX
-
Difficulty Level:Easy
-
Total Repair Time:1- 2 hours
-
Tools:Screw drivers, Socket set
13 of 21 people
found this instruction helpful.
Was this instruction helpful to you?
Thank you for voting!
- < Prev
- 1
- Next >
Questions and Answers
We're sorry, but our Q&A experts are temporarily unavailable.
Please check back later if you still haven't found the answer you need.
- < Prev
- 1
- Next >
Sort by:
Search filter:
Clear Filter
Your search term must have 3 or more characters.
Keep searches simple. Use keywords, e.g. "leaking", "pump", "broken" or "fit".
Sorry, we couldn't find any existing answers that matched.Try using some different or simpler keywords, or submit your new question by using the "Ask a Question" button above!
William
February 23, 2024
I have a kenmoer gas dryer mod #11072812101 how do i put on the bearing and seal, and is there a video help!!!
For model number mod # 11072812101
Hello William, thank you for asking. We do have the video for Bearing and Seal Kit. Good luck with this repair.

1 person found this helpful.
Was this helpful?
Thank you for voting!
- < Prev
- 1
- Next >
Related Parts
Model Cross Reference
This part works with the following models:
PartSelect Number: PS334171
Manufacturer Part Number: 279264
Brand
Model Number
Description

Get in touch, we're here to help!
1-866-883-8386
Monday to Saturday
8am - 9pm EST